
User's Manual Part 3


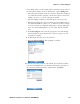

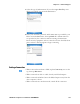
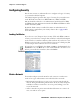

Table Of Contents

Chapter 5 — Network Support
126 PRELIMINARY - CN3 Mobile Computer User’s Manual
iConnect
The default network adapter or radio is dependent on what radios are
installed in your CN3 Computer. With the iConnect menu, using the
Enable feature, you can specify “Wireless” or “No Networking” to load
onto your CN3 Computer when a cold-boot is performed.
If you had specified a network prior to when a warm-boot is performed on
the CN3 Computer, the iConnect application restores your network inter-
faces to what they were before the warm-boot was performed.
See the Developer’s Support area of the Intermec web site for the latest
information on network adapters for your unit.
Select Dismiss from the iConnect menu to end the session without exiting
the application.
Select Exit iConnect to exit the application. To access the iConnect
application after you have exited it, perform a warm-boot on the CN3
Computer. The iConnect icon then reappears above the command bar.
No Networking
If you do not need any networking interface, select Enable > No Network-
ing from the iConnect menu. The Wireless radio tower icon is replaced
with one that shows an “X,” a check mark appears next to the “No Net-
working” option in the menu, and the iConnect application disables all
other networking interfaces.
Wireless Communications
To enable wireless communications on the CN3 Computer, select Enable
> Wireless from the iConnect menu. The Wireless icon (shaped like a
radio tower) appears in the toolbar, a check mark appears next to the
“Wireless” option in the menu, and wireless communications is enabled.
To configure wireless communications on the CN3 Computer, select
Tools > Wireless Settings from the iConnect menu to access the Profile
Wizard for the 802.11b/g radio module.
To access the iConnect menu, tap the iConnect icon (shown to the left)
above your command bar for the following menu:
You can configure wireless 802.11b/g communications through the applet.
Tap Start > Settings > the System tab > the Wireless Network icon to
access the Profile Wizard. Go to “Configuring Microsoft Security” on
page 148 for information.