
User's Manual Part 2

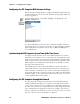


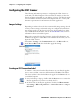


Table Of Contents
- Chapter 2 - Windows Mobile
- Software Builds
- Where to Find Information
- Basic Usage
- Microsoft ActiveSync
- Microsoft Pocket Outlook
- Calendar: Scheduling Appointments and Meetings
- Synchronizing Calendar
- Why Use Categories in the Calendar?
- What’s an All Day Event?
- What’s a Recurrence Pattern?
- Viewing Appointments
- Creating or Changing an Appointment
- Creating an All-Day Event
- Setting a Reminder for an Appointment
- Adding a Note to an Appointment
- Making an Appointment Recurring
- Assigning an Appointment to a Category
- Sending a Meeting Request
- Finding an Appointment
- Deleting an Appointment
- Changing Calendar Options
- Contacts: Tracking Friends and Colleagues
- Tasks: Keeping a To Do List
- Notes: Capturing Thoughts and Ideas
- Messaging: Sending and Receiving E-mail Messages
- Calendar: Scheduling Appointments and Meetings
- Companion Programs
- Internet Explorer Mobile
- Chapter 3 - Configuring the Computer
- Developing Applications for the Computer
- Packaging Applications for the CN3 Computer
- Installing Applications on the Computer
- Updating the System Software
- Launching Your Application Automatically
- Customizing How Applications Load on the Computer
- Configuring CN3 Parameters
- Configuring the Color Camera
- Configuring the SF51 Scanner
- Using Configuration Parameters

Chapter 3 — Configuring the Computer
CN3 Mobile Computer User’s Manual - PRELIMINARY 89
3 Enter the Bluetooth address assigned to your CN3 Computer (shown in
your Bluetooth applet), then click OK to close this dialog.
4 The connection label for the SF51 Scanner appears to the right in the
EasySet application, similar to the following. Scan the label once, then
confirm the Intermec Ready-To-Work™ indicator (blue light) on the end
of the SF51 Scanner starts blinking, which means it is trying to connect.
When connected, the indicator assumes a steady blue, then SF51 data
gets wedged through the keyboard interface.