
User's Manual Part 2
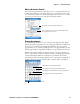
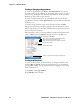
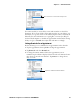

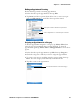
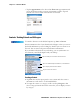
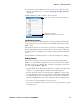
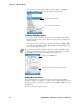
Table Of Contents
- Chapter 2 - Windows Mobile
- Software Builds
- Where to Find Information
- Basic Usage
- Microsoft ActiveSync
- Microsoft Pocket Outlook
- Calendar: Scheduling Appointments and Meetings
- Synchronizing Calendar
- Why Use Categories in the Calendar?
- What’s an All Day Event?
- What’s a Recurrence Pattern?
- Viewing Appointments
- Creating or Changing an Appointment
- Creating an All-Day Event
- Setting a Reminder for an Appointment
- Adding a Note to an Appointment
- Making an Appointment Recurring
- Assigning an Appointment to a Category
- Sending a Meeting Request
- Finding an Appointment
- Deleting an Appointment
- Changing Calendar Options
- Contacts: Tracking Friends and Colleagues
- Tasks: Keeping a To Do List
- Notes: Capturing Thoughts and Ideas
- Messaging: Sending and Receiving E-mail Messages
- Calendar: Scheduling Appointments and Meetings
- Companion Programs
- Internet Explorer Mobile
- Chapter 3 - Configuring the Computer
- Developing Applications for the Computer
- Packaging Applications for the CN3 Computer
- Installing Applications on the Computer
- Updating the System Software
- Launching Your Application Automatically
- Customizing How Applications Load on the Computer
- Configuring CN3 Parameters
- Configuring the Color Camera
- Configuring the SF51 Scanner
- Using Configuration Parameters

Chapter 2 — Windows Mobile
48 PRELIMINARY - CN3 Mobile Computer User’s Manual
•Tap the Appointments tab to select what Show icons appointment indi-
cators should appear when you view appointment contents. Tap and
hold an icon to see its name. Selected icons are in black.
Contacts: Tracking Friends and Colleagues
Contacts maintains a list of your friends and colleagues so that you can eas-
ily find the information you are looking for, whether you are at home or on
the road. You can enter both personal and business information.
If you use Microsoft Outlook on your desktop, you can synchronize con-
tacts between your CN3 Computer and your desktop.
Creating a Contact
1 Tap New, then use the input panel to enter a name and other contact
information. Scroll down to see all available fields.
2 To assign the contact to a category, scroll to and tap Categories, then
select a category from the list. In the contact list, you can display contacts
by category.
To switch to Contacts on the CN3 Computer, tap Start > Contacts.
Tap and enter part of a name to find it in the list
Tap to see additional phone numbers, e-mail addresses
Tap to display and edit contact details
Tap to create a new contact