
User's Manual Part 1

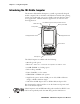
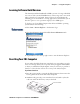

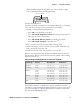
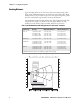
Table Of Contents
- Legal Information
- Contents
- Before You Begin
- Chapter 1 - Using the Computer
- Introducing the CN3 Mobile Computer
- Learning Software Build Versions
- Resetting Your CN3 Computer
- Scanning Bar Codes
- Using the Batteries
- Adjusting the Beeper
- Intermec Settings Applet
- Using the Keypad
- Using the Screen
- Software Tools
- Using the Speakers
- Using the Status LEDs
- Using the Storage Card
- Setting the Vibrator
- Wireless Network Support
- Accessories for the CN3 Computer
- Physical and Environmental Specifications

Chapter 1 — Using the Computer
4 PRELIMINARY - CN3 Mobile Computer User’s Manual
Scanning Bar Codes
Use the scanner to scan and enter bar code data. The type of scanner you
are using and the type of bar code you are decoding determines the way you
scan the bar code. The CN3 Computer supports scanning 2D images.
When you unpack the CN3 Computer, the following bar code symbologies
are enabled:
• Code 39
• Code 128
•UPC-A
•UPC-E
•EAN-8
• EAN-13
• Datamatrix
If you are using bar code labels that are encoded in a different symbology,
you need to enable the symbology on the computer. Use the Intermec Set-
tings applet to enable and disable symbologies for your scanner. See the
Intermec Computer Command Reference Manual available from the Intermec
web site at www.intermec.com.
Scanning with the 2D Area Imager
The CN3 Computer has the 2D area imager, which scans 2D bar code
symbologies and supports omni-directional (360°) scanning where you can
position the CN3 Computer in any orientation to scan a bar code label.
Using the 2D imager is like taking a picture with a digital camera.
1 Press the power switch to turn on the CN3 Computer, point the scanner
window a few inches from the bar code label, and hold steady.
2 Press the Scan button and center the red aiming beam over the bar code
label. The aiming beam is smaller when the imager is closer to the bar
code and larger when it is further away.
Scan button