
Installation Guide
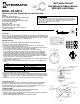

ADJUSTING DIP SWITCH SETTINGS
The occupancy sensor features 2 DIP switch settings. Each setting can be set to an up or down position to
configure the DIP switch setting. Follow these steps to adjust the DIP switch settings.
1. Adjust the sensitivity level DIP Switch (1). The Up position sets the sensitivity to 50%, while the down position
adjusts the sensitivity level to 100%.
DIP SWITCH 1 - SENSITIVITY LEVEL SETTINGS
50% UP position
100% Down positions
2. 2. Adjust the Vacancy feature DIP Switch (2).
NOTE: Turn this DIP switch to ON if you have a momentary switch. This enables overrides.
DIP SWITCH 2 - VACANCY LEVEL SETTINGS
Enable UP position
Disable Down positions
3. Install the front on the sensor and secure with the screws.
TESTING THE OCCUPANCY SENSORS
1. Ensure the PIR Activity is enabled, the Red LED flashes, and the PIR Sensitivity is set to MAX (DIP switch 1 OFF).
2. Ensure the Time Delay is set for TEST MODE.
3. Ensure the Light Level is the default (maximum).
4. Remain stationary until the lights turn OFF. The Red LED and Load are ON.
5. Once the lights turn off, move around the coverage area. The lights will illuminate.
6. When testing and adjustment is complete, reset DIP Switches and Light Level to the desired settings and replace the cover on the sensor.
TROUBLESHOOTING
The PIR activity LED does not flash properly, The warm-up period has not been completed
Make sure the circuit breaker is on
Set the PIR sensitivity to Max/Autoset (DIP switch 1 OFF)
Check all sensor connections
There is improper PIR activity, LED flashes Make sure the light level adjustment is set properly by covering the PIR lens and PIR activity LED to verify if
lights turn on. If lights still turn on, adjust the light level.
The sensor is activating without detecting The PIR sensitivity is set too high. Adjust the PIR sensitivity.
movement. The sensor is mounted too close to HVAC or VAV vents with heavy air flow. Relocate the sensor.
Set the DIP switch 1 to ON
158--02111REF
12
ON
1
2
Sensitivity
Up Position
Down Position
DIP SWITCH
DIP Switch
Settings
Settings Chart
Vacancy
LIMITED WARRANTY
Warranty service is available by either (a) returning the product to the dealer from whom the unit was purchased or (b) completing a warranty claim online at www.intermatic.com. This warranty is made by: Intermatic
Incorporated, 1950 Innovation Way, Suite 300, Libertyville, IL 60048. For additional product or warranty information go to: http://www.Intermatic.com or call 815-675-7000.