
User Guide

LIMITED ONE YEAR WARRANTY
If within the warranty period specified, this product fails due to a defect in material
or workmanship, Intermatic Incorporated will repair or replace it, at its sole option,
free of charge. This warranty is extended to the original purchaser only and is
not transferable. This warranty does not apply to: (a) damage to units caused by
accident, dropping or abuse in handling, acts of God or any negligent use; (b) units
which have been subject to unauthorized repair, opened, taken apart or otherwise
modified; (c) units not used in accordance with instructions; (d) damages exceeding
the cost of the product; (e) sealed lamps and/or lamp bulbs, LED’s and batteries;
(f) the finish on any portion of the product, such as surface and/or weathering, as
this is considered normal wear and tear; (g) transit damage, initial installation costs,
removal costs, or reinstallation costs.
INTERMATIC INCORPORATED WILL NOT BE LIABLE FOR INCIDENTAL OR
CONSEQUENTIAL DAMAGES. SOME STATES DO NOT ALLOW THE EXCLUSION
OR LIMITATION OF INCIDENTAL OR CONSEQUENTIAL DAMAGES, SO THE
ABOVE LIMITATION OR EXCLUSION MAY NOT APPLY TO YOU. THIS WARRANTY
IS IN LIEU OF ALL OTHER EXPRESS OR IMPLIED WARRANTIES. ALL IMPLIED
WARRANTIES, INCLUDING THE WARRANTY OF MERCHANTABILITY AND THE
WARRANTY OF FITNESS FOR A PARTICULAR PURPOSE, ARE HEREBY MODIFIED
TO EXIST ONLY AS CONTAINED IN THIS LIMITED WARRANTY, AND SHALL BE
OF THE SAME DURATION AS THE WARRANTY PERIOD STATED ABOVE. SOME
STATES DO NOT ALLOW LIMITATIONS ON THE DURATION OF AN IMPLIED
WARRANTY, SO THE ABOVE LIMITATION MAY NOT APPLY TO YOU.
This warranty service is available by either (a) returning the product to the dealer
from whom the unit was purchased, or (b) completing a warranty claim on line at
www.intermatic.com. This warranty is made by: Intermatic Incorporated, Customer
Service 7777 Winn Rd. Spring Grove, Illinois 60081-9698. For warranty
service go to: http://www.intermatic.com or call 815-675-7000.
INTERMATIC INCORPORATED
Spring Grove, Illinois 60081-9698 U.S.A.
www.intermatic.com
158--01304-REVA
3. Press h+ to scroll to the desired hour for ON event.
4. Press m+ to scroll to the desired minute for the ON event.
5. Press Timer to advance to the OFF event screen.
6. Press Day to select the days of the week for the OFF event.
7. Press h+ to scroll to the desired hour for the OFF event.
8. Press m+ to scroll to the desired minute for the OFF event.
Take one of these actions.
If... Then...
You need to program another
ON/OFF event pair,
Press Timer to advance to
the next event ON screen and
repeat steps 2 through 8.
All the required ON/OFF
events are programmed,
Press
to return main screen.
The procedure is complete.
NOTE: If events include or intersect with each other, each ON/OFF
event can be independently executed at the setpoint.
NOTE: If an ON event and OFF event occur at the same time, the
timer will run the OFF event.
Daily Operation
Follow this procedure to review or modify an event.
1. Press Timer to scroll to ON or OFF event you want to modify.
2. Take one of these actions.
Modifying an Event
2. Press OVR to delete the event. Dashed lines appear in place
of the time to indicate the event is deleted.
NOTE: If necessary, repeat this procedure to delete both ON
and OFF settings for the event.
3. When the modications are complete, press to return to
time of day screen.
Retrieving an Event
The timer enables deleted events to be retrieved. All deleted
events can be retrieved until a new event is programmed in place
of event.
1. Press Timer to scroll to the ON/OFF event you previously
deleted. Dashed lines appear in place of the event time.
2. Press OVR to retrieve deleted event. The event ON or OFF
time replaces the dashed line indicating that the event is
retrieved.
NOTE: If necessary, repeat this procedure to retrieve both
ON and OFF settings for the event.
3. When the modications are complete, press
to return to
time of day screen.
In case of a timer malfunction or to delete all previous settings,
the unit can be reset.
To reset the timer, use a blunt pointed object to press Reset as
shown in Figure 4 on the next page. The timer resets and deletes
all the settings in the unit.
Resetting the Timer
Adjusting Daylight Saving Time
Press +1h button to add the Daylight Saving Time hour to the
current time or remove the hour to return to standard time.
NOTE: Do not perform this procedure if your area does not use
Daylight Saving Time.
In the event of a power loss, the FM1D14 does the following:
• Relay will be in the OFF state
• Upon power restore, relay will go to the current programmed
state
Overview of FM1D14 Power Loss Functions
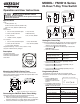
Figure 4. Reset Button
Reset
Button
Timer
Day
h+ m+
+1h
OVR
Reset
If you want to modify the... Then...
Days of the week for
ON/OFF event,
Press Day repeatedly to scroll to
desired days of the week
Go to step 3.
Hour for ON or OFF event, Press h+ to scroll to desired hour
Go to step 3.
Minute for ON or OFF
event,
Press m+ to scroll to desired
minute
Go to step 3.
3. Repeat steps 1 and 2 as needed to modify additional events.
4. When all the desired events are modied, press
to
conrm event settings and return to the time of day screen.
Follow this procedure to delete an event.
1. Press Timer to scroll to ON or OFF event you want to delete.
Deleting an Event
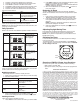
Below is an overview of the different operation modes for FM1D14.
Mode Timer Display Description
Auto ON
MO TU WE TH
FR SA SU
OVR
AUTO
ON
OFF
AM
PM
h
Appears when an
ON setpoint has
been triggered
Auto OFF
MO TU WE TH
FR SA SU
OVR
AUTO
ON
OFF
AM
PM
h
Appears when an
OFF setpoint has
been triggered
OVR ON
MO TU WE TH
FR SA SU
OVR
AUTO
ON
OFF
AM
PM
h
Indicates relay has
been overridden to
ON status
MO TU WE TH
FR SA SU
OVR
AUTO
ON
OFF
AM
PM
h
OVR OFF Indicates relay has
been overridden to
OFF status
NOTE: To execute an ON/OFF status override, press the OVR
button on the timer to override an ON or OFF status. The override
remains active until the next programmed event.