TruVision Navigator 5.
Copyright Trademarks and patents Manufacturer © 2014 United Technologies Corporation Interlogix is part of UTC Building & Industrial Systems, a unit of United Technologies Corporation. All rights reserved. The TruVision Navigator 5.0 Service Pack 3 name and logo are trademarks of United Technologies. Other trade names used in this document may be trademarks or registered trademarks of the manufacturers or vendors of the respective products.
“Machine” means the computer, workstation, terminal, or other hardware product on which the Software is installed. 2. License. The Software is licensed, not sold. UTC shall retain all rights to and in the Licensed Product, including, but not limited to, all copyrights, patents, trademarks, and trade secrets incorporated in the Licensed Products.
. Reverse Engineer. The Software is delivered in object code only. You may not alter, merge, modify, adapt, translate, decompile, disassemble, reverse-engineer, or otherwise reduce the Software to a human-perceivable form. 5. Limited warranty.
SUCH DAMAGES AND REGARDLESS OF WHETHER ANY REMEDY FAILS OF ITS ESSENTIAL PURPOSE. 7. General. The material provided to You, including the Software, shall not be exported or reexported in violation of any export provisions of the USA or any other applicable jurisdiction. Any attempt to sublicense, assign, or transfer any of the rights, duties, or obligations hereunder shall be void.
Content Chapter 1 Overview 1 Client Software Requirements Client Hardware Guidelines Server Software Requirements Server Hardware Guidelines 6 6 8 9 Chapter 2 Installation 12 Architecture Installation Options Languages Installation – Standalone Model Installation – Multi-Client Model Upgrade Initial Login Uninstall Network Time Protocol (NTP) Service Windows 7 and Vista – Local Scheduling Service Installing Navigator on Windows 8 platforms 12 12 13 13 16 21 27 29 32 33 35 Chapter 3 Operation 37 Adding a
Chapter 4 TruVision Navigator Settings 69 User Management & Client Software Delivery Overview Fully Automated Client Software Delivery Partially Automated Client Software Delivery Inactivate a user Restore an inactive user Reset a user after lockout Group management Connection priority Services Notifications and Notifier Health Diagnostics Device Report Database backup and restore Help Licensing 78 79 83 84 85 88 88 89 91 93 96 98 99 100 101 Appendix A Device Details 102 DVMRe / StoreSafe (DVR) SymDec / S
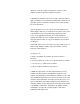
Chapter 1 Overview TruVision Navigator is video management software that enables security-related personnel to easily and remotely gather video evidence, monitor live situations, and configure and maintain a video surveillance system that consists of UTC digital video recorders (devices), analog video cameras, network video recorders, and IP cameras. TruVision Navigator provides a more intuitive way to find and provide relevant video content. Figure 1 shows the TruVision Navigator main screen.
Chapter 1: Overview Figure 1: TruVision Navigator Main Window 1 Navigator Panel 2 Viewer Panel 3 Collector Panel 4 Tasks Panel 5 Settings Dialog 6 Help Dialog 7 Notifier Dialog 8 Services Dialog 9 Controller Panel and Toolbar TruVision Navigator consists of 5 panels and several major dialogs as listed above. Panels are resizable by dragging the vertical left or right splitter bars. Arrow icons next to panel names signify the ability to hide/unhide the panel.
Chapter 1: Overview Navigator will remember your custom panel layout upon logout and restore you to that same point when you log back in. The Navigator panel is the central administration area in the software and allows you to quickly search and access any device or camera in your system. The Navigator features double-click or drag n’ drop capability to view cameras or devices as a whole.
Chapter 1: Overview red triangle icons to mark the beginning and end of a desired video segment. Use the playback controls beneath the timeline to further manipulate playback video. The Collector panel contains all relevant video segments, snapshots, and local recordings ready for export. From here, you can select the desired content to export to your hard drive on demand or via a schedule. To re-open a video clip for further analysis, double-click the thumbnail and the video will launch in the Viewer.
Chapter 1: Overview also includes the licensing screen for TruVision SVR recorder. Please see TruVision SVR User Manual for more information on licensing. The Notifier dialog allows you to collect and manage any notifications sent to you from the devices. You can select an alert in the Notifier panel and view the video results in the Viewer panel. You must configure your devices to send these notifications over the network via TCP or SMTP to the IP address of the TruVision Navigator Server machine.
Chapter 1: Overview Client Software Requirements TruVision Navigator supports all of the following Operating Systems and other software components.
Chapter 1: Overview Table 2: Client PC Hardware Specifications Component Minimum Recommended High Notes Processor 3rd Gen Intel Core i3-3220 Processor (Dual Core, 3.30GHz, 3MB, w/ HD2500 Graphics) 3rd Gen Intel Core i5-3470 Processor (6MB, 3.2GHz) w/HD2500 Graphics 3rd Gen Intel Core i7-3770 Processor (8MB, 3.4GHz) w/HD4000 Graphics CPU power is directly related to the performance of the application when running and rendering video. The better the CPU, the more responsive your application will be.
Chapter 1: Overview Server Software Requirements TruVision Navigator supports all of the following Operating Systems and other software components.
Chapter 1: Overview Other Microsoft .NET Framework 4.0 Packaged with the installation Other WinPCAP 4.1.2 Packaged with the installation Server Hardware Guidelines This specification is meant to serve as a GUIDELINE for the customer. TruVision Navigator will perform to varying degree on a lesser or more robust machine. Table 5 lists the recommended server hardware specification.
Chapter 1: Overview TruVision TVN21(P) 2.0 TruVision DVR12 1.0 TruVision DVR41* 1.0 TruVision DVR42 1.0 TruVision NVR40 (TVN40)* 4.2.1 Changelist 53820 TruVision DVR60 (TVR60) 4.0 TruVision DVR40 (TVR40)* V3.0 build 100416 TruVision DVR31* 8000 TruVision DVR30 (TVR30)* 0453-0329-0552-4723 TruVision DVR10 (TVR10)* 2.0 Build 090722 and 2.2 Build 091210 TruVision DVR11 (TVR11c)* 1.0m TruVision DVR11 (TVR11)* 1.0k TruVision SVR* 7.0.825 SymDec 16 plus 4* 1.46r, 1.47k, 1.51e, 1.
Chapter 1: Overview DSR* 2.23d and 2.24a DVSE Series* 1.20g, 1.41w, and 3.04 * These models are in End of Life status and are not actively supported. TruVision Navigator 5.
Chapter 2 Installation Architecture TruVision Navigator is made up of 3 components: • Client • Services • Database The TruVision Navigator architecture is flexible enough to allow all 3 of these components to co-exist on the same PC (i.e. a single Windows 7 machine) in smallscale environments. As well, TruVision Navigator allows each of these 3 components to operate on separate machines (i.e.
Chapter 2: Installation Whatever installation option you choose, the core features and functions of TruVision Navigator remain the same. You will need Administrator’s rights on the machine to install the application, but the software will be available to all users who successfully log on to a Windows account on that machine.
Chapter 2: Installation Figure 2: InstallationShield Wizard Click Next. The Choose Destination Folder window displays. Figure 3: Choose Destination window Browse for a destination folder for the TruVision Navigator payload or accept the default location and click Next. The Database Connection Model window displays. 14 TruVision Navigator 5.
Chapter 2: Installation Figure 4: The Database Connection Model window Select the Standalone Model (Direct Database Connection) option and click Next. The Installation Confirmation window displays. Figure 5: The Installation Confirmation window Review the installation confirmation page and click Next to proceed with the installation. If you want to make changes, use the Back button to go back and adjust your selections. TruVision Navigator 5.
Chapter 2: Installation Once the installation is finished, The Installation Complete screen displays. Figure 6: The Installation Complete window Select the Yes, I want to restart my computer now option and click the Finish button. A TruVision Navigator icon will be placed on your desktop and in your Start Menu to access the application. Installation is complete.
Chapter 2: Installation Figure 7: Installation Shield Wizard Click Next. The Choose Destination Folder window displays. Figure 8: Choose Destination window Browse for a destination folder for the TruVision Navigator payload or accept the default location and click Next. The Database Connection Model window displays. TruVision Navigator 5.
Chapter 2: Installation Figure 9: The Database Connection Model window Select the Multi-client Model (using IIS or Cassini Web Server) option and click Next. Note: Microsoft’s IIS is the preferred model for Multi-Client Model (i.e. Traditional Client/Server) systems, assuming it is pre-loaded on your system. However, if you do not have IIS pre-loaded, the installer will offer you the Cassini Web Server option as an alternative. See Appendix B “Microsoft IIS Setup” on page 178 for setup instructions.
Chapter 2: Installation Note: We do offer Advanced Web Server settings. To explore those settings, select the Advanced option and proceed with the on- screen instructions. The Database Server window displays. Figure 11: The Database Server window Select the Database Server from the drop-down list and click Next. Note: We do offer Advanced Database Installation settings. To explore those settings, select the Advanced option and proceed with the on-screen instructions.
Chapter 2: Installation Figure 12: Installation Confirmation Dialog Review the installation confirmation page and click Next to proceed with the installation. If you want to make changes, use the Back button to go back and adjust your selections. The Installation Complete screen displays. Figure 13: The Installation Complete window 20 TruVision Navigator 5.
Chapter 2: Installation Select the Yes, I want to restart my computer now option and click the Finish button. A TruVision Navigator icon will be placed on your desktop and in your Start Menu to access the application. Installation is complete. Upgrade TruVision Navigator offers upgrade paths from TruVision Navigator v4.0, TruVision Navigator v4.0 SP1, SP2, SP3, SP4, SP5 and SP6 releases. Note: You cannot use this upgrade procedure for earlier TruVision Navigator v4.0 releases.
Chapter 2: Installation The Choose Destination Folder for Upgrade window displays. Figure 15: Setup Type window Installer will proceed with a prerequisite component install. WinPcap is one of the required components for upgrades from previous versions to v5.0. (except 4.0 SP6). Figure 16: The Setup Status window Proceed to the next steps and accept the license agreement of WinPcap and click next to finish the WinPcap installation.
Chapter 2: Installation Figure 17: The Previous Instance Install Directory window Previous Server Components will be uninstalled automatically. Figure 18: The New Instance Install Directory window After the previous version of Navigator is removed, installer will continue with the installation of new TruVision Navigator version. TruVision Navigator 5.
Chapter 2: Installation Figure 19: The Installation Confirmation window a Once all components of TruVision Navigator are installed, the Installation Complete screen displays. Figure 20: The Installation Complete window Select the Yes, I want to restart my computer now option and click the Finish button. Installation is complete. 24 TruVision Navigator 5.
Chapter 2: Installation Upgrade for Standalone Installations Figure 21: Database Selection window After the database is selected, upgrade confirmation screen displays. Figure 22: Upgrade Confirmation window Click next on the upgrade confirmation screen to proceed with installation. Once the installation is finished, the Installation Complete screen displays. TruVision Navigator 5.
Chapter 2: Installation Figure 23: Upgrade Confirmation window 26 TruVision Navigator 5.
Chapter 2: Installation Initial Login After successful installation, launch TruVision Navigator using one of the following methods: • Double-clicking on the TruVision Navigator icon on your desktop. • Access the Start menu, All Programs, and TruVision Navigator. When TruVision Navigator launches, a login window displays.
Chapter 2: Installation Figure 25: Change Password Dialog To change the password, do the following: Enter the new password in the Password field. Re-enter the password in the Confirm Password field. Select one of the following challenge questions from the drop-down list. Enter the answer to your challenge question in the Challenge Answer field. Press OK. If you ever forget your password, simply click on the Forgot? button on the Login dialog.
Chapter 2: Installation Figure 26: User Account Challenge Dialog Uninstall To uninstall TruVision Navigator do the following: Launch the Add/Remove Programs application from Windows Control Panel. Navigate to TruVision Navigator Server and click on the Remove or Uninstall button. Figure 27: Add or Remove Programs window TruVision Navigator 5.
Chapter 2: Installation The InstallShield window appears and the application will prepare to remove your selection. Figure 28: InstallShield Wizard window Click the Yes button when this window appears. Figure 29: Confirmation window The uninstall will begin and the status window will appear. 30 TruVision Navigator 5.
Chapter 2: Installation Figure 30: Setup Status window When complete, click on the Finish button and restart your computer. Figure 31: Uninstall Complete window Repeat these same uninstall steps for the TruVision Navigator Client application in the Add or Remove Programs window. Note: This process will remove all TruVision Navigator files and logs from your system. No Registry edits are necessary to remove TruVision Navigator from the machine. TruVision Navigator 5.
Chapter 2: Installation Network Time Protocol (NTP) Service The TruVision Navigator Server has the ability to act as an NTP Service for devices on the network (you also have the flexibility to use other 3rd party NTP Services should you choose). Enable the NTP Service in TruVision Navigator by going to Start – All Programs – TruVision Navigator – Enable NTP Service. This will enable the NTP Service on the TruVision Navigator Server.
Chapter 2: Installation Figure 33: NTP Diagram Windows 7 and Vista – Local Scheduling Service If this is a Windows 7 or Vista installation, you may experience issues with your Local Scheduling Service. The Local Scheduling Service on the Client machine is responsible for executing all tasks on behalf of the Client. These tasks include video exports, firmware upgrades, bulk configurations, and database backup/restores.
Chapter 2: Installation Figure 34: TruVision Navigator Client Properties If you do NOT have Admin privileges on the machine, contact your Administrator to turn off the User Account Control (UAC) for the user who will be running the TruVision Navigator Client. To do so, have the Admin perform the following steps: Click the Start button and under the "Start Search" section, enter MSCONFIG. Click Enter. On the System Configuration Window, select the Tools Tab.
Chapter 2: Installation Figure 35: Disable UAC Installing Navigator on Windows 8 platforms TruVision Navigator can be installed on Windows 8 platforms with a couple of prerequisites met before installation. Microsoft Windows 8 OS needs to support Microsoft SQL database drivers fully before the TruVision Navigator installation starts. Therefore, these prerequisites are needed to make your system ready for TruVision Navigator installation.
Chapter 2: Installation iv. Navigator will allow user to use existing SQL 2008 Express. 2. To make the WinPCAP compatible with Windows 8: a. Right click on WinPcap.exe file b. Select Properties c. Compatibility d. Check Run this program in compatibility mode for: Select Windows 7 and click Apply. e. Right click on WinPcap.exe and select Run as Administrator. 36 TruVision Navigator 5.
Chapter 3 Operation Adding a Single Device Add a single device to the Navigator by doing the following: Click the Add Device button in the Navigator. Drop down menu displays with the following options: - Add Manually - Add Via Discovery Tool Adding Devices Manually Once Add Manually option is selected, below screen will display for required input. TruVision Navigator 5.
Chapter 3: Operation Figure 36: Add Device window (Manually) Note: After you click OK, fields highlighted with a red exclamation point indicate rejected values. Place your mouse pointer over the exclamation points for tips on why your values were invalid. All fields must be valid to successfully add a device. • Enter a Device Title. Values are alphanumeric. • Select the appropriate Device Type from the drop-down menu. • Based on your device type, you may need to select a Streaming Type.
Chapter 3: Operation • • Wavelet/Wavejet - This type is based upon Wavelet/Wavejet compression methodologies. This streaming type cannot be changed and is the default streaming type for the DVMRe and StoreSafe DVR lines. Enter the device's IP Address, or, the DynDNS or EzDDNS URL. Note: You can add a device using a Domain Name System (DNS) name as well as a static IP Address. Simply place the DNS name in the IP Address field on the form .• Enter the device's listen Port.
Chapter 3: Operation clicking on the device and selecting Connect. Upon successful connection, the Navigator will populate the respective cameras under the device. Figure 37: Connect to off-line device If you have channels on a DVR that will not be used, you can mark them as "unused" so they do not appear in the Navigator under the DVR. To do this, go to the Camera Title section under the DVR Configuration menus, mark the "Camera Not in Use" check box, and click Save.
Chapter 3: Operation Figure 38: Device Management Window The discovery tool window includes following areas and device management functions • • • • • • Device List Assigning IP Address to a device Pinging device(s) Rebooting device(s) Opening Web Page of a device Checking default credentials of device(s) Device List Provides a list of devices in the network. For convenience, devices can be grouped together by their type (recorder, camera, or both), or brand.
Chapter 3: Operation In addition, the Status column provides the results of the Ping, Assign IP Address, Get Firmware Version and Reboot commands. Assign IP Address Allows the users to assign IP address to a camera. 1. Select a camera from the device discovery list 2. Click [Change IP Address] button located at the top menu of discovery tool. 3. Enter the [New IP Address] to the related field, and click [Ok] Ping Allows the users to ping device(s) to check the link activity.
Chapter 3: Operation Figure 39: Discovery Tool Window Device discovery tool provides an easy way to discover the devices and make them ready for recording in the system. Device discovery tool is available via various paths in TruVision Navigator, and is used for discovering recorders, cameras, and encoders in the network.
Chapter 3: Operation Adding a TruVision 360 Camera TruVision Navigator 5.0 SP3 supports the Interlogix 360 degree panoramic cameras. These cameras can be added to TruVision NVRs as a regular IP camera, manually, or, via discovery tool. Each Panoramic camera provides five streams to the user.
Chapter 3: Operation Figure 40: Import Address Book from Devices node Select WaveReader or SymNav from the Files of Type drop-down menu. Browse and locate the .txt export file that you have saved and click Open. Figure 41: Address Book import Your successfully imported devices are instantly placed by default in a newly created import folder with a time/ date stamp. These devices have been imported as off-line devices (signified by the red X on the device).
Chapter 3: Operation Figure 42: Address Book import - Offline devices 46 TruVision Navigator 5.
Chapter 3: Operation Organize the Navigator The Navigator allows you to organize your devices in a logical manner. As systems get a larger, this will enable you to find your devices and cameras more easily. To organize your Navigator, do the following: In the Navigator, click the Add Folder button. This creates a new folder. Enter a name for the new folder and press Enter. To add a sub-folder within the previously created folder, right-click on the parent folder and select Add Folder from the context menu.
Chapter 3: Operation Find and export video There are three ways to load video from the Navigator into the Viewer: Drag n’ drop a specific camera to the Viewer Drag n’ drop a specific device to the Viewer which will load all of the cameras applicable to the device Double-click on a specific camera Figure 44: Viewer and Controller By default, video will be loaded in the Viewer in Live mode.
Chapter 3: Operation Once video tiles are selected, perform one of the following operations to retrieve Playback video (assuming there is video on the device for the specified time): • Go To Search – click on the Go To button in the Controller, enter a date and time, and click OK. Playback will start at the desired date and time. • Playback Button – click on the Playback button in the Controller to go back a userdefined period of time (the same time you set for Instant Replay - i.e. 5 minutes).
Chapter 3: Operation Figure 45: Collector panel Export all collected video and snapshots to a specific location using the Collector. To export video or snapshots, do the following: Access the Collector and select each thumbnail that you wish to export (you can use the select all/unselect all button in the Collector header bar for quick selections).You can also right- click on snapshots to print, email, or rename them. Check the Include Standalone Player checkbox.
Chapter 3: Operation When export tasks are complete, you can find exported video and snapshots at the location you specified. These files can now be reviewed, burned to media, or stored for later use. In addition, you can use the Local Record button to record live video to your machine. To create a local record video clip, do the following: Display and select a camera in the Viewer. In the Controller, click on the red Local Record button (to the right of the playback controls) to begin recording.
Chapter 3: Operation TruVision Navigator Player The TruVision Navigator Player is a standalone player that can be used to replay any video clip that has been exported using TruVision Navigator (proprietary file formats include .wvf, .mpc, .asf, .mp4, and .drv). This player should be copied to media along with the video clips for authorities. It has a zero footprint – meaning it will launch from the media itself and does not require installation to a machine.
Chapter 3: Operation Figure 47: TruVision Navigator Player window The features of the TruVision Navigator Player are: • Browse – allows the user to browse for a specific video clip in another directory and load it into the Play List. • Snapshot – allows the user to take a snapshot of the highlighted video tile. • Print - allows the user to print a snapshot of the highlighted video tile.
Chapter 3: Operation Note: As the video clips are played, there may be time gaps due to the different video settings on each clip source (i.e. different fps). This function will ensure that the initiation of the playback for all tiles happen at the same time to keep the time gaps between the clips at a minimum. • Time/Date Stamp – on playback, each video will have a time/date stamp on it for evidentiary purposes. Double-click on any video tile to go full screen or use the maximize button in the Tool Bar.
Chapter 3: Operation Multi-site - The multi-site feature allows you to view video from multiple cameras from different devices simultaneously in the Viewer. TruVision Navigator can render Wavelet, Wavejet, MJPEG, MPEG4, and H.264 compression streams simultaneously, which allows you to mix and match the cameras from your many devices seamlessly. Standard video tile layouts include 1x1, 2x2, 3x3, 4x4, and 5x5.
Chapter 3: Operation PTZ control TruVision Navigator has the ability to control PTZ camera and motorized zoom cameras with auto focus feature. Supported features include pan, tilt, and zoom moves, as well as set and go to presets, and record and go to tours. The tours functionality is only available for certain device types. See the device-specific chapters for the support for this feature.
Chapter 3: Operation to, name, and set presets and return cameras to tour (on certain devices). See the device-specific chapters for applicable functionality. Note: PTZ control responsiveness will vary depending upon the frame rate, resolution, and quality of the video stream. D1/ 30FPS/Quality 9 will afford you the most responsive PTZ control over the network. Weigh PTZ control responsiveness with your storage requirements to find the best fit.
Chapter 3: Operation Digital Zoom TruVision Navigator allows you to perform digital zoom in/out functions to the live and recorded view. To zoom in, scroll up with the mouse wheel, and to zoom out scroll down. When in digital zoom mode, you can click and hold the mouse left button to Navigate in the zoomed image. Tampering Monitor TruVision Navigator is equipped with a tampering monitor that compares the current image with a reference image taken during the installation.
Chapter 3: Operation On the left hand side, reference images will be listed with the date and time they were taken. For the first time applications of this feature, the reference images will be empty; therefore, user should click Update All to save the reference images. By comparing reference images with live images located on the right hand side, user can easily measure any tampering activity on each cameras. Configure a device TruVision Navigator allows you to configure devices in bulk or one at a time.
Chapter 3: Operation that audio. At the TruVision Navigator Client PC, speakers need to be attached and the volume control needs to be turned up. Specific video tiles need to be selected to hear the audio. If multiple video tiles are selected, no audio will play. See the device-specific chapters for more detail on this functionality. Motion detection notifications are available in TruVision Navigator assuming several setup steps are completed.
Chapter 3: Operation • Source - this is where you select the device type of the devices you want to configure. As you select different device types, the destination list will toggle in real-time to show the applicable like-devices in the system. • Settings - initially, a configuration template will appear for that device type selected in the source. This generic template will show all of the necessary configurations for that device type but won't have any values populated in the fields.
Chapter 3: Operation Configure a camera The steps required to modify a camera’s configuration is similar to that of configuring a device. To change a specific camera’s configuration do the following: Right-click on a camera in the Navigator and select Configure Camera. A configuration dialog will open. Navigate through the settings, make changes as appropriate, and either click Ok or Cancel. Ok will save the settings to the device and Cancel will abort the configurations you made.
Chapter 3: Operation Figure 54: Camera configuration TruVision Navigator 5.
Chapter 3: Operation Device properties Device properties consist of connection, detail, and capability information. To obtain device properties, simply right-click on the device and select Properties. Figure 55: Device Properties Window The Connection tab shows all of the information previously entered when adding the device. Make changes as appropriate and click OK to save changes.
Chapter 3: Operation Device disk analysis TruVision Navigator features the ability to run a disk analysis on a device in order to get a broader sense of the different types of video data recorded to disk. This video data can include alarms, events, video loss, motion, and more. To run a disk analysis for a device, right-click on the device in the Navigator and select Run Disk Analysis. The disk analysis dialog will appear.
Chapter 3: Operation Firmware upload TruVision Navigator offers the ability to upload firmware to devices remotely. You can do this per device or in bulk-fashion across many like-devices. To upload firmware to device(s), either right-click on the device in the Navigator and select Upload Firmware or right-click on the Devices node in the Navigator and select Bulk Firmware Upload. The Firmware Upload dialog will appear.
Chapter 3: Operation Figure 57: Firmware Upload Window Camera search TruVision Navigator allows you to search cameras for alarms, alarms plus events, motion, and point-of-sale text-related video. For those searches, the device must first be configured to tag the camera’s video based upon those parameters (which must be available in the device). For instance, to be able to search a camera for motion in TruVision Navigator, the motion grid must be setup for that camera in the device and tagged for motion.
Chapter 3: Operation To perform a camera search, right-click on the camera in the Navigator and select Search. The search dialog will appear. From the search dialog, you can specify the video type and time/date range, and upon clicking Search, the results will appear in the table. Click the hyperlinked start times to review the video in the Viewer. Figure 58: Search dialog 68 TruVision Navigator 5.
Chapter 4 TruVision Navigator Settings For both the standalone and multi-client installation models, you have the ability to configure the TruVision Navigator Client and Server for specific features. To configure the TruVision Navigator Client and Server, right-click on TruVision Navigator Server in the Navigator and select Settings. The Settings dialog will appear. TruVision Navigator 5.
Chapter 4: TruVision Navigator Settings Figure 59: Settings Window Client Settings Client tab of Settings Window provides following client settings: Preserve Video Aspect Ratio: Helps keeping the video aspect ratio if selected. Use of Video Card Hardware Acceleration: Enables use of hardware video acceleration if the system is equipped with such an hardware. Enable Audio From Devices: Enables the use of audio from remote devices.
Chapter 4: TruVision Navigator Settings Server Settings Server tab of Settings Window provides following server settings: • SMTP Setup • Permissions Model • Authentication Complexity • Instant Replay • Custom Help Link • Server URL • Client Download URL SMTP Setup Simple Mail Transfer Protocol (SMTP) is a de facto standard for email transmissions across the Internet.
Chapter 4: TruVision Navigator Settings Figure 60: Test Email Window Permission Model TruVision Navigator has two permission models – Simple or Advanced. The default for a new installation is the Simple model. Simple model - Administrators only have the ability to create, edit, and delete users and their corresponding permissions. Advanced model - Administrators have the ability to create, edit, and delete both users AND groups. Groups allow you to scale user permissions in your system across many users.
Chapter 4: TruVision Navigator Settings users or groups within TruVision Navigator, the user interface impact of that permission, and the dependencies of specific permissions. Table 6: Permission Matrix Permission User Interface Impact Configure Server Enable/disable right-click options on TruVision Navigator Server node (i.e.
Chapter 4: TruVision Navigator Settings Show/Hide Folder (folder may also be visible due to other permissions or child permissions) Show/Hide Device (device may also be visible due to other permissions or child permissions) View Notifications Show/Hide Folder (folder may also be visible due to other permissions or child permissions) Show/Hide Device (device may also be visible due to other permissions or child permissions) Enable/Disable Notifier icon in application status bar.
Chapter 4: TruVision Navigator Settings Enable/Disable Controller Playback controls including Go To, Playback, Live, double-click on timeline) Enable/Disable notifications in Notifier dialog. Watch Video HBW Enable/Disable Stream and Bandwidth menus in the Controller. Requires at least one of the Watch Video permissions (Live or Playback). Export Video Enable/Disable Local record button in Controller. Requires both of the Watch Video permissions (Live and Playback).
Chapter 4: TruVision Navigator Settings Table 7: Authentication complexity Authentication Maximum complexity login failure attempts Username complexity Password complexity Password reuse Password expiration Low n/a At least 6 characters At least 6 characters n/a n/a Medium 3 At least 6 characters At least 8 alphanumeric characters n/a n/a High 3 At least 12 characters At least 8 Cannot use the characters with last password at least: 1 Upper- case letter 1 lower-case letter 1 numeric 1 s
Chapter 4: TruVision Navigator Settings completely user-defined. TruVision Navigator simply provides a pathway for users to access it. To add a Custom Help link, enter the Custom Help title of the content that you want to expose to users. Next, enter the Custom Help link, which is the actual path to the content (users will not see what you enter in this field). Click OK. Open the Help dialog (Question Mark icon) from the application status bar and notice the Custom Help title there.
Chapter 4: TruVision Navigator Settings User Management & Client Software Delivery Overview With Multi-client (client/server) installations of TruVision Navigator, PCs on the same network with the TruVision Navigator Server have the ability to download the TruVision Navigator Client. This alleviates the need for an Administrator to physically ship media or visit the PC’s site to install the client software.
Chapter 4: TruVision Navigator Settings Fully Automated Client Software Delivery TruVision Navigator can be configured to use an SMTP server to send automated email messages (with Client Download URL, username, and password) to new users or when an existing user’s login credentials (username and password) need to be reset in the system by an Administrator.
Chapter 4: TruVision Navigator Settings Figure 61: User Account Created Email The user can now click the download URL or cut/paste the string into a web browser. From the Client Installation page, follow the instructions to install the client software. 80 TruVision Navigator 5.
Chapter 4: TruVision Navigator Settings Client Installation Figure 62: Client Installation Window When installation is complete and you have rebooted your machine, click on the TruVision Navigator icon on your desktop. Login to the application using the credentials from the email. You will be prompted to change those credentials upon initial successful login.
Chapter 4: TruVision Navigator Settings Figure 63: User Properties Window Highlight the TruVision Navigator Server node in the device tree and allow/deny the permissions for this user in the Permission section. If your Permission Model is set to Simple (only users), you will only see the Allow column. If your Permission Model is set to Advanced (both users and groups), you will see both the Allow and Deny columns.
Chapter 4: TruVision Navigator Settings case, the child node will show a blue breadcrumb and the parent will show a grey breadcrumb. The table below describes this feature in detail. Table 8: Permission breadcrumbs Permission Breadcrumb Description Blue A blue breadcrumb indicates that there are express permissions granted on that node. These permissions are inherited by the children nodes underneath the parent node.
Chapter 4: TruVision Navigator Settings Figure 64: Add User Window Third, the Administrator has to deliver the user’s login credentials and Client Download URL to the user via phone or through private email. An example of this information is listed below. You can cut and paste the Client Download URL from the TruVision Navigator Server Properties dialog - general Tab. Remember to assign the user’s permissions or he/she will not be able to login.
Chapter 4: TruVision Navigator Settings To make a user inactive, right-click on the user under the Users node in the Navigator and select Inactivate User. Click Yes when prompted with “Are you sure you want to inactivate this user?” Inactive users will be removed from the Users node in the Navigator unless you rightclick on the Users node and select Include Inactive Users. The Inactive User icon is shaded grey while the Active User icon is shaded blue.
Chapter 4: TruVision Navigator Settings Figure 66: User Properties Window If SMTP is in use, the user will get an email automatically sent to him with his temporary password for login. The user will be prompted to change this password upon initial login. 86 TruVision Navigator 5.
Chapter 4: TruVision Navigator Settings Figure 67: User Account Reset Window If SMTP is not in use, the Administrator will have to provide the user a new temporary password at the Change Password dialog. These temporary credentials will need to be delivered to the user via phone or the Administrator’s personally generated email. Figure 68: Change Password Window TruVision Navigator 5.
Chapter 4: TruVision Navigator Settings Reset a user after lockout If a user forgets his or her username or password and challenge question, that user can be locked out of the system. If a user has been locked out for login failures, they can unlock themselves by answering their challenge question via the Login form’s Challenge Dialog window Figure 69: User Account Challenge Dialog Window If a user cannot remember his/her challenge question, a call to the Administrator is necessary to reset the account.
Chapter 4: TruVision Navigator Settings Right-click on the name of the group under the Groups node in the Navigator and select Properties. The Group Properties dialog will appear. Figure 70: Group Properties Window On the Details Tab, you can change the group name, add users to the group, and set the group’s Connection Priority. On the Permission Tab, you can permission the group as appropriate.
Chapter 4: TruVision Navigator Settings When two users are in conflict for the same connection to the device, the user who requests it first will get that connection. Once the device has reached its connection limits, the Connection Manager will begin to broker the connection pool based upon the Connection Priority.
Chapter 4: TruVision Navigator Settings Services Figure 72: Service Status Window There are 3 TruVision Navigator services that can be enabled to perform tasks for users. Standalone installations will only show the Network Time Protocol service in this dialog since the other services are embedded in Server Settings menu. After services are configured, they allow activities to take place without the user being present. As long as the service is running on the machine, the tasks will be executed.
Chapter 4: TruVision Navigator Settings Figure 73: Event Viewer Window Should there be problems with services starting, stopping, or port conflicts, please check the Windows Event Viewer (right-click on My Computer and select Manage). TruVision Navigator will log informational and error reports there with respect to issues with the services. View the reason codes by clicking on the reports. 92 TruVision Navigator 5.
Chapter 4: TruVision Navigator Settings Notifications and Notifier Devices have the ability to push notifications out to an IP Address and port for proactive issue resolution. These notifications typically include alarm, video loss, motion, etc... See the device-specific chapters for what notifications are supported per device. In order to receive notifications from devices in TruVision Navigator, there are configurations that need to be made at both the device and TruVision Navigator servicelevel.
Chapter 4: TruVision Navigator Settings Figure 74: Server Properties Window TruVision Navigator offers you the ability to prune the notification data out of your database to keep the size down. Set the retention period for this data as such. If any of these values are changed, please restart the Notification Writer and Notification Processor services via the Services dialog for the changes to take affect. The central repository for notifications is the Notifier dialog.
Chapter 4: TruVision Navigator Settings Figure 75: Notifier Window From the Notifier, you can view video for live notifications as they are received by double-clicking on the camera name link in the dialog. This will launch the video in the Viewer. New, unacknowledged notifications are signified with a red alert icon over the Notifier icon in the application status bar. You can also tie these live notifications to an audible sound. See the Settings section for more information on this feature.
Chapter 4: TruVision Navigator Settings Health Diagnostics TruVision Navigator offers the ability to run a health diagnostic snapshot on a single device or aggregate health diagnostic reporting across all of the devices in the system. To run a manual health diagnostic snapshot on a single device, right-click on the device in the Navigator and select Run Health Diagnostics. The Diagnostics dialog will appear and show the full set of health diagnostic data for that particular device.
Chapter 4: TruVision Navigator Settings Diagnostic Polling service, right-click on the TruVision Navigator Server node and select Properties. The Settings dialog will appear with the Server tab selected. Figure 77: Server Properties Window From the Health Diagnostics Tab, enter the Diagnostic Polling Start Time and Interval. Enter the retention period for the length of time to keep the health diagnostic polling data in the database and click OK.
Chapter 4: TruVision Navigator Settings To review health diagnostic data for all devices, right-click on the Devices node in the Navigator and select Run Health Diagnostics. The Diagnostics dialog will appear. Use the filters and date parameter to pinpoint your search. You can export the contents of the dialog to .csv via the Export to CSV button for case management, work orders, or issue resolution documentation.
Chapter 4: TruVision Navigator Settings Database backup and restore TruVision Navigator offers users the ability to backup the TruVision Navigator database. This backup should be moved off-machine by an Administrator for safekeeping. Should something happen to the machine where the TruVision Navigator database resides, the Administrator can install that same version of TruVision Navigator and restore the database with the backup file.
Chapter 4: TruVision Navigator Settings Figure 80: Restore Database Window Help TruVision Navigator offers an easy to use Help function for more detailed system instructions. You can also obtain TruVision Navigator version, copyright, and End-user License Agreement information here. Organizations have the ability to add their own custom Help or training link here to facilitate the adoption of the product. Click on the question mark icon in the application status bar to launch the Help dialog.
Chapter 4: TruVision Navigator Settings Figure 81: Help Dialog Window Licensing TruVision Navigator has a licensing interface embedded to the Help screen. The Licensing link will display the Licensed Features window for managing the TruVision SVR recorder base and camera licenses. The Update license button will provide the license management screen where user can change the required licenses, and add more licenses via a new license key purchased from Interlogix.
Appendix A: Device Settings Appendix A Device Details Summary This Appendix contains important device information. Content DVMRe / StoreSafe (DVR) 103 SymDec / SymSafe (DVR) 107 DVSRxU (DVR) 112 TruVision TVR10 (DVR) 116 TruVision TVR30 (DVR) 120 TruVision TVR40 (DVR) 130 TruVision TVR60 (Hybrid DVR) 142 TruVision TVN40 (NVR) 150 Platform Out of Box Experience (OOBE) 171 102 TruVision Navigator 5.
Appendix A: Device Details DVMRe / StoreSafe (DVR) Feature Support Default Ports Video = 1024 (editable) Command and Control = 1024 (editable) Configuration = 1024 (editable) Notifications = 1027 (editable) Firmware Upload = 1024 (editable) Default Username / Password N/A Compression Wavelet / Wavejet Connection Types Wavelet Streaming Limits 16 Live and 1 Playback streams simultaneously Stream Overlay Camera Name Date and Time Alarm Detection High / Low Bandwidth Yes Dual Streaming Notes S
Appendix A: Device Settings Feature Support Disk Analysis Alarm Motion Video Loss Recorded Unknown (video data may or may not be tagged with a type, and therefore is marked as unknown) Video Export Yes TruVision Navigator Player Yes PTZ Control Yes Focus, Iris Control Yes Presets Yes Tours No Go To and Record is not supported. Camera Search Alarm Event Motion Text However, Text Search is not available on the DVMRe CS, DVMRe CD, DSR, or DVSE models.
Appendix A: Device Details Feature Support Notes Notifications Alarm Video Loss Disk Full Disk Failed Authentication Lock Up Device Powered Up Fan Failed Abnormal Temperature DVMRe Pro, DVMRe CT or DVMRe CTII - to setup these devices to send TCP notifications, get the configuration of the device. Under the Alarm menu, go to Notification and make sure the notification method on the page is set to TCP. Enable each of the notifications using the radio buttons.
Appendix A: Device Settings Feature Support Notes Firmware Upload No Remote firmware uploads must be done from the device’s web browser and not via TruVision Navigator. This includes all DVMRe models, all StoreSafe models, the DSR, and the DVSE. Bulk Firmware Upload No Device Configuration Yes Bulk Configuration No Remote Reboot No 106 For certain models - DVMRe CS, DVMRe CD, DVSE, and DSR, configuration must be done via the device’s web browser and not via TruVision Navigator.
Appendix A: Device Details SymDec / SymSafe (DVR) Feature Support Default Ports Video = 5858 for TCP or 8100 to 8115 for UDP (editable) Command and Control = 1024 (editable) Configuration = 1024 (editable) Notifications = 1027 (editable) Firmware Upload = 1024 (editable) Default Username / Password N/A Compression MPEG4 Connection Types Reverse TCP Reverse TCP I-frame UDP Streaming Limits 32 Live and 16 Playback streams simultaneously Stream Overlay Camera Name Date and Time Bit rate Alarm Det
Appendix A: Device Settings Feature Support Notes Playback Controls Switch to Live Switch to Playback Play Pause Frame Advance Fast Forward (2x,4x,8x,16x,32x,100x,300x) Frame Reverse Rewind (2x,4x,8x,16x,32x,,64x,100x) When fast forwarding video and it catches up to present time (or Live video), the video in the viewing tile pauses and will resume fast forward as video becomes available.
Appendix A: Device Details Feature Support Notes Audio Yes There are 2 (SymSafe) or 4 (SymDec) audio inputs per device that are mapped to Cameras 1 to 2 or 1 to 4 respectively. Microphones would need to be in the locations with those cameras. Enabling audio on the device is a per channel setting. Access the setting by going to the camera configuration, and enabling the audio option on the Recording Tab. If enabled, you can hear audio by adding that camera in the Viewer and selecting it.
Appendix A: Device Settings Feature Support Notes Notifications Alarm Video Loss Disk Full Disk Failed Authentication Lock Up Device Powered Up Fan Failed Abnormal Temperature To setup a SymSafe or SymDec16 to send TCP notifications, get the configuration of the device. Under the Network menu, go to Network Notification and make sure each notification on the page is set to TCP.
Appendix A: Device Details Feature Support Health Diagnostics IP Address MAC Address Model Name Serial Number Firmware Version Device Date/Time Total Device Health Device Temperature (C) Device Temperature (F) HDD Status HDD Temperature (C) HDD Temperature (F) HDD Capacity (Gb) Fan Status Cameras in Video Loss Cameras in Alarm Current Client Connections Record Status First Recorded Video Latest Recorded Video Record Time Left (hours) Video Stored (days) Video Stored (hours) Power on Duration Device Expo
Appendix A: Device Settings DVSRxU (DVR) Feature Support Notes Default Ports Video = 8000 (editable) Command and Control = 8000 (editable) Configuration = 8000 (editable) Notifications = 5001 (editable) Firmware Upload = 8000 (editable) Default Username / Password Administrator / 3477 Compression H.264 Connection Types TCP UDP Streaming Limits 24 Live or Playback streams simultaneously with a maximum of 6 streams per channel.
Appendix A: Device Details Feature Support Notes Stream Nomenclature The Main stream is referred to as: On-Screen-Display = Schedule Web Browser = Main stream TruVision Navigator = Main stream The Sub stream, Event, and Time Lapse streams are derivative configurations of the Main stream.
Appendix A: Device Settings Feature Support Notes Instant Replay Yes There is a 2 to 5 minute video buffer in the device. While video is in the buffer, it cannot be viewed. Once the buffer fills, the video is written to the hard drive and is available for playback. This affects Instant Replay and the Playback button in TruVision Navigator. Those 2 features get their time increment from the user-defined Instant Replay configuration on the TruVision Navigator Server Properties Tab.
Appendix A: Device Details Feature Support Notes Notifications Alarm Video Loss Motion Disk Full Disk Failure To setup the device to send TCP notifications for cameras, right-click on the device in the Navigator and select Configure Device. On the Camera Tab’s Event Section, select the events you would like to receive and set the schedules as appropriate. On the Camera Tab’s Rules Section, for each event type, ensure that “notify me” is selected. Repeat for each event type.
Appendix A: Device Settings Feature Support Bulk Configuration Yes Remote Reboot Yes Notes TruVision TVR10 (DVR) Feature Support Default Ports Video = 8000 (editable) Command and Control = 8000 (editable) Configuration = 8000 (editable) Notifications = 5001 (editable) Firmware Upload = 8000 (editable) Default Username / Password admin / 1234 Compression H.
Appendix A: Device Details Feature Support Notes Stream Nomenclature The Mainstream is referred to as: Event Stream is not supported on the device.
Appendix A: Device Settings Feature Support Focus, Iris Control Yes Presets Yes Tours Go To Record Only 1 tour is supported (which is hard coded to Tour 1 on the PTZ camera). Camera Search Alarm Event Motion Text Search is not supported on the device. Motion Yes get the configuration for this device via TruVision Navigator and set the active zones on a per camera basis via the Motion Configuration option associated with each camera. Audio Yes There is 1 audio input per device.
Appendix A: Device Details Feature Support Notes Notifications Alarm Video Loss Motion Disk Full Disk Failure To setup the device to send TCP notifications for cameras, right-click on the device in the Navigator and select Configure Device. On the Camera Tab’s Event Section, select the events you would like to receive and set the schedules as appropriate. On the Camera Tab’s Rules Section, for each event type, ensure that “notify me” is selected. Repeat for each event type.
Appendix A: Device Settings Feature Support Device Configuration Yes Bulk Configuration Yes Remote Reboot Yes Deivce log support Yes Notes TruVision TVR11 / TVR12 (DVR) Feature Support Default Ports Video = 8000 (editable) Command and Control = 8000 (editable) Configuration = 8000 (editable) Notifications = 5001 (editable) Firmware Upload = 8000 (editable) Default Username / Password admin / 1234 Compression H.
Appendix A: Device Details Feature Support Notes Stream Nomenclature The Mainstream is referred to as: Event Stream is not supported on the device. On-Screen-Display = Time Lapse Web Browser = Mainstream TruVision Navigator = Mainstream The Sub stream is referred to as: On-Screen-Display = N/A Web Browser = Sub stream TruVision Navigator = Sub stream Playback Controls Switch to Live Switch to Playback Play Pause Frame Advance Fast Forward (2x,4x, 8x 16x) Slow motion (1.0x, 0.5x, 0.25x, 0.125x, 0.
Appendix A: Device Settings Feature Support Focus, Iris Control Yes Presets Yes Tours Go To Record Camera Search Alarm Event Motion Text POS Text Yes Motion Yes Get the configuration for this device via TruVision Navigator and set the active zones on a per camera basis via the Motion Configuration option associated with each camera. Audio Yes There are 4 audio input per device. That input can be mapped to any camera on the device simply by enabling audio on that camera.
Appendix A: Device Details Feature Support Notes Notifications Alarm Video Loss Motion Disk Full Disk Failure To setup the device to send TCP notifications for cameras, right-click on the device in the Navigator and select Configure Device. On the Camera Tab’s Event Section, select the events you would like to receive and set the schedules as appropriate. On the Camera Tab’s Rules Section, for each event type, ensure that “notify me” is selected. Repeat for each event type.
Appendix A: Device Settings Feature Support Bulk Configuration Yes Device Log Support Yes Remote Reboot Yes Notes TruVision TVR20 (DVR) Feature TVR20 Default Ports Video = 80 (editable) Command and Control = 80 (editable) Configuration = 80 (editable) Notifications = 1600 (editable) Firmware Upload = 80 (editable) Default Username / Password admin 1234 We recommend changing this default password at time of installation. Default IP Address 192.168.1.82 Compression H.
Appendix A: Device Details Feature TVR20 Instant Replay Yes Disk Analysis Alarm Motion Video Loss Untagged Video Export Yes TruVision Navigator Player Yes .avr proprietary file format.
Appendix A: Device Settings Feature TVR20 Notifications Alarm Motion Video Loss Disk failed Disk full Fan failed Abnormal temperature Device powered up Recording stopped Recording started Authentication lockup Network disconnected Health Diagnostics IP address Subnet mask Gateway MAC Address Model name Serial number Firmware version Date/time Cameras in video loss Current client connections Disk capacity Logical disk count Physical disk count Disk temperature celcius Disk temperature farenheit Recordi
Appendix A: Device Details TruVision TVR30 (DVR) Feature Support Notes Default Ports Video = 80 (editable) Command and Control = 80 (editable) Configuration = 80 (editable) Notifications = 5000 (editable) Firmware Upload = 80 (editable) Video and control port changes must be done from the front panel of the device. Default Username admin / 1234 / Password Compression We recommend changing this default password at time of installation. H.
Appendix A: Device Settings Feature Support Notes Local Record Yes The device only supports local record for one camera at a time. If user has a local recording going and tries to initiate another camera from the same device, the original local recording will be stopped and a then the new local recording will begin. Instant Replay Yes Disk Analysis Alarm Motion Video Loss Unknown Disk analysis takes approximately 30-60 seconds depending on the amount of recorded data on the device.
Appendix A: Device Details Feature Support Notes Notifications Alarm Motion Video Loss Disk Full Hard Disk Error To setup the device to send TCP notifications for cameras, right-click on the device in the Navigator and select Configure Device. On the Camera Tab’s Event Section, select the events you would like to receive per camera.
Appendix A: Device Settings Feature Support Notes Firmware Upload Yes To upload firmware to this device via TruVision Navigator, download the firmware file with file extension .tgz. Extract the .tar file to your desktop from the .tgz. Right-click on the device in the Navigator and select Upload Firmware. Browse for the .tar file when prompted. Execute the upload.
Appendix A: Device Details Feature Support Notes Streaming Limits 16 channel: 16 live or 16 playback streams per connection on 16 channel (maximum of 8 connections). 8 channel: 8 live or 8 playback streams per connection on 8 channel units (maximum of 8 connections). If Connection lease is transferred among users when connection limit is reached, the user whose connection is taken will be disconnected from device and all videos closed.
Appendix A: Device Settings Feature Support Notes TruVision Navigator Player Yes .video proprietary file format.
Appendix A: Device Details Feature Support Health Diagnostics Host Name IP Address MAC Address Equipment Name Model Name Hardware Revision Firmware Version Device Time/Date Current Client Connections Record Status First Recorded Video Latest Recorded Video Video Stored (Days) Video Stored (Hours) Physical Disk Model Name Physical Disk Count HDD Status HDD Capacity (Gb) HDD Temperature (C) HDD Temperature (F) Firmware Upload Yes Bulk Firmware Upload Yes Device Configuration Yes Notes To upload fi
Appendix A: Device Settings TruVision TVR40 (DVR) Feature Support Default Ports Video = 8000 (editable) Command and Control = 8000 (editable) Configuration = 8000 (editable) Notifications = 5001 (editable) Firmware Upload = 8000 (editable) Default Username / Password Administrator / 3477 Compression H.264 Connection Types TCP UDP Streaming Limits 24 Live or Playback streams simultaneously with a maximum of 6 streams per channel.
Appendix A: Device Details Feature Support Notes Stream Nomenclature The Main stream is referred to as: On-Screen-Display = Schedule Web Browser = Main stream TruVision Navigator = Main stream The Sub stream, Event, and Time Lapse streams are derivative configurations of the Main stream.
Appendix A: Device Settings Feature Support Notes Disk Analysis Alarm Motion Recorded Unknown Video Loss is not supported in disk analysis. Disk analysis takes approximately 45 to 90 seconds depending on the amount of recorded data on the device. Video Export Yes There will be approximately 4 seconds of additional video exported prior to the specified start time. TruVision Navigator Player Yes .mp4 proprietary file format.
Appendix A: Device Details Feature Support Notes Notifications Alarm Video Loss Motion Disk Full Disk Failure To setup the device to send TCP notifications for cameras, right-click on the device in the Navigator and select Configure Device. On the Camera Tab’s Event Section, select the events you would like to receive and set the schedules as appropriate. On the Camera Tab’s Rules Section, for each event type, ensure that “notify me” is selected. Repeat for each event type.
Appendix A: Device Settings Feature Support Bulk Configuration Yes Notes Remote Reboot Yes TruVision TVR41 / TVR42 (DVR) Feature Support Default Ports Video = 8000 (editable) Command and Control = 8000 (editable) Configuration = 8000 (editable) Notifications = 5001 (editable) Firmware Upload = 8000 (editable) Default Username / Password admin / 1234 Compression H.
Appendix A: Device Details Feature Support Notes Stream Nomenclature The Mainstream is referred to as: Event Stream is not supported on the device. On-Screen-Display = Time Lapse Web Browser = Mainstream TruVision Navigator = Mainstream The Sub stream is referred to as: On-Screen-Display = N/A Web Browser = Sub stream TruVision Navigator = Sub stream Playback Controls Play Pause Frame Advance Fast Forward (1x, 2x, 4x, 8x,16x) Slow motion (1.0x, 0.5x, 0.25x, 0.125x, 0.
Appendix A: Device Settings Feature Support Camera Search Alarm Event Motion Text Smart Search Yes Notes Browser only Point-of-Sale Text Yes Motion Yes Get the configuration for this device via TruVision Navigator and set the active zones on a per camera basis via the Motion Configuration option associated with each camera. Audio Yes There are 4 audio input per device. That input can be mapped to any camera on the device simply by enabling audio on that camera.
Appendix A: Device Details Feature Support Notes Notifications Alarm Video Loss Motion Disk Full Disk Failure To setup the device to send TCP notifications for cameras, right-click on the device in the Navigator and select Configure Device. On the Camera Tab’s Event Section, select the events you would like to receive and set the schedules as appropriate. On the Camera Tab’s Rules Section, for each event type, ensure that “notify me” is selected. Repeat for each event type.
Appendix A: Device Settings Feature Support Bulk Configuration Yes Device Log Support Yes Remote Reboot Yes Notes TruVision Generic TVR / TVN Feature Support Default Ports Video = 8000 (editable) Command and Control = 8000 (editable) Configuration = 8000 (editable) Notifications = 5001 (editable) Firmware Upload = 8000 (editable) Default Username / Password admin / 1234 Compression H.
Appendix A: Device Details Feature Support Notes Playback Controls Play Pause Frame Advance Fast Forward (1x, 2x, 4x, 8x) Slow motion (1.0x, 0.5x, 0.25x, 0.125x, 0.0625x) Frame Reverse and Rewind Speeds are directly dependant on the actual device capabilities. Video jumps back 4 seconds after resume playback from Fast Forward and Frame Advance.
Appendix A: Device Settings Feature Support Notes Audio Yes There are 4 audio input per device. That input can be mapped to any camera on the device simply by enabling audio on that camera. Access the setting by going to the device configuration, and enabling the audio option on the Recording Tab for each camera. If enabled, as soon as any camera from the device is added in the TruVision Navigator Viewer and selected, the audio will play.
Appendix A: Device Details TruVision TVR60 (Hybrid DVR) Feature Support Default Ports Video = 8000 (editable) Command and Control = 8000 (editable) Configuration = 8000 (editable) Notifications = 5001 (editable) Firmware Upload = 8000 (editable) Default Username / Password admin / 1234 Compression H.
Appendix A: Device Settings Feature Support Notes Stream Nomenclature The Main stream is referred to as: On-Screen-Display = Time Lapse Web Browser = Time Lapse TruVision Navigator = Main stream The Sub stream is referred to as: On-Screen-Display = Alarm Web Browser = Alarm TruVision Navigator = Sub stream The Event stream is referred to as: On-Screen-Display = N/A Web Browser = Event TruVision Navigator = Event The Schedule stream is referred to as: On-Screen-Display = Schedule Web Browser = Schedule
Appendix A: Device Details Feature Support Notes Instant Replay Yes There is a 2 to 5 minute video buffer in the device. While video is in the buffer, it cannot be viewed. Once the buffer fills, the video is written to the hard drive and is available for playback. This affects Instant Replay and the Playback button in TruVision Navigator. Those 2 features get their time increment from the user-defined Instant Replay configuration on the TruVision Navigator Server Properties Tab.
Appendix A: Device Settings Feature Support Notes Notifications Alarm Video Loss Motion Disk Full Disk Failure To setup the device to send TCP notifications for cameras, right-click on the device in the Navigator and select Configure Device. On the Camera Tab’s Event Section, select the events you would like to receive and set the schedules as appropriate. On the Camera Tab’s Rules Section, for each event type, ensure that “notify me” is selected. Repeat for each event type.
Appendix A: Device Details Feature Support Bulk Configuration Yes Remote Reboot Yes IP Cameras UTC CamPlus2 IP Models Firmware: UTCC-IP2VD-DN - V1.00E3 UTCC-IP2VD-DNP - V1.00E3 UTCC-IP2D - V1.00E2 UTCC-IP2D-P - V1.00E2) UTCC-IP2B - V1.00E2) UTCC-IP2B-P - V1.00E2) UTC UltraView IP - Firmware: UVC-IP-EVRDN-HR - 4.2.1, 53820 UVD-IP-EVRDNR - 4.2.1, 53820 UVC-IP-EVRDN-HR-P - 4.2.1, 53820 UVD-IP-EVRDNR-P - 4.2.1, 53820 UVC-IP-XP3DN-HR - 4.2.1, 53820 UVD-IP-XP3DNR - 4.2.1, 53820 UVC-IP-XP3DN-HR-P - 4.2.
Appendix A: Device Settings TruVision TVN10/20/21/50 (NVR) Feature Support Default Ports Video = 8000 (editable) Command and Control = 8000 (editable) Configuration = 8000 (editable) Notifications = 5001 (editable) Firmware Upload = 8000 (editable) Default Username / Password admin / 1234 Compression H.264 Connection Types TCP UDP Streaming Limits TVN20: 48 Live or Playback streams simultaneously with a maximum of 6 streams per channel.
Appendix A: Device Details Feature Support Stream Nomenclature The Main stream is referred to as: On-Screen-Display = Time Lapse Web Browser = Time Lapse TruVision Navigator = Main stream Notes The Sub stream is referred to as: On-Screen-Display = Alarm Web Browser = Alarm TruVision Navigator = Sub stream The Event stream is referred to as: On-Screen-Display = N/A Web Browser = Event TruVision Navigator = Event The Schedule stream is referred to as: On-Screen-Display = Schedule Web Browser = Schedule
Appendix A: Device Settings Feature Support Notes Instant Replay Yes There is a 2 to 5 minute video buffer in the device. While video is in the buffer, it cannot be viewed. Once the buffer fills, the video is written to the hard drive and is available for playback. This affects Instant Replay and the Playback button in TruVision Navigator. Those 2 features get their time increment from the user-defined Instant Replay configuration on the TruVision Navigator Server Properties Tab.
Appendix A: Device Details Feature Support Notes Notifications Alarm Video Loss Motion Disk Full Disk Failure To setup the device to send TCP notifications for cameras, right-click on the device in the Navigator and select Configure Device. On the Camera Tab’s Event Section, select the events you would like to receive and set the schedules as appropriate. On the Camera Tab’s Rules Section, for each event type, ensure that “notify me” is selected. Repeat for each event type.
Appendix A: Device Settings Feature Support Bulk Configuration Yes Remote Reboot Yes IP Cameras UTC CamPlus2 IP Models Firmware: UTCC-IP2VD-DN - V1.00E3 UTCC-IP2VD-DNP - V1.00E3 UTCC-IP2D - V1.00E2 UTCC-IP2D-P - V1.00E2) UTCC-IP2B - V1.00E2) UTCC-IP2B-P - V1.00E2) Notes See “device feature matrix” at www.interlogix.com for updated information. UTC UltraView IP - Firmware: UVC-IP-EVRDN-HR - 4.2.1, 53820 UVD-IP-EVRDNR - 4.2.1, 53820 UVC-IP-EVRDN-HR-P - 4.2.1, 53820 UVD-IP-EVRDNR-P - 4.2.
Appendix A: Device Details TruVision TVN40 (NVR) Feature Support Notes Default Ports Video = 3000 (editable) Command and Control = 3000 (editable) Configuration = 3000 (editable) Notifications = 4444 (un-editable) Firmware Upload = 3000 (editable) PTZ = 3000 These are the recommended ports between TruVision Navigator and the TVN40. It is not recommended to restrict ports between the TVN40 and the actual IP cameras themselves.
Appendix A: Device Settings Feature Support Disk Analysis Alarm Recorded Unknown Video Export Yes Notes TruVision Navigator Yes Player .mp4 proprietary file format. PTZ Control Yes When configuring PTZ on the UltraView Encoder connected to the Legend IP camera, set the Protocol in TruVision Navigator to “Kalatel” and the protocol to ge ASCII on the physical ge Legend IP camera (Protocol #5 list).
Appendix A: Device Details Feature Support Health Diagnostics Host Name IP Address Subnet Mask Gateway MAC Address NIC Name NIC Type Equipment Name Model Name Serial Number Hardware Revision Firmware Version Build Date Device Date/Time Memory Size Number Of CPUs Number of Power Supplies Diagnostic Date/Time Device Responded Power On Duration Fan Status Device Temperature (C) Device Temperature (F) HDD Status Running Voltages Total Device Health Logical Disk Count Logical Disk Volume Name(s) Logical Disk
Appendix A: Device Settings Feature Support Notes Device Configuration Yes Allow at least 2 minutes between TVN40 configurations. If two TruVision Navigator clients (i.e. two stand-alone installs) push configurations simultaneously to the same TVN40, there is a chance that the TVN40 settings will become corrupted. The user will need to “Repair Device” from TruVision Navigator via the right-click context menu. Bulk Configuration Yes Remote Reboot Yes 158 TruVision Navigator 5.
Appendix A: Device Details Feature Support Notes IP Cameras UTC Legend – Firmware: Legend (NTSC or PAL) 3.77 UTC Legend IP camera (NTSC) now available with 7.5 frame rate in both FULL and CIF. When the UltraView IP Camera is rebooted, the camera Date/Time will be set to January 1st, 2003 and will require approximately 5 minutes to re-sync with NTP server. Within that 5 minutes time period, Instant replay is not available and will show the “No folder” image.
Appendix A: Device Settings Feature Support How to assign the TVN40 an IP Address The TruVision NVR 40 is designed for configuration and installation through an Ethernet network. Follow these steps to change the TVN40's default IP Address for use on your network. Launch your web browser and connect to the TVN40 via its default IP Address of 192.168.1.2. Access the device configuration window, by selecting Administration from the main menu. Enter username: admin and Password: admin on the login screen.
Appendix A: Device Details Feature Support Notes How to add the TruVision Navigator requires the TVN40 TVN40 to TruVision and its associated IP Cameras to be Navigator synched to a common time. If the devices have disparate times, problems will occur during playback and disk analysis. To maintain time synchronization, TruVision Navigator features an internal NTP Service that should be enabled before you add the TVN40/IP Cameras.
Appendix A: Device Settings Feature Support How to configure the TVN40 To configure the TVN40 right-click on the device in the Navigator panel and select Configure Device. The TVN40 Configuration dialog will open. There are 4 tabs on this Configuration Form: Network, Recording, Alarm, and System. The dialog will store your changes as you toggle from one tab to another. Please make all of your configurations on the tabs first and then click Save once.
Appendix A: Device Details Feature Support The Recording Tab Recording Summary – provides the user an overall recording summary for the device based upon what has been configured. Storage Estimator – allows the user to simulate number of days of storage based upon total device bandwidth usage. Camera Stream Detail – provides the user a summary by stream of the configuration details. This is not editable.
Appendix A: Device Settings Feature Support The System Tab The System tab contains un-editable, firmware version information for the TVN40. 164 Notes TruVision Navigator 5.
Appendix A: Device Details Feature Support How to add IP Cameras on the TVN40 Once you have successfully configured the TVN40, right-click on the TVN40 and select Add Cameras. The Add Cameras dialog will appear. This form is designed to quickly add IP Cameras to the system WITHOUT having to do deep configuration of the IP Camera upon time of addition. We have selected default configurations for each IP Camera that keep the bit rates low enough to allow for video viewing on most networks.
Appendix A: Device Settings Feature Support How to change the default configurations of the IP Cameras on the TVN40 If you would like to tweak the default configurations of the IP Cameras after they have been added, right-click on the camera and select Configure Camera. The Camera Configuration Form will open in a dialog with 2 tabs - Camera and Video. The Camera Tab Edit any of the fields that you previously entered on the Add Camera form.
Appendix A: Device Details Feature Support The Video Tab Enabled - For applicable cameras, you will have the ability to enable an Alternate Stream. Live Stream - if there is an Alternate Stream, you will have the ability to designate, which one you would like to use for Live Video. Recording Type - Continuous, Event, or None. Low Bandwidth – enable the primary or alternate stream for low bandwidth functions including Live, Live+Recorded, or Off.
Appendix A: Device Settings Feature Support What are the options in the TVN40 context menu When you right-click on a device or node in the Navigator, you see a context menu with functional choices for that device. This purpose of this section is to explain each of the choices with respect to the TVN40 context menu. 168 Notes Repair Device - Should, for any reason, your TVN40's configuration become corrupted, there are 2 options to restore it to use.
Appendix A: Device Details Feature Support Troubleshooting – Video Loss This means there is no video streaming from the IP Camera itself. Things to consider: Ping the IP Camera for Ethernet connectivity. Potential IP Address conflicts on the network. The bit rate for the stream exceeds bandwidth availability. A single IP Camera has been added to multiple TVN40s.
Appendix A: Device Settings Feature Support Troubleshooting – Black Video Tile This means something is blocking the video stream from displaying. Things to consider: The 3000 port or the port you changed it to is blocked on the network. Anti-Virus or Windows Firewall is blocking the video (You may need to add TruVision Navigator to the Application Exception List as per the screen shot below) Network bandwidth is too low to support the current cameras video stream.
Appendix A: Device Details TruVision Software Video Recorder (SVR) Feature Support Default Ports Video = 554 (default RTP) Command and Control =554 (default RTP - editable) Default Username / Password N/A Compression H.
Appendix A: Device Settings Feature Support Tours Yes Camera Search Alarm Event Motion Motion Yes Audio Yes Bi-directional Audio No Notifications Alarm Video Loss Motion Disk Full Disk Failure Notes Health Diagnostics IP Address Firmware Version Device Date/Time Total Device Health Recording Location Recording Capacity Left(TB) Recording Capacity Protected (TB) Recording Retension Period Firmware Upload No Bulk Firmware Upload No Device Configuration Yes Bulk Configuration Yes Remote
Appendix A: Device Details different platforms. TruVision Navigator now supports analog DVRs, hybrid DVRs (both analog and IP), NVRs, and TruVision SVR for COTS servers. The table below outlines the 3 OOBEs and the differences between them.
Appendix A: Device Settings DVR HYBRID DVR NVR IP Cameras Install IP cameras on network Apply IP address Install IP cameras on network Configure IP camera via the Apply IP address native browser of that IP camera Add IP camera to the device via the device OSD (optional) UltraView, or TruVision Encoders and IP Cameras Install UltraView, or TruVision Encoders and IP cameras on network Apply IP address Apply NTSC or PAL configuration (optional) Add UltraView Encoders and IP cameras to the device via the de
Appendix A: Device Details DVR HYBRID DVR NVR STEP 5 – LICENSING (SVR ONLY) Add purchased SVR server and camera licenses via Licensing Tool located in Help menu.
Appendix A: Device Settings DVR HYBRID DVR NVR UltraView or TruVision Encoders and IP Cameras UltraView or TruVision Encoders and IP cameras that were added via the device OSD in Step 2 will automatically show up under the device in the Navigator upon addition to TruVision Navigator TruVision Navigator will pull the camera configuration, check for valid settings based upon TVR60 limitations, and after the compare, either push a default (NTSC or PAL) configuration to the UltraView Encoders and IP cameras
Appendix A: Device Details DVR HYBRID DVR UltraView Encoders and IP Cameras Make additional UltraView Encoder and IP camera configurations remotely via TruVision Navigator’s “Configuration” Form as needed TruVision Navigator 5.
Appendix B: Microsoft IIS Setup Appendix B Microsoft IIS Setup Microsoft IIS Setup TruVision Navigator client server model requires IIS and ASP.NET to be installed in order to operate correctly. When setting up IIS please use the following instructions. Step 1: Click Start Control PanelUninstall a Program OR Program & Features. Step 2: Click on Turn Windows Features on or off on left side panel. To enable the IIS, select the Internet Information Services option: 178 TruVision Navigator 5.
Appendix B: Microsoft IIS Setup Step 3: Expand the “Internet Information Services” and then expand the “World Wide Web Services” and “Application Development Features”. Check the check Box ASP.NET. All other check boxes should already be checked automatically as shown in the figure below. TruVision Navigator 5.
Appendix B: Microsoft IIS Setup Note: Windows 8 has slightly different options for ASP.NET. Please select ASP.NET 4.5 as shown in the following figure. 180 TruVision Navigator 5.
Appendix B: Microsoft IIS Setup Step: 4. Click the OK button and then wait until the IIS is installed with all the ASP.Net features. Note: If IIS is already enabled but not configured for ASP.NET, repeat the steps 3 and 4 to enable the ASP.Net feature TruVision Navigator 5.