
User Manual


10BChapter 11: Alarm settings
TruVision NVR 50 User Manual 97
screen to also alert you. See “Status information” on page 27 for further
information.
The system notifications include:
• HDD Full: All installed HDDs are full (overwrite option is disabled).
• HDD Error: Errors occurred while files were being written to the HDD, no
HDD installed or HDD had failed to initialize.
• Network Disconnected: Disconnected network cable.
• IP Conflicted: Conflict in IP address setting.
• Illegal Login: Wrong user ID or password used.
• Abnormal Record: Recording failed due to encoder or HDD problems.
See “Description of alarm notification types” on page 91 for information on the
different alarm notification types available.
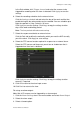
To set up system notifications:
1. Click the Alarm settings icon in the menu toolbar and select Notification.
2. Select a notification type. See “Description of alarm notification types” on
page 91 for more information.
3. Check one or more response options: Audible warning, notify surveillance
center, send e-mail, trigger alarm output.
4. Click Apply to save the settings.
Detecting video loss
Video may be lost if the video cable or camera develop a fault or are damaged.
You can set up the NVR to detect video loss and trigger a system notification.
To setup video loss detection:
1. Click the Camera management icon in the menu toolbar and select Video
Loss.
2. Select a camera to configure for video loss detection.
3. Check the Enable Video Loss Alarm box to enable the feature.
4. Click Rules next to the Video Loss Detection box to enter the Rules screen.
5. Click the Rule tab and select how you want the NVR to notify you of video
loss. Click Apply to save the settings and then clock OK to return to the
previous screen.
6. Click the Arming Schedule tab and select the schedule of when you want
video loss detection to be enabled. Schedule can be set for all week or any
day of the week with up to 8 time periods per day.
7. Click the Apply button to save settings.