
User Manual User guide
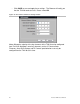
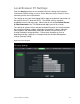
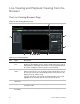
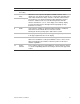
Table Of Contents
- Chapter 1 TVN 20 System Basics
- Chapter 2 TVN Advanced Topics
- HDD Configuration & Management
- Account Management (Users)
- Advanced Camera Settings
- Exception Parameters – System Health Monitoring
- Video Loss
- Remote Record & Video Download
- Additional Network Settings
- Remote Update
- Serial Port Settings – RS-232 & RS-485
- Log Files
- Appendix A Troubleshooting
- Appendix B TVN 20 Specifications
- Appendix C TVN 20 IP Camera Capacities
- Appendix D TVN 20 Supported IP Cameras
- Appendix E TVN 20 USB Archive Options
- Appendix F TruVision Device Finder
- Appendix GGlossary of Terms
- Appendix HWarranty and Support
54 TruVision NVR 20 User Manual
Searching for Video
The process for searching for video is:
• Select the camera that you wish to search for video on. Only one camera
may be played back at a time.
• Select the day you wish to view video (Day-Search) from OR for the specific
day enter a specific time (Time-Search) to localize the search.
• Press Search (or GO to, if time range search). The video is loaded in the
timeline below the video display window. Schedule Recording (Time-lapse)
video is in blue and Motion or Alarm Input recording is in Red.
• The User controls the display via the Playback controls. The available
controls are:
• Play/Pause
• Stop
• Fast Forward (multiple steps …2x, 4x, 8x)
• Frame Advance
Note: Rewind is not supported in the browser.
• The User can also control where playback time is by placing their mouse in
the time bar and dragging the time display to the desired placement in the
vertical pointer. As the time bar is move across the vertical pointer, the time
updates so the user can see the current time under the vertical pointer.
Day Search
Select the Date to view video from and press the Search icon.
Day and Time Search
Select the Date to view video from and click the symbol to enter a specific time to
go to for playback.
After entering the desired time, press the Go to button.