
User Manual User guide

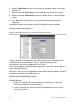
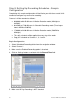
Table Of Contents
- Chapter 1 TVN 20 System Basics
- Chapter 2 TVN Advanced Topics
- HDD Configuration & Management
- Account Management (Users)
- Advanced Camera Settings
- Exception Parameters – System Health Monitoring
- Video Loss
- Remote Record & Video Download
- Additional Network Settings
- Remote Update
- Serial Port Settings – RS-232 & RS-485
- Log Files
- Appendix A Troubleshooting
- Appendix B TVN 20 Specifications
- Appendix C TVN 20 IP Camera Capacities
- Appendix D TVN 20 Supported IP Cameras
- Appendix E TVN 20 USB Archive Options
- Appendix F TruVision Device Finder
- Appendix GGlossary of Terms
- Appendix HWarranty and Support
30 TruVision NVR 20 User Manual
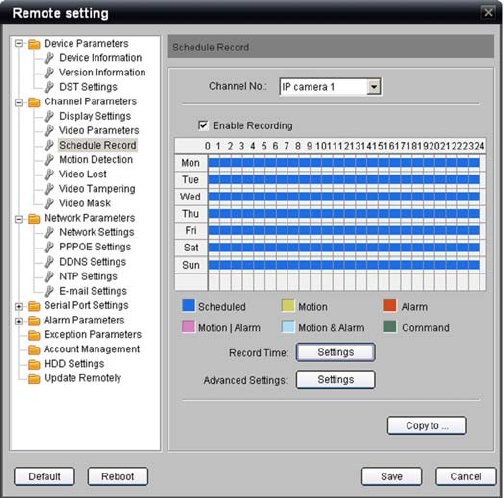
Step 8: Setting Up Recording Schedules - Sample
Configuration
Completing this sample configuration will familiarize you with the essential skills
needed to configure any camera for recording.
Camera 1 will be recorded as follows:
00:00:00 to 06:45:00 hours in Motion Detection mode (Midnight to
6:45AM).
06:45:00 to 17:00:00 hours in Schedule Recording mode (Time-Lapse
from 6:45AM to 5:00PM).
17:00:00 to 24:00:00 hours in Motion Detection mode (5:00PM to
Midnight).
This daily schedule will be applied for every day of the week.
Copy this schedule to Cameras 1, 2, 3 and 4.
Begin Configuration
1. Select Scheduled Recording folder from the navigation window.
2. Select Camera 1.
3. Make sure the Enabled Recording option is checked.
4. Click on Settings button associated with the Record Time field.
5. Make sure All Day Recording is NOT checked.