
User Manual User guide
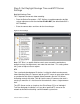
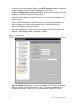
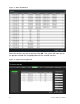
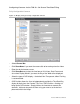
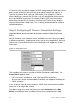
Table Of Contents
- Chapter 1 TVN 20 System Basics
- Chapter 2 TVN Advanced Topics
- HDD Configuration & Management
- Account Management (Users)
- Advanced Camera Settings
- Exception Parameters – System Health Monitoring
- Video Loss
- Remote Record & Video Download
- Additional Network Settings
- Remote Update
- Serial Port Settings – RS-232 & RS-485
- Log Files
- Appendix A Troubleshooting
- Appendix B TVN 20 Specifications
- Appendix C TVN 20 IP Camera Capacities
- Appendix D TVN 20 Supported IP Cameras
- Appendix E TVN 20 USB Archive Options
- Appendix F TruVision Device Finder
- Appendix GGlossary of Terms
- Appendix HWarranty and Support
TruVision NVR 20 User Manual 21
Clicking on the Channel No. for each line, the IP Camera Config panel on the
right will display additional details about the configured camera.
Please Note: The Online/Offline status will not automatically refresh its status
and may take a few minutes before its status will be available. Press F5 to
refresh the page.
Alternative Add – Manual Process
Should the desired IP camera not support Auto-Discovery or if other network
issues inhibit auto-discovery, the user can manually add cameras.
• Select the channel number (D1, D2, D3…..); this will allow the USER to
populate the IP Camera Config panel (on the right of the screen).
• Login Mode = IP (or Domain)
• Manually input the IP Address or Dormain.
• Select the IP camera/encoder manufacturer from the drop down list.
• Select the communication port used by the camera (per the IP camera
manufacturer’s specifications usually port 8000 or 80).
• Enter the IP Camera’s User Name and Password.
• Channel No. only applies if the device connected is a multi-channel encoder,
the default value of 1 should be sufficient for most installations.
• Press Modify to add the camera.
• The camera will show up in the list if the setup parameters are correct.
Step 5: Configure IP Camera - Device Settings
Depending on the IP Camera model, the IP Camera titles, on-screen display
(OSD), frame rate resolution and activity detection may be configured within the
TVN 20 Browser. In the cases where functionality within the browser does not
support configuration, the User can link to the IP camera web page and
configured the desired parameters.
There is a chart at the end of this guide that shows the current list of supported
cameras and their capabilities. Please check with your Interlogix representative
for the latest list of supported cameras.