
User Manual User guide
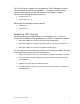

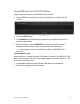
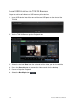
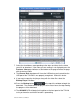
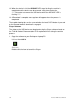
Table Of Contents
- Chapter 1 TVN 20 System Basics
- Chapter 2 TVN Advanced Topics
- HDD Configuration & Management
- Account Management (Users)
- Advanced Camera Settings
- Exception Parameters – System Health Monitoring
- Video Loss
- Remote Record & Video Download
- Additional Network Settings
- Remote Update
- Serial Port Settings – RS-232 & RS-485
- Log Files
- Appendix A Troubleshooting
- Appendix B TVN 20 Specifications
- Appendix C TVN 20 IP Camera Capacities
- Appendix D TVN 20 Supported IP Cameras
- Appendix E TVN 20 USB Archive Options
- Appendix F TruVision Device Finder
- Appendix GGlossary of Terms
- Appendix HWarranty and Support
TruVision NVR 20 User Manual 133
7. Select the check boxes corresponding to the dates and times for the video
you wish to download. If the video you are seeking is not displayed press the
Previous / Next page indicators at the bottom of the page to locate the page
with the desired video.
8. The Choose Disk drop-down will show the USB device you inserted into the
USB port of the TVN 20 if it was properly recognized. Select this device.
9. If you want to copy the mini-player along with the video files select the
Backup Player checkbox.
10. Press the Backup button at the top of the window to begin the
download. The window will be display an active status bar at the top showing
the progress of the download.
11. The ARCHIVE LED will begin flashing blue on the front panel of the TVN 20
to let you know the archive off function is proceeding