
Manual


INTELLITRACK CHECK IN-OUT V8.1
User Manual
112
form so that they will be available as selections in the various Check In-
Out forms. After you have enabled the Sites option and entered your sites
into the Sites form, be sure to assign the default site, site viewing privi-
leges, and site modification privileges at the Local Site Settings form.
Note: The site {0} is a system default site that is used when the Site field is
disabled (when multiple sites are not enabled).
Please refer to the instructions that follow for more information on work-
ing with the Site form. Please refer to
“Setting Site Options” on page 66for
more information about setting site privileges. To add locations to a site,
please see
“Adding a Location to a Site” on page 138.
Adding a Site To add a site to Check In-Out:
Warning: When entering data in the application, DO NOT USE special
characters or quotes with the exception of dashes, dots and spaces. Except
for dashes, dots, and spaces, if you use special characters or quotes when
entering data in the application, the database will become corrupted. For
more information, please refer to
“Precautions When Entering Data” on
page 42.
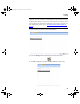
1. Select Manage > Lookup Tables > Site option in the ribbon.
2. The Site form appears:
2283.book Page 112 Thursday, July 7, 2011 2:29 PM