AWARE Flood Advance Warning Equipment IoT Flood Inundation Sensor User Guide Intellisense Systems, Inc.
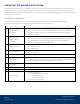
OPERATING THE AWARE FLOOD SYSTEM The AWARE Flood System was designed with simple commands and an open architecture that will work with nearly every existing network or platform. This document explains the commands, initialization, and website navigation at https://flashflood.info so that users can set up their AWARE Flood System and access their data within minutes. AWARE Flood Commands The AWARE Flood Node can be remotely configured and commanded via two-way cellular LTE-M communication.
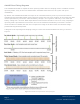
AWARE Flood Timing Diagrams The AWARE Flood Node is capable of three reporting modes and two sampling modes. In addition to these reporting modes, if any of the user-defined alarm thresholds have been met, the system will report immediately. By default, the AWARE Flood Node will report in an automated mode to preserve power and maximize operation during extended weather events that prevent the unit from solar recharge.
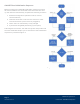
AWARE Flood Initialization Sequence Before turning on the AWARE Flood Node, please ensure that all sensors/modules are connected to the main node. On startup, the node will automatically complete the following functions: 1. Establish configuration (initialize camera, sensors, communications) 2. Calibrate the Water Level Pressure Sensor for water level measurement (sensor must be plugged in) 3. Inform the user if the battery is fully charged 4.
SOFTWARE CONTROL FOR THE AWARE FLOOD SYSTEM The AWARE Flood System integrates into existing software by utilizing a direct connection via the standard TCP/IP protocol. This protocol is an open standard utilized by most Internet-based data servers. In addition, the code and packet structure with integration instructions can be provided to integrate sensor data into almost any existing server network.
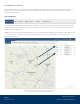
Navigating the Website After logging into the user account, the main dashboard is displayed on the screen (as shown in Figure 3 below). This screen is organized by five tabs towards top of the screen which are used for the overall network management. MAP OVERVIEW This tab shows a map with the locations of AWARE Flood System on the left, and a list of all nodes on the right. The map can be zoomed in or out, and when the mouse is not on a unit icon, the map can be moved left to right or up and down.
Clicking on the pencil icon next to each unit in the Devices panel will open the “Edit Device” window where users can change the organization’s name and the device’s alias. Figure 4: The “Edit Device” Window Intellisense Systems Inc.
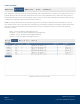
ALERT SETTINGS This tab allows the user to set up destination SMS and email addresses. Each device assigned to the user is prepopulated to this tab. For each desired unit check the “Alert Enabled (Input)” check box and insert the desired destination into the “Alert Email(s) (Input)” text box. Once these changes have been made click the “Change Alert Settings” button at the bottom of the list. NOTE: If multiple destinations are desired, simply insert a comma in between each destination.
IMAGE SCHEDULE This tab is for units that are equipped with a water-resistant camera module. It allows the user to schedule specific days and times for the unit to capture an image. It also enables the unit to visually verify conditions outside of events. Each device assigned to the user is prepopulated to this tab. For each desired unit, check the “Schedule Enabled (Input)” check box and use the drop-down boxes to set the day and time (UTC) of the desired schedule.
EXPORT This tab allows the user to export data for desired units to either a .csv or Excel spreadsheet. Follow the following steps to access the historical data: 1. 2. 3. 4. 5. Set the time constraints of the desired data Select the unit from the list Select the desired data points Select the file format Click “Export” Figure 7: The Export Window Intellisense Systems Inc.
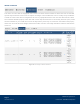
COMMAND QUEUE This tab allows users to see the commands that have been requested of each unit. The default window is set to the last day. You may change the window by clicking on the clock icon near the top of the tab. To view the data easily, the user may click the top of each column to sort the entries in ascending or descending order. Figure 8: The Command Queue Window Intellisense Systems Inc.
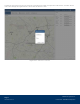
Accessing the Unit Dashboard Clicking on an active icon will pop-up a preview window with the current data (as shown in Figure 3). Clicking on “Go To Unit Dashboard” or on any item from the list to the right will make the website navigate to the Unit Dashboard, which displays complete details of the unit. Figure 9: Navigating to the Unit Dashboard The Unit Dashboard shows the following information: 1. 2. 3. 4. 5. 6.
Figure 10: The Unit Dashboard Intellisense Systems Inc.
Mean Sea Level (MSL) Setting The Mean Sea Level (MSL) setting allows the user to know the exact water height relative to other structures with a known elevation from sea level. To enable this function, a surveyed WLP sensor elevation must be entered into the Elevation text box at the bottom of the unit dashboard, (as shown in the image below). Once the elevation is entered, press the “Set Elevation” button next to the text box.
The Unit Dashboard also enables the user to make changes to the unit settings. These settings are listed on page 1, along with manual overrides of both GPS location and elevation. For more information, please see page 1. Figure 12: Unit Dashboard Settings Tab NOTE: Any parameter that appears in RED text or showing “-9999” is NOT reporting correctly. If you experience this issue, please check the connection point of the unit.
The user can update the email address and account password by opening the menu at the top right of the page and going to “Profile.” The user’s email address should be current so that notifications of website maintenance and other pertinent updates can be quickly and efficiently communicated to the right person. The user can also log out by opening the same menu (as shown in Figure 7 below). Figure 13: The Profile and Logout Menu. Phone: 310-320-1827 Email: Info@intellisenseinc.com www.intellisenseinc.