
User manual


inStallation
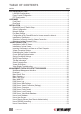
Before installing the Digital KVM over IP Switch, take a moment to make sure you have the
following components on hand to ensure a proper setup. (See Appendix B for sample images.)
• Suitable (USB or PS/2) combo KVM cables (or, for added convenience, combo-free cables)
to connect the switch to the keyboard, video and mouse ports of each PC.
• Monitor with standard D-sub 15-pin video connector (HDB15) for each PC.
• Standard PS/2 Microsoft or Logitech keyboard.
• Standard PS/2 Microsoft- or Logitech-compatible ve-key mouse.
• Daisy chain cable (HDB15 male to HDB15 female) as needed for cascade congurations
using conventional 8- or 16-port KVM switches (models 503471 and 503396).
• Terminator (if daisy-chaining) to plug into Daisy Chain Out port of last KVM switch in chain.
Digital KVM over IP Switch Setup
1. Plug the included power adapter into the switch and an AC source, then turn on the switch.
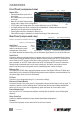
2. Set up your local console by connecting a keyboard, monitor and mouse to the corresponding
Console (keyboard, video and mouse) ports on the switch (see Rear Panel above). NOTE:
Refer to Appendix A for an introduction to basic local console operation.
3. Connect to one or more computers/servers as described below. NOTE: Make sure that PS/2
computers are turned off before connecting to the switch; otherwise, the non-Plug and Play
interfaces may not recognize the PS/2 keyboard and mouse later in the install procedure.
• Single Server Mode (see Page 5 conguration image): To use just one server or computer,
simply connect to a PC port with an appropriate (USB or PS/2) combo cable.
• Multiple Server Mode (see Page 6 conguration image): To connect to multiple servers/
computers, add a conventional KVM switch to the conguration by connecting the Daisy
Chain Out port of the Digital KVM over IP Switch to the Daisy Chain In port of the second
KVM switch, which is then connected to additional computers/servers as desired.
4. Boot up connected computers (if not yet powered on and verify the connections. NOTE:
Do not use both USB and PS/2 keyboard connectors on a computer simultaneously.
Server Conguration
Mouse Acceleration
Mouse acceleration is not supported by the
Digital KVM over IP Switch, so any such
function (including any “Snap To” option)
needs to be deactivated on all connected
servers.
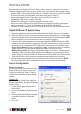
Windows XP:
Go to the Mouse Control Panel, select the
Mouse Properties tab, then go to the Pointer
Options screen.
1. Set the pointer speed slide bar to the
exact middle.
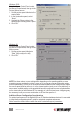
2. Uncheck the “Enhance pointer precision”
option.
3. Uncheck the “Automatically move pointer
to the default button in a dialog box”
option.
4. Click “OK.”
9
INSTALLATION