
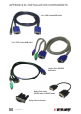
User manual


example, ScrLk, ScrlLk, 0, 3, 0, 7 would select the computer connected to Bank 3, Port 7.
In a single-switch conguration, however, enter “01” as the bank number — (a) and (b) — in
the hotkey sequence, as this is the default for each individual (and in this case, single) switch.
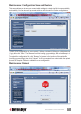
• OSD: With the OSD menu activated (ScrLk, ScrLk, Space Bar), use the cursor keys to
navigate to the desired channel and press Enter. In a daisy-chain conguration, rst select
the correct bank using the Page Up or Page Down keys.
Next Lower Channel
• Front-panel buttons: Press the corresponding button.
• Hotkeys: ScrLk, ScrLk, Up arrow (since the lower-numbered channel would be in a “higher”
position if displayed in a list).
• OSD: Navigate to and select the corresponding item on the menu.
Next Higher Channel
• Front-panel buttons: Press the corresponding button.
• Hotkeys: ScrLk, ScrLk, Down arrow (since the higher-numbered channel would be in a
“lower” position if displayed in a list).
• OSD: Navigate to and select the corresponding item on the menu.
Next Lower Bank (within a daisy-chain)
• Front-panel buttons: Press the corresponding Port-Switching button on the appropriate
cascaded switch in the conguration.
• Hotkeys: ScrLk, ScrLk, Page Down.
• OSD: Press Page Up.
Next Higher Bank (within a daisy-chain)
• Front-panel buttons: Press the corresponding Port-Switching button on the appropriate
cascaded switch in the conguration.
• Hotkeys: ScrLk, ScrLk, Page Up.
• OSD: Press Page Down.
Beep On/Off
While autoscanning, port-switching or issuing a hotkey command, a beep will sound. If you
want to turn this beeping on or off, use the hotkey sequence ScrLk, ScrLk, B.
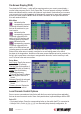
OSD Title Bar On/Off
The OSD title bar, which displays the computer name, can be toggled on or off by using the
hotkey sequence ScrLk, ScrLk, T.
OSD Title Bar Position
The OSD title bar can be positioned on either the left or right side of the screen. On the Setup
menu, navigate to the Title Bar option, press Enter to select, then use the cursor keys to
position. The default position is the left side.
Auto Logout
On the OSD Setup menu, navigate to the Auto Logout option, press Enter to select, then
make the desired change to the value (0 - 99 minutes. Auto Logout is disabled by default,
indicated by 00.
63
APPENDIX A