
User manual


control unit is connected.
• Exclude some computers from the auto-scanning process.
• Refrain from generating alarms for some computers.
NOTE: You can also work without supplying any computer information. In this case, just keep
the values by default. You’ll have to remember on which KVM port your computers are attached
and generate the specic KVM hot keys by hand. (This is the way most low-end IP KVM
extenders work.) After you’ve made all modications, click “Store Settings,” then “Apply Settings”/
“Restart Servers.”
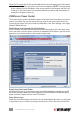
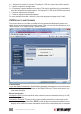
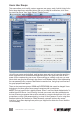
Select the KVM Switch in the Daisy Chain
The various settings on this screen are KVM-switch-specic as well as KVM-port-specic because
a computer is rst identied by the KVM switch and the KVM port it is attached to. Before
conguring any port-specic settings, choose the KVM switch on which you will congure these
settings.
Select the Port Number
Select the KVM port on which your subsequent settings on this screen are directed. You can
use the drop-down menu as well as use the “Previous” and “Next” buttons to navigate to a
specic port.
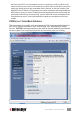
Computer Name
Enter a character string (32 characters maximum) to identify the computer attached to the
selected port. NOTE: The computer names you specify here for each port will appear in the
Windows and Java viewers.
Scanning
If you don’t want a computer included in auto-scanning, select “Do not include in Scanning
Process.” Thus, you can place a specic computer “off your radar screen” if it is of no monitoring
importance.
Alarms
If you don’t want the scanning process to generate alarms or SNMP messages for this specic
(selected) computer, select “Do not Generate Alarms” to exclude it.
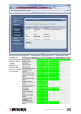
Power Management
If you require power control for your connected computers, you can connect a serial power
control (SPC) device to the serial port on the rear panel of the switch, and then enable the
switch’s power control feature. By doing so, remote users can perform power on/off and power
cycling either via the viewer interface or by a pre-dened alarm-triggered action. The switch can
support most standard serial power control devices via its serial port (RJ12) on the rear panel.
(For details about enabling the switch’s power control feature, refer to the Power Control section
below.)
When using a power control device, note that some newer computers will require
some BIOS option adjustment to restart when power is coming back; otherwise, they will not
restart without pressing the computer power button. Usually, you should enable the Power Loss
Restart option on your computer BIOS (or similar option, depending on the BIOS vendor) so
that your computer can boot up when the power control device is feeding power again.
Power Down Command: Specify the command that must be sent to the power control unit to
power down the computer. (Refer to your power control unit documentation.) NOTE: To
remotely power down this computer from the Windows or Java viewers, switch to this
computer and then click “Power off” in the viewer menu. The command specied here will
be sent automatically by the switch to the power control unit.
Delay: Specify the delay time between the sending of power-down and power-on commands
to complete a power cycling. A power cycling is processed only if you’ve selected “Restart
Computer” on the Alarms screen. By default, this delay is 5 seconds.
43
MANAGEMENT OVER A BROWSER