Digital KVM over IP Switch user manual Models 503723 & 503730 Shown: 16-Port , Model 503730 INT-503723/503730-UM-0808-01
introduction Thank you for purchasing the INTELLINET NETWORK SOLUTIONS™ Digital KVM over IP Switch, Model 503723 (8-Port) or Model 503730 (16-Port). This switch is the perfect solution for any organization that demands secure and flexible local and remote administration of its critical systems, offering revolutionized remote server management by combining industry-leading remote control technology with a proven Enterprise-class digital KVM switch.
table of contents section page SYSTEM ARCHITECTURE................................................................................................... 5 LAN/WAN Configurations.............................................................................................. 5 Power Control Configuration......................................................................................... 6 PPP Configuration.................................................................................................
Alarms: E-mails............................................................................................................ 54 Alarms: SNMP (Traps)................................................................................................. 55 Alarms: Selection......................................................................................................... 56 Maintenance: Software Version...................................................................................
Daisy-chained (cascaded) with other switches Tampa Power Control Configuration Connected to a remote power control device SYSTEM ARCHITECTURE
PPP Configuration Set up as a PPP server to accept dial-in requests from a remote PPP client via a modem Set up as a PPP client to dial out to an ISP for remote clients to access via the Internet SYSTEM ARCHITECTURE
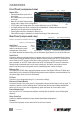
hardware Front Panel (compressed view) Selected Live Bank no. Status LEDs • Selected identifies a port with a green light. • Live identifies an on-line port with a red light. • Bank No. identifies this particular Power switch within a daisy-chain configuration. Port-switching buttons (8-port model shown) 10/100 Link Video • 10/100 lights solid orange when the current digital link runs at 100 Mbps.
installation Before installing the Digital KVM over IP Switch, take a moment to make sure you have the following components on hand to ensure a proper setup. (See Appendix B for sample images.) • Suitable (USB or PS/2) combo KVM cables (or, for added convenience, combo-free cables) to connect the switch to the keyboard, video and mouse ports of each PC. • Monitor with standard D-sub 15-pin video connector (HDB15) for each PC. • Standard PS/2 Microsoft or Logitech keyboard.
Windows 2000: Go to the Mouse Control Panel, select the Mouse Properties tab, then go to the Pointer Options screen. 1. Set the pointer speed slide bar to the exact middle. 2. In the Acceleration panel, select “None.” 3. Uncheck the “Move pointer to the default button in dialog boxes” option. 4. Click “OK.” Windows 98: Go to the Mouse Control Panel, select the Mouse Properties tab, then go to the Motion screen. 1. Set the pointer speed slide bar to “Slow” (all the way to the left). 2. Click “OK.
The Digital KVM over IP Switch supports most display modes up to 1600 x 1200. However, you might encounter some display problems when your display card is outputting an unusual display mode, such as no video or an abnormal screen display. To simplify the display factor before connection to the switch, it’s recommended that more standard display modes be used (see chart at left).
Network Settings 1. Connect the Digital KVM over IP Switch to the Ethernet LAN. The factory default network settings for the switch: • IP address: 192.168.1.200 • Net mask: 255.255.255.0 • Gateway: 192.168.1.254 • DNS: 192.168.1.254 2. Access the switch’s Web Management interface by entering the following in the address bar of your browser window on a remote client: https://192.168.1.200:5908. 3. A login prompt displays for the account name (username) and the password.
Port Base Settings NOTE: If you’re satisfied with the default port base setting as 5900, you can skip this section. The default port base for switch connection is set at 5900. This means it will use port 5900 (port base) for viewer connection and port 5908 (port base + 8) for https Web browser connection.
Configuration of the Firewall/Router for Access across the Internet To allow access to the Digital KVM over IP Switch behind a corporate firewall/router, establish the following settings on your firewall/router (not on your switch). 1. Configure a virtual server on your router (or ask your network administrator to do it) as mapped to the switch’s local IP address. 2.
1. Access the switch’s Web Management interface and go to the Security Settings screen. 2. Click “Browse” and use the “Choose File” dialog box to browse and locate your certificate files. 3. Click “Upload” on the Security Settings screen to upload the root certificate to the switch. When the upload is completed, the prompt page for rebooting will display. 4. Click “Reboot.” Once the switch has booted back up, continue with the import of the server.crt and the serverkey.pem files.
Selection of a Security Level for Viewer Connection 1. Go to the Security Settings screen on the switch’s Web Management interface and make a viewer connection selection from the “Security Level” drop-down menu.
in order to make a successful viewer connection with the switch in the Level 3 security setting. If you use the standard set of certificates provided on the included support CD, the password that encrypts the server private key is “serverpwd.” However, if you use your own set of certificates, you should get the correct server password from the Certificate Authority that issued those certificates. 3. Go to the Apply Settings screen and click “Restart Servers” to validate your selection.
viewer connection The Digital KVM over IP Switch provides a Win32 viewer for Windows users and a Java viewer for cross-platform use on any major operating system. Installation of a Win32 Viewer Go to the Download screen to download the Win32 viewer (Kripview_install.exe). Install the viewer program on the client computer that will connect to the switch. After installation, a KLE icon (right) will be created on your client desktop. Installation of a Java Viewer Before you can use the Java viewer (KViewer.
Importing Certificates to a Viewer on a Client Computer NOTE: If you will be using only the non-PKI-authenticated viewer connections to the switch (such as Level 1 – no encryption/authentication or Level 2 – 256-bit SSL encryption and only server authentication by client), you are not obliged to use or import any certificates and you can skip this section.
Viewer Connection Options The viewer connection option interface presents several options that can be combined in various ways to optimize your viewer connection. In the Connection Details window, click “Options” (represented by the top two screen images at right for Win32; by the bottom two images for Java). Compression Slow Internet: Video quality is optimized viewer connection with slower Internet bandwidth. Fast Internet: Video quality is optimized for connection with better Internet bandwidth.
Establishing the Viewer Connection To use the Win32 viewer for connection, run the viewer program, entering the access IP address and port number for the switch in the login window (as shown at right with the default IP address). NOTE: You can enter the access IP address without specifying the port number (as shown), but only when the port number is defaulted to 5900. (You can also enter the full default address: 192.168.1.200:5900.
Win32 Viewer Settings Window Size Adjustment The size of the viewer window can be adjusted by dragging the border of the viewer windows. Full Screen Mode For a full-screen display, click the viewer icon on the title bar of the viewer window to display the Quick Menu (shown on the left-hand side of the image at right), then select “Full Screen.” A message prompt will display as a reminder of how to exit the Full-Screen mode. Click “OK” and the viewer will present Full-Screen mode.
Switch infrastructure using a single client desktop. (Shown below: The upper image presents five Win32 viewers on a Windows client desktop, each showing a different remote server desktop; the lower image presents four Java viewers on a Linux client desktop, each showing a different remote server desktop.
Title Bar Information 256 ServerRoom_TPE: This is the name specified for your video server. Windows XP Professional: This is the name you specified for this connected computer. 54 ms: This is the capture time that is used for capturing the video image. Shared: This is a shared session that allows other authorized user logins. (“not shared” indicates a session that blocks others from subsequent logins.) Optimizing: Indicates the video server is optimizing the video capture from the server desktop.
Connection options: Click to display the “Connection Options” window (below). Connection info: This displays the server connection information as it relates to the viewer session. New connection: Make another new connection using the viewer. Save connection options: Save the settings (such as those connection parameters specified in the “Connection Options” window) and also the password within the registry of the client computer.
Video Display Troubleshooting The video server supports most major display modes up to 1600 x 1200. Some display problems can occur, however, such as when there is abnormal or unusual display output from your server, when the display resolution is beyond the maximum support level of 1600 x 1200, or when the display vertical frequency is beyond the support range in that pixel dimension. A few of the more common issues are addressed below.
connection is made, select the Adjust Screen option on the viewer’s Quick Menu to display the Adjust Screen window (as shown on Page 25). Check whether or not you have Automatic Centering enabled. If it is not yet enabled, select/enable it. If it is already checked, uncheck it, wait at least 15 seconds, then check the option again to force the video server to align (center) the display on the viewer screen.
NOTE: Remember that it’s a secure SSL-encrypted connection, so you should enter “https” instead of the usual “http”; otherwise, the connection will not be established. The port number may vary according to its setting on the server. By default, the browser connection uses port 5908. Both the username and password are case-sensitive.
USER: Provides only minimal access to Web Management features (only the Download screen). Note the lone menu option at left. Download Viewers The Download menu option lets you download both the Windows and Java viewers.
The viewer for Windows can run on most Windows platforms: 98/Me/NT/2000/XP/Server 2003/ Vista. Click “Download” and follow the installation instructions. Note: To use the secure fullSSL connection (Level 3 security), obtain a set of certificates from your administrator. Install the certificates on your computer by running the Import Certificate utility provided with this viewer. Refer to the Security section.
zone and “Los Angeles” as your region. The advantage of setting up the correct time zone is that you don’t have to change your local time setting every time you relocate the switch to a different time zone. Instead, you just change the “Time Zone” settings and let the switch readjust the local time for you. Local Time Enter the correct date (dd-mm-yyyy) and time (hh:mm) here and click “Change Local Time” to set the current system time on the switch.
Certificates and Keys Certificates are only needed if you intend to implement full PKI authentication for the viewer connections. If an SSL-encrypted session is already enough for your security requirements, you can just ignore this aspect of PKI authentication. Where can you get the certificates? There is a default set of certificates on your support CD. You can use them to practice the certificate uploads.
• Global Password means the viewer will prompt you for a global user password, which is used by all users (a sort of building door code). • User Password means the viewer will prompt you for your user-specific password (a sort of apartment door code). Note: The viewer can also prompt you for the client certificate password if you are using Level 3 security. Global User-Password: This field only appears if you select “Global Password” as the password policy.
TCP/IP Settings TCP Port Base: You can freely specify the port base for viewer connection with the server. Choose any available port base, starting from the lowest alternative of Port 5900 in increments of 10 up to Port 6090. The port base you choose is exactly the port number the switch uses for viewer connection. Also, “port base + 8” is the exact port number you’ll use for secure http connection to the browser.
PPP Mode There are three PPP options: “Disabled,” “Server” and “Client.” • Disabled is the default setting. • Server is for a connection request from a peer computer. It allows users to connect to your servers without the Internet understructure, and it can be used as a backup access in case of Internet failure or an ultra-secure access by the use of private lines and modems. • Client is for a dial-in connection to a PPP server (your ISP or an Enterprise PPP server).
Peer IP Address: Enter the IP address (default= 192.168.2.201) that will be assigned by the switch to the peer client at connection time. Maximum Speed: Specify the modem connection speed. The switch supports a high-speed serial connection up to 1 Mbps (megabits per second). Note: The modem connection speed is not the PPP connection speed, which depends on the modem technology. For example, even if the modem connection speed is 115,200 bps, a 56K modem will provide only a 56,000 bps PPP connection.
PPP server at connection time; for example, 62.147.111.39. If the PPP connection is not yet established, however, the IP address will show as “Unknown.” NOTE: This address is used by the switch as a PPP client, and thus is distinct from the one that is used by the switch on the LAN. Maximum Speed: Specify the modem connection speed. The switch supports a high-speed serial connection up to 1 Mbps (megabits per second).
address from which the login attempt originated, even when the attempt was not successful. Also, it will show certain technical details, such as the compression ratio, encoding scheme and bytes transmitted in each successful viewer session. This is the screen you should view first if you want to know the usage/“health” conditions of your switch. Enable Log: Select to enable the logging of switch server events. If you choose to not enable this option, no logging will be done.
Attached KVM Model: If you ever use a KVM switch behind this Digital KVM over IP Switch for connection with multiple computers, you should select the model of that KVM switch. If the KVM switch model does not appear on the list, you can always add it or even add more KVM switch models to augment the list so that your computer icons can support the port switching hotkeys of that specific KVM switch when they’re clicked.
or not a computer is still responding to keyboard actions. If you select this option, the switch will send a NumLock signal to the PC while scanning. If the PC sends a response, then the NumLock LED will light. The NumLock test can determine if the connected PC is still responsive to keyboard events. Additionally, the NumLock signal will serve as a “wake up” signal if the PC is in Sleep mode. If the NumLock test has failed, it most likely indicates that your computer is in trouble.
Server Name for Viewers Enter the server name you chose for the video server on the switch, and it will appear on the title bar of your switch’s viewer window. Keyboard Layout Choose the keyboard layout for the switch according to the real keyboard you’re using on the remote login client. Choosing the correct keyboard layout for your keyboard is very important since some key codes are represented by different keys, depending on the keyboard layout.
Viewer Hot Keys Enter your preferred keystroke sequence that will serve as viewer hot keys. By default, this is CTLR–CTLR (two consecutive keystrokes of the Right Ctrl key: CTLR). Note that this is not the Left Control key (CTLL). Mouse Resynchronize Key This is the only command supported by TKIP-101. It permits synchronization of the local and remote mouse cursors. By default, this is the HOME key. Thus, by default, you have to hit CTLR–CTLR–HOME to synchronize the remote and the local mouse cursors.
control unit is connected. • Exclude some computers from the auto-scanning process. • Refrain from generating alarms for some computers. Note: You can also work without supplying any computer information. In this case, just keep the values by default. You’ll have to remember on which KVM port your computers are attached and generate the specific KVM hot keys by hand. (This is the way most low-end IP KVM extenders work.
Power On Command: Specify the command that must be sent to the power control unit to power on the computer. (Refer to your power control unit documentation.) Note: To remotely power on this computer from the Windows or Java viewers, switch to this computer and then click “Power on” in the viewer menu. The command specified here will be sent automatically by the switch to the power control unit.
“Power Device Needs a Login” option to display a Login Dialog field for entering your login script. Login Dialog (chat style) This editable field is where you should enter the login script for your power control device, if the device requires it. (Refer to the user guide of your power control device for specifics.
\p — Pauses for a fraction of a second. The delay is 1/10th of a second (not valid in expect). \r — Sends or expects a carriage return. \s — Represents a space character in the string. This may be used when it is not desirable to quote the strings which contains spaces. The sequence ‘HI TIM’ and HI\sTIM are the same. \t — Sends or expects a tab character. \\ — Sends or expects a backslash character. For more detailed information, refer to the Linux chat program man page (man 8 chat).
has to be turned off. A zero-acceleration mouse on a remote server will not reflect on the viewer since the mouse cursor on the remote server should catch up with the mouse on the viewer side, which could use any acceleration factor. However, on the local console of the Digital KVM over IP Switch you’ll experience zero mouse acceleration and reduced efficiency when trying to move your mouse.
Video Mode Use the drop-down menu to select a video mode from the video mode database. Each video mode is indicated by the pixel dimension (length by width) at a certain refresh frequency; for example, 1024 x 768 @ 60 Hz. As with the refresh rate and the pixel dimensions, video mode parameters — screen width, total width, Hsync start and screen height, total height, Vsync start — can be adjusted. The following diagram demonstrates the geometric relations between the VGA parameters.
Each of the three user groups — SUPERADMIN, ADMIN and USER — has different rights regarding the Web Management interface and the viewers. NOTE: Only SUPERADMIN users can manage user accounts.
Users: User Groups This screen allows you to modify, create or suppress user groups, each of which is listed in the Select drop-down menu as detailed below. After you’ve made all modifications, click “Store the (new) User Group,” then “Apply Settings”/“Restart Servers.” Up to 64 user groups can be defined, each having a name and a set of properties specifying which computers can be accessed and whether the users of this group can power on and power off the computers they can access.
Select Select a user group from the local database. Group Name Modify this field if you want to create a new user group. Don’t make changes in this field if you only want to change the port list of the current user group. Power Control Select “Users of this group can power on/off computers” to allow these users to “manually” power on and power off the computers they can access through the viewers. Note: A power control device is required to do this.
Authentication Server Type From the drop-down menu, enable the remote server authentication either by LDAP or the RADIUS server (or select “None” to disable the remote authentication support). Before proceeding with subsequent settings on this screen, check with your network administrator for the availability of either an LDAP server or a RADIUS server. Directory Server Using LDAP SSL Access: Select to enable SSL access of the LDAP authentication.
Users: RADIUS Accounting Normally, RADIUS accounting is disabled by default. However, if you have RADIUS accounting enabled on a RADIUS or LDAP server, you can enable it here and subsequently configure its relevant settings to take advantage of this feature. After you’ve made all modifications, click “Store Settings,” then “Apply Settings”/“Restart Servers.
Enable RADIUS Accounting Select to enable RADIUS accounting support and modify the settings. Port: Specify the port used for Radius accounting. By default, it’s set to 1813. Accounting Server: Enter the IP address of the server offering the RADIUS accounting service. Second Server (if any): Enter the IP address of the secondary server, if you’ve got any backup RADIUS accounting server that offers RADIUS accounting service.
Copy To: The e-mail address of addressees who should get a courtesy copy of alarm e-mails. SMTP Server: Enter the name or IP address of the SMTP server (mail server) that will route the switch’s e-mail alarms to recipients. Alarms: SNMP (Traps) This screen allows you to set up the e-mail notification for alarm events. After you’ve made all modifications, click “Store Settings,” then “Apply Settings”/“Restart Servers.
Primary Manager Specify the IP address of the primary SNMP manager device on your network. Secondary Manager Specify the IP address of the secondary SNMP manager device on your network (if any). SNMP Community Specify the name of the SNMP community to which your SNMP management host and SNMP agent should belong. Note: The SNMP manager and agents must belong to an SNMP community identified by its name, which is a collection of hosts grouped together for administrative purposes.
600 x 400 or 600 x 480. Then select a response action: “Restart Computer,” “Send an E-mail” or “Send an SNMP Trap.” NumLock Test Alarm (Frozen Keyboard) The NumLock test sends a NumLock signal to the computer, to which the computer normally returns an immediate response so that the NumLock LED indicator on the keyboard will be lit to indicate the success of the test.
Maintenance: Firmware Upgrade This screen allows you to browse to the path location of a firmware upgrade file and upload it to the Digital KVM over IP Switch across a LAN or the Internet. Generally, the upgrade file comes with a filename formatted as kvmfirm-yy-mm-dd, and is accumulative: You can upgrade the KVM part of the file just as you upgrade the firmware of its IP module. Just browse to the location of the upgrade file and click “Upload.
Maintenance: Configuration Save and Restore This screen allows you to save your current switch settings to a single .tgz file for more portability and usability. You can also set up several switches with the same or similar configurations. To back up the configuration file, click “Backup”; choose a location for saving the configuration file (*.tgz); then click “Save.” The filename format is kconfig-yyyymmdd.tgz, with a timestamp in it.
If your switch has crashed and simply clicking “Apply Settings”/“Restart Servers” has no effect on your restoration effort, a last resort is to completely reboot the switch by clicking “Reboot Device.” NOTE: The reboot brought about by clicking “Reboot Device” is a total reboot and takes longer to boot up completely, while clicking “Restart Servers” is much quicker (just few seconds) since it restarts only the server programs on the switch.
appendix a: local console operation If you’re unfamiliar with local console operation, this section serves as an introduction to its controls. Additionally, Appendix B features the cable components needed for initial setup of the Digital KVM over IP Switch. There are three ways to operate the Digital KVM over IP Switch: using the front-panel buttons, keyboard hotkeys and the on-screen display (OSD) menus.
On-Screen Display (OSD) To activate the OSD menu — which will be superimposed on your current screen display — use the hotkey sequence ScrLk, ScrLk, Space Bar. The menu presents a listing of available banks and channels and the current online status of each channel. It also allows you to rename your computer (up to eight characters), to find a specific computer by name and to passwordprotect your switch system. NOTE: While the OSD is activated, all front-panel buttons and mice are rendered inactive.
example, ScrLk, ScrlLk, 0, 3, 0, 7 would select the computer connected to Bank 3, Port 7. In a single-switch configuration, however, enter “01” as the bank number — (a) and (b) — in the hotkey sequence, as this is the default for each individual (and in this case, single) switch. • OSD: With the OSD menu activated (ScrLk, ScrLk, Space Bar), use the cursor keys to navigate to the desired channel and press Enter.
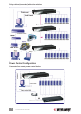
appendix b: installation components 3-in-1 USB Combo KVM cable 3-in-1 PS/2 Combo KVM cable Combo-Free USB PS/2 KVM cable Daisy-Chain cable (HDB15 male to HDB15 female Daisy-Chain terminator 64 APPENDIX B
Combo-Free USB PS/2 KVM cable APPENDIX B 65
specifications Standards • IEEE 802.1X (Network Access Control) • IEEE 802.3 (10Base-T Ethernet) • IEEE 802.
INTELLINET NETWORK SOLUTIONS™ offers a complete line of active and passive networking products. Ask your local computer dealer for more information or visit www.intellinet-network.com. Copyright © INTELLINET NETWORK SOLUTIONS All products mentioned are trademarks or registered trademarks of their respective owners.