
Instructions

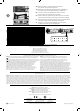

110D
110D / Krone
Krone
[EN] Note: These instructions can be used for any
Patch Panel in the Intellinet line. Your
model may differ from the one shown.
[DE] Hinweis: Diese Anleitung kann für jedes Patchpanel im
Intellinet-Produktsortiment verwendet werden. Ihr
Modell kann von dem abgebildeten abweichen.
[ES] Nota: Estas instrucciones se pueden usar para cualquier
Panel de Parcheo en la línea de Intellinet. Su
modelo puede diferir del que se muestra.
[FR] Remarque: Ces instructions peuvent être utilisées pour
toute platine de brassage dans la ligne Intellinet.
Votre modèle peut différer de celui illustré.
[PL] Uwaga: Niniejsza instrukcja ma zastosowanie do
każdego Patch Panela z linii Intellinet. Twój
model może różnić się od pokazanego.
[IT] Nota: Queste istruzioni possono essere utilizzate
per qualsiasi Pannello Patch Intellinet. Il tuo
modello potrebbe differire da quello mostrato.
Scan to
register your
product warranty
For additional benefits
or go to:
register.intellinet-network.com/r/519526
2
[EN] Refer to the IDC color codes on the back page to position each wire, and
connect it to the patch panel using a Krone or 110D punch-down tool.
[DE] Mit Hilfe der IDC-Farbcodes auf der Rückseite können Sie die Drähte
richtig positionieren. Legen Sie sie mit einem Krone-oder 110D-Werkzeugs
auf das Patchpanel auf.
[ES] Consulte los códigos de color IDC
en la última página para posicionar
el cable y conéctelo al panel de
conexión utilizando una herramienta
de impacto (Krone o 110D).
[FR] Reportez-vous aux codes de couleur
IDC sur la page inverse pour positionner
chaque fil, et le connecter à la platine
de brassage en utilisant un outil de
perforation pour bornier (Krone ou 110D).
[PL] Odnosząc się do tabeli kodów
kolorystycznych IDC na tylnej stronie
umieść każdą żyłę w złączu i połącz je
z patch panelem używając narzędzia uderzeniowego 110D lub Krone.
[IT] Fare riferimento ai codici colore IDC nel retro della pagina
per posizionare ogni cavo e collegarlo al pannello patch
utilizzando un attrezzo Krone o 110D per cablaggio.
1
25 mm / 1 in.
UTP
25 mm / 1 in.
FTP
Wire holder
[EN] Strip away 25-30 mm of the cable jacket and separate the wires
into 4 pairs. Cut the wire holder flush with the cable jacket.
[DE] Entfernen Sie ca. 25-30 mm der Kabelisolierung und teilen Sie
die Drähte in 4 Adernpaare auf. Schneiden Sie die Ummantelung
bündig mit dem Kunststoff-Trennelement ab.
[ES] Pele la cubierta del cable de 25 a 30mm y separe los cables en
4 pares. Corte el alambre a ras de la cubierta del cable.
[FR] Dénuder 25-30 mm de la gaine de câble et séparer les fils dans 4
paires. Couper le support de fil au ras de la gaine du câble.
[PL] Zdejmij około 25 – 30 mm izolacji kabla i podziel żyły na 4
pary. Obetnij plastikowy krzyżak równo z izolacją kabla.
[IT] Togliere 25-30 mm di guaina del cavo e separare i fili in 4 coppie.
Tagliare il supporto del cavo a livello con la guaina.
Cat6 Patch Panel
Instructions
Model 519526 Important: Read before use. • Importante: Leer antes de usar.