Quick Install Guide ENGLISH Kurzanleitung DEUTSCH Guía de instalación rápida ESPAÑOL Guide de demarrage rapide FRANÇAIS upute za brzu instalaciju HRVATSKI guida all’installazione rapida ITALIANO Instrukcja szybkiej instalacji POLSKI Sprievodca rýchlou inštaláciou SLOVENSKY
ENGLISH Safety and Regulatory Notices This equipment has been tested and found to comply with the limits for a Class B computing device pursuant to Subpart B of Part 15 of FCC rules, which are designed to provide reasonable protection against such interference when operated in a commercial environment.
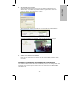
Connect the RJ45 network cable from the camera’s LAN port to your network; e.g., the router or a LAN switch, then power on the camera. The boot sequence will take about one minute. By default, the network camera searches for a DHCP server on the network and obtains an IP address automatically. A very common DHCP server is a router, a device that is found on most networks.
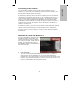
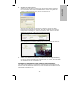
2. IP Admin for Windows This utility is designed to find the network camera on your network and lets you make changes to the configuration. Click on “Next” to begin the installation and follow the instructions on the screen. When the program starts, you are presented with the screen shown above. The IP Installer utility lists all cameras that can be found on your network.
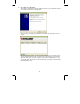
3. Accessing the camera When prompted, select “Run Add-on” or “Run Add-on onAll Websites”. Once the installation is complete, you’ll see the camera live image. 4. Video Surveillance Software Refer to user manual on the CD for the 16-channel NVR (network video recorder). Hardware Installation and Additional Information For additional information about the installation process, the configuration and functions of the camera please refer to the user manual on the INTELLINET installation CD.
DEUTSCH Sicherheits- und Rechtshinweise Dieses Gerät wurde geprüft und entspricht den Bestimmungen für ein digitales Gerät der Klasse B gemäß Teil 15 der FCCSchutz vor schädlichen Störungen beim Betrieb des Geräts in Gewerbegebieten. Beim Betrieb dieses Geräts in Wohngebieten sind Interferenzen wahrscheinlich. In diesem Fall muss der Nutzer die Interferenzen auf eigene Kosten beseitigen.
Verbinden Sie den LAN-Anschluss über das RJ45-Netzwerkkabel mit Ihrem Netzwerk; z. B. dem Router oder einem LAN-Switch, und schalten Sie dann die Kamera ein. Der Startvorgang dauert ca. eine Minute. Standardmäßig sucht die Netzwerkkamera im Netzwerk nach einem DHCPServer und bekommt automatisch eine IP Adresse zugewiesen. In den meisten Netzwerken dient ein Router als DHCP- Server. Ein DHCP-Server in Ihrem Netzwerk vereinfacht die Installation enorm.
2. IP Admin for Windows Diese Software dient der Identifikation der Kamera im Netzwerk und ihrer Identifikation. Klicken Sie auf “Next”, um die Installation zu starten und folgen Sie den Installationsanweisungen auf dem Bildschirm. Bei Programmstart wird obiges Fenster eingeblendet. Die IP-InstallerSoftware listet alle kompatiblen Kameras auf, die in Ihrem Netzwerk gefunden werden konnten. Mit dieser Software können Sie NetzwerkEinstellungen der Kamera ändern.
3. Zugriff auf die Kamera Wenn Sie das erste Mal auf die Kamera zugreifen, wird Sie Ihr WebBrowser darauf aufmerksam machen, dass die Installation einer aktiven Komponente notwendig ist. “Add-on ausfuehren” oder “Add-on auf allen Webseiten auffuehren” sollte dann ausgewaehlt werden. Nach erfolgreicher Installation gelangen Sie zur Live-Ansicht der Kamera.. 4.
ESPAÑOL Avisos de Seguridad y Regulatorios Este equipo ha sido probado y se encontró que cumple con los límites establecidos para los dispositivos de cómputo Clase B según lo acordado en la Sub-parte B de la Parte 15 de las reglas de la FCC, la cual está diseñada para proporcionar una protección razonable contra todas aquellas interferencias operadas en un ambiente comercial.
Conectando la cámara De fábrica, la cámara de red buscan que un servidor DHCP les asignen una dirección IP de manera automática. Un ejemplo de servidor DHCP puede ser el ruteador, dispositivo que se encuentra en la mayoría de las redes. La presencia de un servidor DHCP en su red simplifica la instalación y los usuarios con conocimiento limitado en redes TCP/IP podrán instalar la cámara de red en minutos. Si no cuenta con servidor DHCP, la cámara de red tomará su dirección IP de fábrica: 192.168.1.221.
2. IP Admin para Windows Esta utilería está diseñada para encontrar la cámara un su red y permitirle realizar cambios en su configuración. Haga clic en “Siguiente” para comenzar la instalación y siga las instrucciones en la pantalla. Cuando se inicia el programa, se le presentara la pantalla como se muestra arriba. La utileria IP Installer lista todas las camaras que se pueden encontrar en la red.
3. Accesando a la cámara Cuando se le solicite, seleccione “Ejecutar y agregar” o “Ejecutar y agregar en todos los sitios Web”. Una vez finalizada la instalación, verá la imagen de la cámara en vivo. 4. Software de Vídeovigilancia Refiérase al manual del usuario en el CD para instalar y configurar el Grabador de Vídeo en Red de 16 canales (NVR).
FRANÇAIS Instructions juridiques et de sécurité Cet appareil a été testé et déclaré conforme aux exigences de la classe B pour appareils numériques, selon l’article 15 de la norme européenne. Conçu pour apporter une protection raisonnable contre les interférences dangereuses en milieu commercial.
Connectez le port LAN via le câble RJ45 à votre réseau; p. ex. le routeur ou un switch LAN, puis démarrez la caméra. Le démarrage dure env. une minute. Par défaut, la caméra recherche un serveur DHCP sur le réseau et obtient une adresse IP automatiquement. Un serveur DHCP très commun est un routeur, un appareil qui se trouve sur la plupart des réseaux.
2. IP Admin for Windows Cet utilitaire sert à trouver la caméra sur votre réseau et à modifier la configuration. Cliquez sur “Next pour lancer l’installation et suivez les instructions sur l’écran. Quand le programme démarre, le menu en haut s’affiche. L’utilitaire IP Admin affiche toutes les caméras qui ont été trouvées sur votre réseau.
3. Accéder la caméra Si l’installation vous demande, sélectionnez « Exécuter Add-on » ou « Exécuter Add-on sur tous les sites ». Dès que l’installation est complète, vous voyez l’image de camera live. 4. Logiciel de surveillance vidéo Pour l’enregistreur vidéo réseau (NVR – network video recorder) 16 canaux, veuillez lire le manuel utilisateur sur le CD inclus.
HRVATSKI Sigurnosne i regulatorne obavijesti Ova oprema je testirana i testiranjem je utvrđeno da odgovara limitima klase B digitalnih uređaja te da odgovara odjeklju B iz dijela 15 FCC pravilnika. Oprema je dizajnirana da bi osigurala zaštitu od smetnji kada se koristi u komercijalne svrhe. Uporaba ove opreme u kućnim instalacijama može izazvati smetnje. U tom slučaju korisnik će, na vlasititi trošak, morati poduzeti mjere potrebne za popravak nastale štete.
Spojite RJ45 mrežni kabel na kamerin LAN port i na mrežu; npr., ruter ili LAN switch, nakon toga upalite kameru. Uključenje će trajati oko jednu minutu. Prema zadanom, mrežna kamera traži DHCP server na mreži i dodjeljuje IP adresu automatski. Zajednički DHCP server je ruter, uređaj koji se može pronaći na većini mreža. Prisutnost DHCP servera na mreži pojednostavljuje instalaciju i korisnici s slabijim poznavanjem TCP/IP mreža mogu instalirati mrežnu kameru u nekoliko minuta.
2. IP Admin za Windowse Ovaj program je dizajniran za pronalazak kamere na mreži i omogućava promjene postavki konfiguracije. Kliknite “Yes” za početak instalacije. Kada se program pokrene, pojavit će se ekran kao na slici iznad. IP Installer prikazuje sve kamere koje se nalaze na mreži. Možete promijeniti postavke TCP/IP konfiguracije, ili možete otvoriti kameru preko vašeg browsera klikom na ikonicu browsera.
3. Pristup kameri Ako Vas pita slijedeće, odaberite “Run Add-on” ili “Run Add-on onAll Websites”. Kada je instalacija završena, vidjet ćete sliku uživo sa kamere. 4. Software za video nadzor Pogledajte upute za uporabu na CD-u za 16-kanalni NVR (mrežni video snimač). Hardware instalacija i dodatne informacije Za dodatne informacije o instalaciji, konfiguraciji i funkcijama kamere, molimo pogledajte upute za uporabu na INTELLINET instalacijskom CD-u.
ITALIANO Sicurezza e Informazioni Normative Questa apparecchiatura è stata testata e risulta conforme ai limiti indicati per periferiche di classe B conformemente al Sottosezione B della Parte 15 dell’ordinamento FCC, che sono destinate a fornire una protezione ragionevole contro tali interferenze quando si opera in ambienti commerciali.
Collegare il cavo di rete RJ45 dalla porta LAN della telecamera alla rete; ad esempio, il router o uno switch LAN, quindi alimentare la telecamera. La sequenza di avvio del sistema richiederà qualche minuto. Per impostazione predefinita, la telecamera di rete cerca un server DHCP nella rete e ottiene automaticamente un indirizzo IP. Un server DHCP molto comune è un router, una periferica che è trovata nella maggior parte delle reti.
2. IP Admin per Windows Questa utilità è realizzata per trovare la telecamera nella rete e permettere di effettuare le modifiche alla configurazione. Clicca su “Si “ (Next) per iniziare l’installazione e segui le istruzioni che compaiono sullo schermo. All’avvio del programma, compare la videata sopra riportata. L’IP Installer utility elenca tutte le telecamere che possono essere rilevate nella rete.
3. Accesso alla telecamera Appena inserite le informazioni, selezionare “Run Add-on” o “Run Add-on on All Websites”. Appena l’installazione è completa, vedrai l’immagine live dalla telecamera. 4. Software per la Video Sorveglianza Far riferimento al manuale utente presente sul CD per NVR a 16 canali (network video recorder).
POLSKI Bezpieczeństwo i normy Kamery sieciowe IP przeznaczone są do użytku w środowiskach klasy B. Jednak wyposażenie w pewne funkcje opcjonalne może spowodować zmianę kategorii urządzenia na klasę A. Aby ustalić klasyfikację elektromagnetyczną urządzenia, należy szukać informacji w punktach dotyczących poszczególnych instytucji normalizacyjnych.
Podłącz kamerę kablem Ethernet RJ45 do sieci LAN, a następnie podłącz zasilanie do kamery. Sekwencja „bootowania” może zająć kilkadziesiąt sekund. Domyślnie kamera ustawiona jest w trybie pozyskiwania adresu IP z serwera DHCP. Jeśli w Twojej sieci LAN nie działa żaden aktywny serwer DHCP, kamera ustawi się na domyślny adres IP: 192.168.1.221.
2. IP Admin for Windows – Aplikacja do konfiguracji wstępnej Aplikacja dla systemów Windows pozwalająca wykryć i wstępnie skonfigurować wszystkie kamery Intellinet podłączone do Sieci LAN. Kliknij “Next”, aby rozpocząć proces instalacji. Po uruchomieniu program pojawi się powyższe okno. IP Admin wykryje i wylistuje wszystkie kamery IP dostępne w Twojej sieci lokalnej.
3. Logowanie do kamery Gdy pojawi się poniższy komunikat, wybierz “Zainstaluj ten dodatek dla wszystkich użytkowników”. Po zakończeniu instalacji dostępny będzie obraz z kamery. 4. Video Surveillance Software – Aplikacja monitoringowa Bezpłatne 16-kanałowe oprogramowanie NVR. Patrz instrukcja na płycie CD. Szczegółowa konfiguracja i dodatkowe informacje Opis szczegółowej konfiguracji kamery oraz wszelkie dodatkowe informacje znajdują się w pełnej instrukcji użytkownika na CD.
SLOVENSKY Bezpečnosť a právne normy Zariadenie bolo testované a uznané za vyhovujúce limitom pre ktoré sú navrhnuté tak, aby poskytovali primeranú ochranu proti škodlivým rušeniam pri prevádzke v komerčnom prostredí. Prevádzka tohto zariadenia v obytnej zóne pravdepodobne spôsobí rušenie, kedy može byť používateľ na vlastné náklady požiadaný, aby prijal potrebné opatrenia na úpravu alebo odstránenie rušenia.
Pripojte sieťový kábel RJ45 z LAN portu kamery do vašej siete, napr. do routru alebo LAN prepínača a potom zapnite kameru. Bootovacia sekvencia bude trvať asi jednu minútu. V primárnom nastavení sieťová kamera vyhľadá server DHCP v sieti a získa IP adresu automaticky. Veľmi častým DHCP serverom býva router, zariadenie, ktoré sa nachádza vo väčšine sietí.
2. IP Admin pre Windows Tento nástroj je navrhnutý tak, aby našiel sieťovú kameru v sieti a umožňuje vykonávať zmeny v konfigurácii. Pre začiatok inštalácie kliknite na “Next” a nasledujte pokyny na obrazovke. Keď sa program spustí, zobrazí sa na obrazovke okno ako je uvedené vyššie. Utilita IP Inštalátor zobrazí zoznam všetkých kamier, ktoré je možné nájsť na sieti.
Open MS Internet Explorer and go to the address indicated by the admin utlity. You’ll then be presented with a login window. The user name is “admin”, the password is “1234.” Akonáhle budete vyzvaní, zvoľte možnosť “Run Add-on” alebo “Run Add-on on All Websites”. Po ukončení inštalácie sa zobrazí záber kamery snímaný naživo. 4. Video softvér stáleho pozorovania Pozrite časť užívateľskej príručky na CD pre 16 kanálový NVR (Network Video Recorder).
WARRANTY INFORMATION Deutsch Garantieinformationen finden Sie hier unter www.intellinet-network.com/warranty. English For warranty information, go to www.intellinet-network.com/warranty. Español Si desea obtener información sobre la garantía, visite www.intellinet-network.com/warranty. Français Pour consulter les informations sur la garantie, rendezvous à l’adresse www.intellinet-network.com/warranty. Italiano Per informazioni sulla garanzia, accedere a www.intellinet-network.com/warranty.
- 35 -
INTELLINET NETWORK SOLUTIONS™ offers a complete line of active and passive networking products. Ask your local computer dealer for more information or visit www.intellinet-network.com Copyright © INTELLINET NETWORK SOLUTIONS All products mentioned are trademarks or registered trademarks of their respective owners.