Wireless 300N 3G Router quick install guide Model 524681 INT-524681-QIG-0809-03
introduction Thank you for purchasing the INTELLINET NETWORK SOLUTIONS™ Wireless 300N 3G Router, Model 524681. This quick install guide presents the basic steps required for setting up and operating this device. For detailed instructions and specifications, refer to the user manual on the CD enclosed with this product at www.intellinet-network.com. System Requirements • For a complete list of compatible 3G USB modems, visit www.intellinet-network.
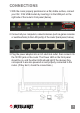
connections 1. With the router properly positioned on a flat, stable surface, connect . your 3G / 3.5G USB modem by inserting it in the USB port on the right side of the router’s front panel (below). Wireless 300N 3G Router 2. Connect all your computers, network devices (such as game consoles or switches/hubs) to the LAN port(s) of the router (back panel, below). 12VDC ON/OFF Reset/WPS 4 3 2 1 WAN 3.
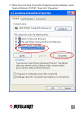
network setup The following procedure is for configuring the Wireless 300N 3G Router using your Web browser. NOTE: For the initial configuration, a computer with a wired Ethernet connection is required. 1. Set your computer to obtain an IP address from the wireless router: Go to Start (in the lower-left corner of your desktop), then go to Control Panel. Double-click Network Connections, then double-click Local Area Connection. When the Local Area Connection Status screen displays, click “Properties.
2. When the Local Area Connection Properties screen displays, select “Internet Protocol (TCP/IP),” then click “Properties.
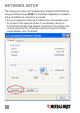
3. When the Internet Protocol (TCP/IP) screen displays, select “Obtain an IP address automatically” and “Obtain DNS server address automatically,” then click “OK.” The IP address setup is now complete.
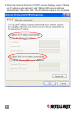
4. Go to Start again, then Run. Enter “cmd,” then click “OK.” 5. Enter “ipconfig,” then press . Check the “IP Address” and “Default Gateway” settings. (In the example below, the IP address of router — the default gateway — is 192.168.2.1.) C:\Documents and Settings\home user>ipconfig Windows IP Configuration Ethernet adapter Local Area Connection: Connection-specific DNS Suffix . : IP Address . . . . . . . . . . . . . . . . . . : 192.168.2.3 Subnet Mask . . . . . . . . . . . . . . . . .: 255.255.
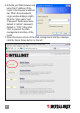
6. Activate your Web browser and enter the IP address of the router in the browser’s address bar. When the subsequent Login window displays (right), fill in the “User name” and “Password” fields (username default is “admin”; password default is “1234”), then click “OK” to present the Web management interface of the router. 7. When the Home screen of the Web management interface displays, click the Quick Setup button on the left.
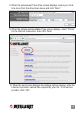
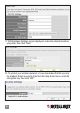
8. When the subsequent Time Zone screen displays, select your local time zone from the drop-down menu and click “Next.” 9. When the subsequent Broadband Type screen displays, select “3/3.5G” for the Internet connection, then click “Next.” 10. When the next screen displays the settings options (below), enter the Internet connection values if/as required by your 3G / 3.5G service provider. Click “OK.
11. With the Basic Settings screen displayed, make the selections/entries you prefer, then click “Next.” 12. To protect your wireless network, it’s recommended that the security be enabled. Select a security type from the drop-down menu, enter the encryption key, then click “OK.
13. When the prompt appears to restart the system, click “Apply.” A status message will display, indicating that the router will be ready for operation in approximately 30 seconds. Once the router is ready for use, connect to any Internet site or open any Internet application to check that they’re working properly.
WASTE ELECTRICAL & ELECTRONIC EQUIPMENT Disposal of Electric and Electronic Equipment (applicable in the European Union and other European countries with separate collection systems) ENGLISH This symbol on the product or its packaging indicates that this product shall not be treated as household waste. Instead, it should be taken to an applicable collection point for the recycling of electrical and electronic equipment.
WARRANTY INFORMATION english: For warranty information, go to www.intellinet-network.com/warranty. deutsch: Garantieinformationen finden Sie unter www.intellinet-network.com/warranty. ESPAñOL: Si desea obtener información sobre la garantía, visite www.intellinet-network.com/warranty. FRANçAIS: Pour consulter les informations sur la garantie, visitez www.intellinet-network.com/warranty. Polski: Informacje dotyczące gwarancji znajdują się na stronie www.intellinet-network.com/warranty.
FEDERAL COMMUNICATIONS COMMISSION REGULATORY STATEMENT FCC Class A This equipment has been tested and found to comply with the limits for a Class A digital device, pursuant to Part 15 of the Federal Communications Commission (FCC) Rules. These limits are designed to provide reasonable protection against harmful interference when the equipment is operated in a commercial environment.
INTELLINET NETWORK SOLUTIONS™ offers a complete line of active and passive networking products. Ask your local computer dealer for more information or visit www.intellinet-network.com. All products mentioned are trademarks or registered trademarks of their respective owners. INTELLINET NETWORK SOLUTIONS™ bietet ein vollständiges Sortiment aktiver und passiver Netzwerkkomponenten. Für weitere Informationen wenden Sie sich bitte an Ihren Händler oder nutzen Sie die Webseite www.intellinet-network.com.
Copyright © INTELLINET NETWORK SOLUTIONS