
- Intellinet Wireless Network IP Camera User's Guide


WIRELESS NETWORK IP CAMERA User’s Guide
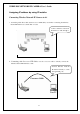
Using IP Installer
To install an IP address, you should use the IP Installer provided with Wireless Network IP
Camera.
You can download its program through the web site (http://intellinet-network.com)
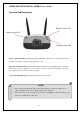
Note: The MAC Address can be found on the underside label of the Wireless Network IP
Camera. To choose a Wireless Network IP Camera, click on its list.
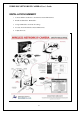
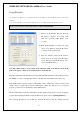
Enter the Administrator ID and Password in the blank (Default Administrator ID and Password are
all “admin”) to assign (or change) IP Address for the Wireless Network IP Camera and set up.
Enter the IP address, Gateway address, Subnet Mask address, DNS Server address and Server IP
address that are assigned from network administrator. (When the addresses are not assigned
properly, you cannot access the Wireless Network IP Camera).
The Server IP Address represents an IP address of a PC, which is being used to execute the upgrade
program when updating the Wireless Network IP Camera (please refer to Updating Firmware).
After entering all addresses for the Wireless Network IP Camera, click the “Change Network
15
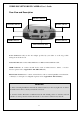
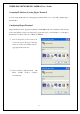
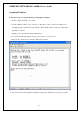
Note : System required for IP installer; Microsoft Windows9X/NT/2000
① Execute the IP Installer after the Network
IP Camera completes its booting (wait
until the operating LED blinks every
second).
② When the IP Installer is executed, the panel
shows every Wireless Network IP Camera
connected on the local network.
③ From the Wireless Network IP Cameras
listed, select one to assign a new IP address
(every Wireless Network IP Camera has a
factory default IP address).