Desktop 10Base-T Internet ISDN Gateway User’s Manual 529930 I-ISS-020
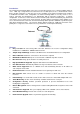
Introduction The NexIP Internet Sharing Station is the most cost-effective Internet access solution available today for users. With only a single Internet account and a low cost dial-up line, it lets a small network of more than 2 desktop computers to share the vast resource available on the Internet simultaneously.
Package Contents This package has: 1. One Internet Sharing Station 2. One power adapter 3. Wall Mounting kit 4. This user’s guide Hardware Introduction The components of the unit are shown as the following figure: Front Panel LED Status Table ON: DC power is on PWR OFF: No DC power FDX ON: Indicates communication on your LAN is operating at full-duplex mode. OFF: Indicates transmission mode is half-duplex. LNK ON: Ethernet interface is being connected.
Install the unit This unit can be placed on a flat surface or mounted on a metallic surface or partition. Please comply with the following steps for proper installation. Desktop Installation y Carefully take out the unit from its packaging y You will find four self-adhesive rubber feet attached on the bottom of the unit, which provide space for ventilation and cushion the unit needed against vibrations. Place the unit directly on your desk.
1. Connecting the Ethernet cable. Connect a network cable to the Internet Sharing Station’s RJ-45 or BNC port. This unit supports two types of Ethernet cables: Thin Ethernet (10BASE2, BNC connector) and Twisted Pair Ethernet (10BASE-T, RJ-45 connector). During power up, the unit automatically detects the type of network cable and adjusts to that environment. Note: Please do NOT use both of BNC and RJ-45 connections simultaneously. 2. Connect your modem.
To configure a Windows 95/98 system 1. Right-click Network Neighborhood. 2. Click Properties on the pop-up menu. 3. Click the Configuration tab and select the TCP/IP networking component and click Properties. 4. Make sure “Obtain an IP Address Automatically” is selected. 5. Select the DNS Configuration tab, and select Disable DNS. 6. Select the Gateway tab and remove any addresses. Click OK. 7. Click OK to close the Network Control window. 8. Click OK to close and restart your computer.
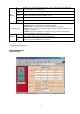
[The Station] IP Address: Network Mask: DHCP Server: Primary DNS: Secondar y DNS: IP address for the Internet Sharing Station. Use the default value (192.168.0.254) unless the address is already in use. The default value 255.255.255.0 is OK for small networks. Select “Enable” to enable the function of DHCP service for local LAN. Select “Disable” to disable the function of DHCP service Enter the DNS IP address (default value is 168.95.192.1) provided by your ISP.
[Internet Account] Baudrate (bps) Serial Port Teardown [WAN 1] Time Authentica tion Baudrate (bps) Teardown Time Authentica Serial Port tion [WAN 2] Activity Mode Define Internet accounts for each WAN 1 and WAN 2 ports. Phone No.: Enter your ISP’s telephone number. Use the format described in your modem’s user manual. User ID.: Enter the account name provided by your ISP. Password: Enter the password for the corresponding account name. IP Address: Enter the IP address assigned to you by your ISP.
Modem AT Command Settings If your model is listed, simply select it , then the modem initial string will be configured automatically. If your model is not listed, try “Standard” or “Standard 56K” modem Model: If it still not work, select “Other”. You will have to enter the modem initial strings, as described below.
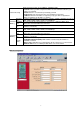
Email Sharing Configuration The usage of Email sharing allows one Email account shared with multiple users. The [Mail Server Account] specifies the shared Email account, and the [Local User Account] specify the sharing users. The detail configurations to some popular Email clients such as “Outlook”, “Eudora”, and “Netscape Messenger” are described on Appendix B. Remote Access Service Configuration Configures WAN 2 as RAS-Port Internet pc1 pc2 192.168.0.254 RAS-Port 192.168.0.
Virtual Server Configuration Internet Sharing Station Internet CHAT Server (192.168.0.10) WWW Server (192.168.0.1) FTP Server (192.168.0.2) Telnet Server (192.168.0.3) External port on IS020 Any incoming IP packets send to the external port will redirect to this internal server on this port This shows the internal servers that allowed to be accessed through the Internet Sharing Station from Internet. Type 0.0.0.0 will prevent the Internet users from accessing the internal servers.
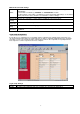
Firmware Upgrade Procedure You may follow the procedure specified in this page to update your firmware. Reset to Factory Default This feature let all configurations return to the initial factory value. System Restart If complete all configurations, the new values may effect after you restart the Internet Sharing Station. Setting up the other PCs Once the Internet Sharing Station has been configured on your LAN, it is ready for use.
Note: 1 Once the Internet Sharing Station has been configured, all of the PCs should be restarted to get the new TCP/IP settings from the Internet Sharing Station. 2 After restarting your computer, please make sure your computer has obtained an IP address, DNS and Gateway IP address(192.168.0.254). Customizing TCP/IP settings The Internet Sharing Station is preconfigured for installation on a network that is not set up for TCP/IP. It uses a range of private IP addresses in a range from 192.168.0.
Renew. On Windows NT: Type ipconfig from the command prompt. The PC should have an IP address of 192.168.0.n, where n is from 1 to 252. The Gateway IP address of the PC must be 192.168.0.254. If the IP address is not in the range, type the following commands: ipconfig / release ipconfig / renew 2. If you have used proxy on the browser, make sure it has 192.168.0.254 as an exception In Internet Explorer: Add 192.168.0.254 as an exception In Netscape Navigator: Add 192.168.0.
5. Problem: My Modem/ISDN TA is working fine with my PC running Windows 95. How do I find its initial string ? Solution: 1. Select My Computer, then Dial-Up Networking. 2. Select the icon for your connection, then properties. 3. Click the Configure button, then Connection tab. 4. Select Advanced , then check the option Record a log file, click OK and exit. 5. Use Dial-up Networking to make your on-line connection normally. A log file MODEMLOG.TXT will be created in your Windows directory. 6.
Specifications Standards and Protocols IEEE 802.3 10BASE-T and 10BASE2 TCP/IP, PPP, CHAP/PAP/MS-CHAP, DHCP Operational Characteristics LAN port: 10BASE2/10BASE-T auto sensing WAN speed: 230.4Kbps max.
CE Mark Declaration of Conformity for EMC and Safety(EEC) EMC: EN55022 (1994)/CISPR 22 (1993) class B IEC 1000-4-2 (1995) 4kV CD, 8kV AD IEC 1000-4-3 (1995) 3V V/m IEC 1000-4-4 (1995) 1kV - (power line) , 0.5kV - (signal line) This product complies with the requirements of the Low Voltage Directive 73/23/EEC and the EMC Directive 89/336/EEC Safety Compliance EN60950, UL 1950 Sicherheitshinweise 1. Die Steckdose muß sich in der Nähe des Gerätes befinden und leicht zugänglich sein. 2.
Appendix A: Login Script Files This section describes the script file commands and syntax to be used when editing script files. Script file is only required if your ISP does not use a standard PPP negotiation. Learn the script syntax Five commands can be used to automate a proprietary negotiation process. The commands are as follows: send “” Send a data string and then go to next line 1.
Appendix B: Configure Your E-mail Clients For E-mail Sharing Function Email Sharing Operation Model Internet pc1 pc2 192.168.0.254 Email Server: Host name: ms25.hinet.net User name: unextest Password : xxxxxxxx E-mail setting on pc1 (or pc2) : User name: pc1 (or pc2) Password: xxxx Incoming POP3 server: 192.168.0.254 Outgoing SMTP server: ms25.hinet.net Send mail to pc1 : 1. pc1, or 2.”pc1”
Step 3: Fill in the incoming and outgoing mail server The real mail server The IP address of Internet Sharing Station The user name defined in Internet Sharing Station The password for this user on Internet Sharing Station Netscape Messenger Step 2: Fill in aliases name and real email address Select the user name defined in IS020 The shared E-mail account 19
Step 1: Select Edit->Preferences->Mail & Newsgroup->Identity Select the user name defined in Internet Sharing Station The shared E-mail account Step 2: Fill in the incoming and outgoing mail server The IP address of Internet Sharing Station The real mail server The user name defined in Internet Sharing Station 20
Step 3: ->Select 192.168.0.254->Edit Select “POP3 Server” as the mail receiving protocol The user name defined in Internet Sharing Station Eudora 1.5.4 ~ 3.x.
Step 2: Tools->Options->Sending Mail The shared E-mail account The real mail server Eudora 4.x.
23