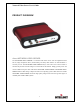
Network Video Server User’s Guide Network Video Server Model 550000 User’s Guide V1.
Network Video Server User’s Guide FCC Compliance Statement The user manual or instruction manual for an intentional or unintentional radiator shall caution the user that changes or modifications not expressly approved by the party responsible for compliance could void the user's authority to operate the equipment. NOTE: This equipment has been tested and found to comply with the limits for a Class B Digital Device, pursuant to Part 15 of the FCC Rules.
Network Video Server User’s Guide Important Notice 1. The NETWORK VIDEO SERVER is not weatherproof so that you should be well aware of environment specifications that are included in the manual. In case of outdoor use, where it needs additional weather criteria, you should equip weatherproof case to protect NETWORK VIDEO SERVER from weather, moisture, or temperature (higher or lower than specification). To clean the NETWORK VIDEO SERVER cleaning, gently wipe with clean dry cloth. 2.
Network Video Server User’s Guide TABLE OF CONTENTS PRODUCT OVERVIEW ....................................................................................................................................6 ABOUT NETWORK VIDEO SERVER..............................................................................................................6 MAIN FEATURES AND BENEFITS .........................................................................................................................
Network Video Server User’s Guide H. DYNAMIC DOMAIN NAME SERVICE (DDNS) ..............................................................................................64 HOW TO USE DYNDNS DDNS SERVER ............................................................................................................67 I. HIGH SPEED SOLUTIONS................................................................................................................................71 J. REINSTATING THE FACTORY DEFAULT SETTINGS ....
Network Video Server User’s Guide PRODUCT OVERVIEW About NETWORK VIDEO SERVER The NETWORK VIDEO SERVER is a network CCD camera server with an integrated Internet Server, image compression device, flash memory, and many other features. No other hardware is necessary for use. The NETWORK VIDEO SERVER relays video source from a CCD camera to network and provides real time images over networks and the Internet. Simply provide power and connect a RJ45 LAN plus video cable to the NETWORK VIDEO SERVER.
Network Video Server User’s Guide Main Features and Benefits Convenient Operation The NETWORK VIDEO SERVER is a standalone system with built-in CPU requiring no special hardware or software such as PC frame grabber cards. The NETWORK VIDEO SERVER supports both Active X mode for Internet Explorer and JAVA mode for Internet Explorer and Netscape Navigator. Therefore, all that is required is a common web browser, such as Microsoft Internet Explorer 4.x or above.
Network Video Server User’s Guide Embedded Linux Operating System NETWORK VIDEO SERVER uses an embedded Linux operating system within its 32bit RISC CPU. Linux like other UNIX is one of the most stable operating system available. There is very little chance of the operating system crashing. Real-time JPEG compression Video input can be efficiently compressed into packets of JPEG images without delay. Optimal compression engine makes the equivalently excellent image with much smaller size.
Network Video Server User’s Guide System Requirements Network 10Base-T Ethernet or 100Base TX Fast Ethernet Recommended PC or Notebook to Access the NETWORK VIDEO SERVER. System requirement: CPU : Pentium II, 266 MHz or above Memory Size: 32 MB (64MB recommended) VGA card resolution: 800x600 or above Web Browser: Internet Explore 5.0 or above (Active X & JAVA Mode-Image View for Windows OS and JAVA Mode – Image View for other OS) Netscape 6.
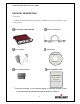
Network Video Server User’s Guide PHYSICAL DESCRIPTION Contents Carefully remove all items from the package.
Network Video Server User’s Guide Front Panel Video Video Output Network LED On Air LED Video Input: To input video signal through a coaxial cable Video Output: To output video signal through a coaxial cable. (Roof-through from “Video Input” BNC connector) PWR LED (RED): This LED indicates the status of Power on and off. NETWORK LED (GREEN): This LED indicates the status of network. ON AIR LED (GREEN): This LED indicates the operating status.
Network Video Server User’s Guide Rear Panel Power Ethernet RS232/485 Port Digital Input Power Out Digital Output Power Connector: Only use the AC Adapter provided by your dealer to avoid any possible damage from electric shock. Power Out, Digital Input, Digital Output: To connect external devices such as infrared Sensors, alarms, or motion detectors (please refer to Appendix F – The I/O Connector). Ethernet Connector: Connect 10baseT Ethernet or 100base TX Fast Ethernet cable.
Network Video Server User’s Guide Installation Overview Installation Summary Connect Ethernet and Power to NETWORK VIDEO SERVER on local network for configuration Insert a program CD of NETWORK VIDEO SERVER to a PC on local network Assign an IP address with IP installer to NETWORK VIDEO SERVER and configure administrator’s condition Configure Users and Access Rights Connecting Connect Ethernet Cable to the Ethernet port in the rear Connect the power supply to a power supply port in t
Network Video Server User’s Guide ASSIGNING IP ADDRESS & ACCESSING NETWORK VIDEO SERVER’S HOMEPAGE Access via IP Addresses To access the NETWORK VIDEO SERVER, you need to assign an appropriate network IP address. Important To access NETWORK VIDEO SERVER, you first should assign an appropriate IP address.
Network Video Server User’s Guide Installing NETWORK VIDEO SERVER in your Network 1. Connecting with direct cable (Non Crossover UTP cable). Used when connecting the NETWORK VIDEO SERVER to a switch, hub or router. Leased Line, xDSL Line, etc Internet ROUTER HUB Remote User Direct Cable Connect Server to a PC through HUB Local User 2. Connecting with Crossover UTP Cable. Use the crossover cable to directly connect the NETWORK VIDEO SERVER to a PC.
Network Video Server User’s Guide Installation Using Windows IP Installer To install an IP address, you should use the IP Installer provided with NETWORK VIDEO SERVER. 1) After you start IP INSTALLER it scans your network for available NETWORK VIDEO SERVERS and NETWORK IP CAMERAS. IP INSTALLER displays all devices found in the list box. 2) In order to change one particular NETWORK VIDEO SERVER (or NETWORK IP CAMERA), simply highlight the entry in the list box.
Network Video Server User’s Guide Information on IP Addresses 1. If you do not know which IP Address you have to enter in IP INSTALLER you should ask your Network Administrator for an available IP Address. 2. In case you are installing Network IP Camera in Home Network which communicates to the Internet using a Broadband Router, you should perform the following steps: 2.1. Find out the IP Range of your Network. Example: Windows XP Home Edition Click on: START -> Settings -> Network Connections.
Network Video Server User’s Guide Assigning IP Address by using Hyper Terminal (Advanced Users only) This chapter is for advanced users only. Normally it is not required to access the camera via Hyper Terminal. The installation via IP INSTALLER is the preferred method. You may skip this chapter and continue with “Accessing NETWORK VIDEO SERVER Homepage”. Configuring Hyper Terminal Hyper Terminal is a basic program for Windows 9x/NT/2000/XP.
Network Video Server User’s Guide ③ Configure bit/sec as 19200 and leave other settings at the default values. ④ The panel shows up like thus image when configured properly.
Network Video Server User’s Guide Assigning IP Address Follow these steps to assign an IP address using Hyper Terminal 1. Execute “Hyper Terminal” on your PC 2. Connect RS232 Cable to the serial port of PC that you have selected in Chapter 4.3.1 Configuring Hyper Terminal and the NETWORK VIDEO SERVER serial port while Hyper Terminal is executed. 3. Supply power to the NETWORK VIDEO SERVER. 4. A count down will start with the message “Press any key to stop auto-boot.” 5.
Network Video Server User’s Guide 6. You can see Network Configuration while [Boot] Prompt is running by pressing ‘p’ key again. Here, inet on ethernet (e), host inet (h) and gateway inet (g) values are network configuration values. You should review these values and change accordingly. If you don’t know what value you should assign, contact your network administrator. Inet on ethernet (e) is IP address and subnet mask address of NETWORK VIDEO SERVER.
Network Video Server User’s Guide Gateway inet (g) is the gateway address of Network Camera 7. Type ‘c’ key to change the network configuration in [Boot] prompt. If you type ‘c’ key, NETWORK VIDEO SERVER shows you the information you can change its values and the current assigned values. You can change as the following figure. 8. When you terminate hyper-terminal program after you changed network configuration, hyper-terminal program asks you whether you saved the session.
Network Video Server User’s Guide Accessing NETWORK VIDEO SERVER After assigning NETWORK VIDEO SERVER an IP address you may access NETWORK VIDEO SERVER and monitor real-time image on Internet. You may configure NETWORK VIDEO SERVER with any standard Web browser on local or remote network. Starting Web Browser Start your web browser and enter the IP Address of Network Video Server. The Default Address: http://192.168.1.221 Login Page This page is to login to NETWORK VIDEO SERVER.
Network Video Server User’s Guide 1. ID and Password If you key in a user ID and password, you can access the camera to monitor real-time video. With administrator’s ID and password, you can access real-time video with administrator’s authority. The default value of both user ID and password are “admin” and the administrator may change it at the Administrator Menu. Each ID and Password must be composed of no more than 10 bytes (e.g. 10 English letters).
Network Video Server User’s Guide Manual installation of Active-X If Active-X program fails to be installed automatically, you may install it manually. The manual installation program is to be downloaded by clicking ‘here’ as follows: Note: If you have any problem when you install ActiveX, visit http://www.intellinetnetwork.com/driver/NetCam.exe to download and install ActiveX manually. Please follow the instructions to install Active-X manually. Please follow the instruction to install Active-X manually.
Network Video Server User’s Guide 4) Java Applet for Macintosh or Unix/Linux System users and Windows Users who do not use MS Internet Explorer If you are using Microsoft Windows as the Operating System and use MS Internet Explorer as the primary web browser, than there is no need to use the JAVA Applet. In all other cases ActiveX technology is not available and JAVA is the option to go with.
Network Video Server User’s Guide NETWORK VIDEO SERVER Homepage Having completed the login procedure, you now see the NETWORK VIDEO SERVER homepage 1. Connected Client It show the number of multi access users. (100 multi users can be accessed simultaneously.) 2. Administrator Menu This button is to access the administration menu. However, only the user who has authority as an administrator can access the page with administrator’s ID and Password (please refer to Configuring Administration Menu). 3.
Network Video Server User’s Guide 4. Save, Stop save, snap shot, show only image ① Save, stop save Users can save real time images from NETWORK VIDEO SERVER on PC. Press ‘save’ button then select folder that you want to save images. (The image is saved as an AVI file.) Once it starts to save images, “Saving” message and XviD Status appear. To stop saving, press “stop, Save” button. (Saving Mode) (XviD Status) NOTE Click the “Install XviD” to install the necessary video codec on your system.
Network Video Server User’s Guide ② Snap Shot To save only one image, press “snap shot” button and then select a folder. Save the image as JPG file. (Default file name dedicate the date and time) ③ Show only image When you want to see only video panel, Press “show only image”. 5. Frame rate You may choose image transmission speed. If you choose the option ‘Fastest’, you will get images at the best possible frame rate. The transmission speed depends on your network line’s capacity and PC’s performance 6.
Network Video Server User’s Guide CONFIGURING ADMINISTRATION TOOLS Press “Administrator Menu”. You can control the configurations of NETWORK VIDEO SERVER by Administrator’s Tool. Only authorized user can access administrator tool. If non-authorized users try to access it, you may see the caution message “You are not an administrator”. You may control all configurations for NETWORK VIDEO SERVER.
Network Video Server User’s Guide Administration Menu’s Overview The table below provides a one-step overview of the Administrations Tools: Image Configuration Network Configuration User Configuration Event Trigger Configuration Time Configuration System Configuration Home To configure compression rate, image size, brightness, contrast, etc.
Network Video Server User’s Guide Image Configuration NETWORK VIDEO SERVER Image Parameters 1. Video Input Network Video Server supports two different types of analog video Signals: NTSC and PAL. NTSC is used in the United States mainly while PAL is being used across the globe, especially in Europe. Ultimately this setting depends on the standard which the CCTV Camera you connect supports. If the camera supports PAL you need to select PAL, even if you are located in the United States. 2.
Network Video Server User’s Guide 3. Image size You may choose the image size VGA (640x480) or QVGA (320x240) and SQVGA (160*120). Larger resolutions g lower frame rates while small sizes result in higher frame rates. 4. Vertical Flip To turn the image view upside down (no effect on images uploaded via FTP or Email!). 5. Horizontal Flip To switch the image view right from left (no effect on images uploaded via FTP or Email!). 6.
Network Video Server User’s Guide Network Configuration This screen defines the network type and addresses of the NETWORK VIDEO SERVER. Here you can configure the Camera’s IP address, the DNS server, the DDNS Setup and the SMTP Server.
Network Video Server User’s Guide 1. Set IP Address, Subnet mask, gateway address. To set the IP address, Subnet mask, and gateway address manually, you may select “manually” in combo box. In case of selecting “manually”, you can configure them with the IP installer as well as this page. (If you have trouble configuring network system information, please ask your network administrator.
Network Video Server User’s Guide 5. Upgrade port number To set the Port Number for upgrading firmware. Default port number is “9000” and users can select from 8000~65535. 1. PTZ port number (not applicable for NETWORK VIDEO SERVER) To set the port number for PTZ control. (Default is ‘10000’ and users can select from 8000 to 65535. CAUTION Be careful not to duplicate port number between Image Transfer Port Number and Upgrade port number. If it is duplicated, the warning message may appear. 2.
Network Video Server User’s Guide 5. Use SMTP authentication If you need user authentication for using the SMTP server, check in a box. and enter you ID, Password and Realm for your SMTP server. (The NETWORK VIDEO SERVER’s SMTP authentication is supporting “LOGIN” method) - Authentication method: Choose the SMTP authentication method. - ID : Enter the user ID for SMTP authentication. - Password: Enter the user Password for SMTP authentication..
Network Video Server User’s Guide User Configuration This screen is used to configure IDs and Passwords for an administrator and up to 5 users. 1. User Account (max. 10 characters) There is one administrator account and 5 user accounts. Account names can be changed. 2. Password (max. 10 characters) If you want to open your NETWORK VIDEO SERVER to everyone, you may not change default user’s ID and Password, However you should change administrator’s ID and Password with unique Ones of yours. 3.
Network Video Server User’s Guide Event Trigger Configuration NETWORK VIDEO SERVER can perform certain tasks without user interaction. It can send images via Email or upload JPG images to an FTP Server, i.e. an Internet Web Server or a shared network drive. It can trigger external devices by supplying power to the 12V output port. And it can access shared network drives for storage of JPG images. There are three trigger events: 1. Activated by external security sensors.
Network Video Server User’s Guide 1. Trigger Condition This is to select option how to send an event signal to NETWORK VIDEO SERVER. ① Activation of digital input port The NETWORK VIDEO SERVER receives an event signal from external devices such as infrared Sensor Alarm sensor etc. The “Trigger Condition” (closed or opened) defines the alert state of the digital IO connector. There are two types of sensors on the market.
Network Video Server User’s Guide 2. Image capture option This is to configure image capture option when an event is triggered. ① Before Event You may set the starting time to capture image before event is triggered. (Input limitation is from 0 to 21 seconds.) ② After Event You may set the finishing time to capture image after event is triggered. (Input limitation is from 0 to 21 seconds.) ③ Image capture frame rate Set the frame rate from 1 to 15fps when the image is being captured.
Network Video Server User’s Guide 3. Trigger Output Here you define which action the camera is to perform when a trigger condition is met. 1. External devices signal output This is to supply voltage to output port when events are triggered. (This option is only activated when you select “Activation of digital output” option in previous “Trigger Condition” option.) 2. Send alarm to ETSP client (currently not available, option not useable at this point) 3.
Network Video Server User’s Guide Time Configuration This screen is to configure date and time. 1. Synchronized with NTP server The NETWORK VIDEO SERVER automatically configures Date & Time through the NTP (Network Time Protocol) server. The NTP Server is based on Greenwich time. Select NTP server, IP address and Time zone. The Update Interval tells the Video Server how often to synchronize the internal time with the external NTP Server. Possible values are 2880 minutes (= 2 Days) to 1 minute.
Network Video Server User’s Guide System Configuration This screen is used to configure camera name, location, and image sensor oscillator for frequency, PTZ control and System information for NETWORK VIDEO SERVER. 1. Server name You can enter the Name of your camera here. The name must not be longer than 15 characters. 2. Server location You may enter the location of your camera here. The location must not be longer than 30 characters. 3.
Network Video Server User’s Guide 4. Direct public access to image via HTTP Controls access to the live image via http command http://camera_address/jpg/image.jpg. This feature can be important when using the Video Server in 3rd party video surveillance systems. With Direct Public Access disabled a username and password must be provided in order to view the image. With Direct Public Access enabled no username and password is required in order to view the image. 5.
Network Video Server User’s Guide PTZ CONTROL (only for use with PTZ CCTV Cameras) This screen is to control PTZ function. This PTZ control box may be activated only if PTZ external devices are connected to NETWORK VIDEO SERVER and configure PTZ control enable in System Configuration screen. External PTZ Devices must be compliant to the PELCO protocol.
Network Video Server User’s Guide PoE (Power over Ethernet) Support Power over Ethernet uses single Ethernet cable to transmit both power and data. For PoE to work, the electrical current must go into the data cable at the power-supply end, and come out at the device end, in such a way, as shown below, that the current is kept separate from the data signal so that neither interferes with the other. The current enters the cable by means of a component called an injector.
Network Video Server User’s Guide APPENDIX A. Technical Specifications Image Resolution: 640x480, 320x240, 160x120 Standard JPEG Compression – 10 levels of compression Network 10BaseT Ethernet or 100Base-TX Fast Ethernet Twisted pair category 5 cables, Standard RJ45 connector Supporting protocol: TCP/IP, UDP, PING, ARP, FTP, TFTP, and HTTP Configuring is achieved by private setup program and Web server built in administration page.
Network Video Server User’s Guide Approvals EMC: FCC Class B, CE EN55022/1994, EN61000-3-2 & 3: 1995, EN50082-1: 1997 Operating Temperature 0 ~ 50 Degrees Centigrade Others Operating Status LED, Power LED, Image Capture LED, Network Packet Transmit LED EEPROM clear button 49
Network Video Server User’s Guide B. Frequently Asked Question (FAQ) Asks for the features 1. What is a Video Server? A Network Video Server is a network CCD camera server with an integrated Internet Server, image compression device, flash memory, and many other features. No other hardware is necessary for use. 2. What if I forgot my password? Every access to Video Server needs authentication.
Network Video Server User’s Guide D. In case that you use default account, the administrator may protect the video from the public. 6. How can I use a name instead of the IP address to connect Video Server? To allow users to connect to Video Server through an easily memorized name, the administrator must installs the Video Server with a reserved IP address and assigns it with a name in the domain name service, then users can connect to Video Server by typing a name instead of IP address.
Network Video Server User’s Guide 14. Can I view a Video Server image from my PDA? Network IP Cameras can now be viewed on most Windows CE, including Pocket PC and Pocket PC 2002, Windows Mobile 2003 and Windows Mobile 2005 devices, such as the Compaq iPAQ, HP Jornada, Dell Axim, Casio Cassiopeia and many other devices. The free Pocket PC Viewer can be downloaded from the INTELLINET NETWORK SOLUTIONS Web Site. C.
Network Video Server User’s Guide Symptoms, Possible Causes and Remedial Actions Symptoms NETWORK VIDEO SERVER cannot be accessed from a Web browser The Power LED is not constantly lit Possible causes Remedial actions The IP address is 1.Disconnect your NETWORK VIDEO SERVER already used by another from the network devices 2.
Network Video Server User’s Guide The operating LED status Faulty connecting Verify that the power is well connected Check the internet firewall with your system Your NETWORK Firewall protection manager VIDEO SERVER works locally, but not Router configuration Verify the Router Setup. externally. incorrect Direct exposure to extreme sunlight or halogen light may cause serious damage to the CMOS sensor. Reposition your NETWORK VIDEO SERVER into a more shaded location immediately.
Network Video Server User’s Guide D. Utilizing IP Addresses on Local Network Introduction Access to the Internet is achieved via Internet IP addresses. Currently, IP addresses are limited. There are 5 classes of networks, and each network contains IP addresses. A network can only hold a limited number of IP addresses. The number of IP addresses depends on the network class. The 5 classes are labeled “A” through “E” with the most common one being the “C” class network.
Network Video Server User’s Guide C Class Network 1. Features of Addresses IP address: The three-digit number in room ‘X4’ is for the Host ID. The number ranges from 0 to 255. Among the numbers, 0 is used for Network ID, 1 is used for Router IP (Gateway address) and 255 are used for Broadcast address. The numbers from 2 to 244 are IP addresses that can be assigned to NETWORK VIDEO SERVER, PC etc. Network ID: Identifies a network. Generally the first number assigned is Network ID.
Network Video Server User’s Guide Sub-Network ID: xxx.xxx.xxx.0 Gateway Address: xxx.xxx.xxx.1 Subnet Mask: 255.255.255.192 Broadcast Address: xxx.xxx.xxx.63 IP Addresses: xxx.xxx.xxx.2 – xxx.xxx.xxx.62 Sub-Network ID: xxx.xxx.xxx.64 Gateway Address: xxx.xxx.xxx.65 Subnet Mask: 255.255.255.192 Broadcast Address: xxx.xxx.xxx.127 IP Addresses: xxx.xxx.xxx.66 – xxx.xxx.xxx.126 Sub-Network ID: xxx.xxx.xxx.128 Gateway Address: xxx.xxx.xxx.129 Subnet Mask: 255.255.255.128 Broadcast Address: xxx.xxx.xxx.
Network Video Server User’s Guide Gateway Address: xxx.xxx.xxx.193 Subnet Mask: 255.255.255.192 Broadcast Address: xxx.xxx.xxx.255 IP Addresses: xxx.xxx.xxx.194 – xxx.xxx.xxx.
Network Video Server User’s Guide E. Updating Firmware CAUTION Follow the instruction as provided in this manual. During the process you must not disconnect Network Video Server from the network or power source. Otherwise your NETWORK VIDEO SERVER can be seriously damaged beyond repair. If the Firmware Upgrade Process failed and NETWORK VIDEO SERVER does not operate properly after the upgrade, please contact your dealer or get in contact with our technical support team on the web at http://www.
Network Video Server User’s Guide The Firmware Upgrade Process. The NETWORK VIDEO SERVER can be upgraded via the LAN or remotely over the Internet (please see note below). Follow these steps to install a new Firmware: 1. Confirm that the NETWORK VIDEO SERVER is connected to your PC. (As long as you can access your NETWORK VIDEO SERVER Homepage, you can process upgrading) 2. Execute the Firmware Update Utility (which is included in the Firmware ZIP file from the web site). 3.
Network Video Server User’s Guide F. The I/O Connector The I/O Connector provides the physical interface to a digital output, and a single digital photocoupled input that is used for connecting a variety of external alarm devices to the NETWORK VIDEO SERVER; including, IR-sensors, switches and alarm relay. In combination with the configurable alarm facilities, you can quickly develop a variety of security applications that are triggered on time – or alarm based – events.
Network Video Server User’s Guide G. RS 232 CABLE & Pan/Tilt/Zoom Control The Serial Connector In absence of a local network connection, the RS232 serial connector provides a physical interface for connecting a PTZ devices or computer to NETWORK VIDEO SERVER. This means that NETWORK VIDEO SERVER can operate as a standard unit -independent of any computer network. Users can connect to NETWORK VIDEO SERVER by external mode.
Network Video Server User’s Guide RI : Ring Indicator Pan/Tilt/Zoom Control Pan/Tilt/Zoom control interface of NETWORK VIDEO SERVER is initially set to support RS485. To operate Pan/Tilt/Zoom control through NETWORK VIDEO SERVER, camera or receiver is to be connected to 9PIN DIN connector of rear panel as shown below; 9PIN DIN Connector Receiver or Camera 7 8 + - If your camera supports RS232 instead RS485 for Pan/Tilt/Zoom control, then, follow the next directions. 1. Uncover the rear panel. 2.
Network Video Server User’s Guide H. Dynamic Domain Name Service (DDNS) Your internet Service Provider (ISP) provides you at least one IP address which you use to connect to the Internet. The address you get may be static, meaning it never changes, or dynamic, meaning it’s likely to change periodically. Just how often it changes, depends on your ISP.
Network Video Server User’s Guide How to use ODS DDNS service 1. Get access to ODS homepage (www.ods.org). 2. In case you didn’t register your ID, you should select ‘REGISTER’ menu and then register your ID/ Password. Otherwise, you just login with registered ID/Password. 3. After you register ID/Password normally, you can see ‘Manage’ page.
Network Video Server User’s Guide If you want to use normal DDNS service among many services, you should fill in the blanks in a check box and then click “Add Host” button. ① Host: write name you want. ② Domain: Select domain you want. ③ Type: Select ‘A’ (‘A’ is normal) ④ Target: Write initial IP of equipment but just write any IP address that is in the form of “xxx.xxx.xxx.xxx” ⑤ TTL Priority: Do NOT select. This is option. If you want to select “intellinet.dyndns.
Network Video Server User’s Guide How to use DynDNS DDNS server 1. Get access to DynDNS Homepage (www.dyndns.org). 2. In case you didn’t register your ID, click “Sign Up Now” and then register your ID. Otherwise, you just login with registered ID.
Network Video Server User’s Guide 3. Click “Add Host”, and then go to the next page.
Network Video Server User’s Guide 5. Enter Domain name you want and just leave other items, and then Click the “Add Host” button to register. If you want to know detail of each field, please refer to FAQ of each homepage. 5. You may see this page that shows setting information. after the register is succeeded, NOTE After completing DynDNS setting, you should activate DDNS support in Network Video Server. See next page for details.
Network Video Server User’s Guide DDNS registration for the NETWORK VIDEO SERVER 1. Login to the Administrator Menu, then open the NETWORK CONFIGURATION Screen. 1. Select the DDNS service (www.ods.org or www.dyndns.org). 2. Enter your DDNS Account User ID. 3. Enter your DDNS Account Password. 4. Enter the Host Name you have registered with your DDNS Service, i.e. example.dyndns.org or yourcamera.dyndns.org or intellinet.ods.org. 5. Activate the checkbox (x) DDNS manual update and click on SUBMIT. 6.
Network Video Server User’s Guide I. High Speed Solutions This information is to help you access high-speed Internet services such as xDSL or a cable modem connection. However, most high-speed Internet Services provide you with some external IP addresses, there are several practical issues that should be considered.
Network Video Server User’s Guide ROUTERS AND FIREWALLS Another solution is to use one of several small routers/firewalls currently available on the market. These provide the necessary NAT functionality and allow complete independence for your PC, which can be switched off or rebooted without affecting the image transmission from your NETWORK VIDEO SERVER.
Network Video Server User’s Guide J. Reinstating the Factory Default Settings This information explains instructions in detail on how to set the default settings in the NETWORK VIDEO SERVER. In certain circumstances it may become necessary to restart or reinstate the Factory Default settings for your NETWORK VIDEO SERVER: This is performed by pressing the Reset Button, or using Hyper Terminal Setting.
Network Video Server User’s Guide NOTE Reinstating the original default settings will cause all parameters (Including IP address) to be reset. Factory default setting Administrator ID: admin Administrator Password: admin Guest ID: guest Guest Password: guest IP Address: 192.168.1.221 Subnet Mask Address: 255.255.255.0 Gateway Address: 192.168.1.1 Server IP Address: 192.168.1.
Network Video Server User’s Guide K. Glossary of Terms ActiveX – A control (or set of rules) used by a browser. ActiveX controls are often downloaded and installed automatically as required. ARP – Address Resolution Protocol. A method for finding a host's Ethernet address from its Internet address. The sender broadcasts an ARP packet containing the Internet address of another host and waits for it (or some other host) to send back its Ethernet address.
Network Video Server User’s Guide FTP - A client-server protocol that allows a user on one computer to transfer files to and from another computer over a TCP/IP network. Also the client program the user executes to transfer files. It is defined in STD 9, RFC 959. HTML - A markup language used to structure text and multimedia documents and to set up hypertext links between documents, used extensively on the World Wide Web.
Network Video Server User’s Guide SMTP – Simple Mail Transfer Protocol TCP/IP - Transmission Control Protocol/Internet Protocol. Wide-area-networking protocol that makes the Internet work. TCP/IP is used on many networks, including the Internet. TCP keeps track of the individual packets of information and IP contains the rules for how the packets are actually sent and received. URL – Uniform Resource Locator. An “address” on the network. WAN – Wide–Area–Network.
Network Video Server User’s Guide www.intellinet-network.