
User's Guide
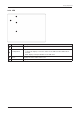
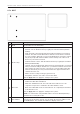
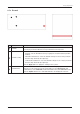
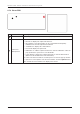
Table Of Contents
- Chapter 1. Precautions
- Chapter 2. Certifications
- Chapter 3. Introduction
- Chapter 4. Planning Installation
- Chapter 5. Installing ADU
- Chapter 6. Installing BDU
- Chapter 7. Operating BDU
- Chapter 8. Using AptusLX
- Chapter 9. Specification
- Chapter 10. Warranty
- Chapter 11. Appendix
- Chapter 1. Precautions
- Chapter 4. Planning Installation
- Chapter 5. Installing ADU
- Figure 9: Antenna Dimensions
- Figure 10: ADU Mounting Template
- Figure 11: Recommended Mast Design using Inner Holes (with M6 Bolts)
- Figure 12: Recommended Mast Design using Outer Holes (with M10 Bolts)
- Figure 13: Mounting Antenna using Inner Holes (with M6 Bolts)
- Figure 14: Mounting Antenna using Outer Holes (with M10 Bolts)
- Figure 15: Installing 40A Pole Bushing inside Pole Tube
- Figure 16: Installing Pole Bracket
- Figure 17: Mounting Antenna on Pole Mounted Bracket
- Figure 18: Vent Hole
- Figure 19: Connecting RF Cable using Inner Holes (with M6 Bolts)
- Figure 20: Connecting RF Cable using Outer Holes (with M10 Bolts)
- Chapter 6. Installing BDU
- Figure 21: BDU Dimensions (Direct Mounting Type)
- Figure 22: BDU Dimensions (19-inch Rack Mounting Type_Optional)
- Figure 23: BDU Mounting Template
- Figure 24: Direct Mounting of BDU
- Figure 25: Attach Connector Tray to BDU
- Figure 26: Attach Rackmount Plate to BDU
- Figure 27: Intellian C700 System with Connected Devices
- Figure 28: BDU Back Panel View
- Figure 29: LAN Ports (RJ45) Pinout
- Figure 30: Phone Port (RJ14 & 6P4C) Pinout
- Figure 31: Using Cable Splitter with RJ14 Phones
- Figure 32: GPIO Connector Pinout
- Figure 33: Power Connector Pinout
- Figure 34: BDU to Antenna Cable Connection
- Figure 35: Grounding Stud Connection
- Chapter 7. Operating BDU

58
Intellian C700 - Marine Satellite Communication System
No. Item Description
1
Wi-Fi
Sets
the Wi-Fi access information.
2
Wi-Fi Cong
Sets
the Wi-Fi access point conguration.
• Activate: sets the Wi-Fi function by toggling the activation button (Enable/
Disable).
• SSID: the SSID is the network name shared among all devices in a wireless
network. The SSID must be identical for all devices in the wireless network.
It is case-sensitive and must not exceed 32 alphanumeric characters, which
may be any keyboard character. Make sure this setting is the same for all
devices in your wireless network.
• SSID Broadcast: sets the SSID broadcast function by toggling the activation
button (Enable/Disable).
• Channel: selects an appropriate channel from the list provided to correspond
with your network settings. All devices in your wireless network must use the
same channel in order to function correctly. Try to avoid conicts with other
wireless networks by choosing a channel where the upper and lower three
channels are not in use.
• Mode: sets the security mode type (Open/Secret).
• Passphrase: enter the user name connected to Wi-Fi.
Click the Apply button to apply the settings to the system.
3
Mac Filter
Select
the mac lter mode (Disable/White List/Black List).
• Disable: the MAC lter is disabled.
• White List: in Whitelist mode, the router will restrict LAN access to all
computers except those contained in the "Mac Address" menu.
• Black List: in Blacklist mode, the listed devices are completely blocked from
local network access.
Click the Apply button to apply the settings to the system.
NOTE: Use caution when using the MAC Filter to avoid accidentally blocking
yourself from accessing the router.
4
Mac Address
Displays the
mac address
. To create new
mac addresses
, click the
plus icon
.
Then the pop-up window is opened. You can assign the new
mac address
. C
lick
the Create button. The created mac addresses display on the list.
8.7.2 Wi-Fi
2
3
4
1