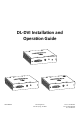
DL-DVI Installation and Operation Guide Rev 140512 11675 Ridgeline Dr Colorado Springs, CO 80921 Phone: 719-260-0061 Toll-Free: 800-530-8998 Fax: 719-260-0075
DL-DVI Installation Guide Important Safety Instructions »» Please completely read and verify you understand all instructions in this manual before operating this equipment. »» Keep these instructions in a safe, accessible place for future reference. »» Heed all warnings. »» Follow all instructions. »» Do not use this apparatus near water. »» Clean only with a dry cloth.
DL-DVI Installation Guide 3
DL-DVI Installation Guide Table of Contents Product Overview ��������������������������������������������������������������������������������������������������������������������������������������� 5 Package Contents ��������������������������������������������������������������������������������������������������������������������������������������� 6 Front and Rear Panel Descriptions �������������������������������������������������������������������������������������������������������������� 7 DL-DVI-S �
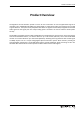
DL-DVI Installation Guide Product Overview The DigitaLinx DL-DVI extenders provide a means for the transmission of non-encrypted DVI-D signals at resolutions up to 1920x1200 and 1080p, plus either S/PDIF or analog stereo audio, over Category 5e or 6 cable at great distances. The system is fully compatible with all DVI 1.0 signals and seamlessly integrates the selected audio signal into the signal path. The unique locking power connectors are used to enhance overall system security.
DL-DVI Installation Guide Package Contents The DL-DVI extender in the package will vary depending upon the product ordered. DL-DVI-S DL-DVI-R100 DL-DVI-R250 Please verify the following items are in the product box prior to installation of the DL-DVI extenders. 6 Alignment Screwdriver 1 ea AU, EU, and UK AC Adapters 1 ea 5V DC 2.
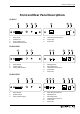
DL-DVI Installation Guide Front and Rear Panel Descriptions DL-DVI-S 1 1. 2. 3. 4. 2 3 DVI-D Input S/PDIF Input Analog Audio Input Audio Selection Switch 4 A A. B. C. B C Twisted Pair (UTP) Output 5V DC Input Power LED DL-DVI-R100 1 1. 2. 3. 2 3 DVI-D Output S/PDIF Output Analog Audio Output A A. B. C. D. E. B C D E D E F EQ Adjustment Gain Adjustment Twisted Pair (UTP) Input 5V DC Input Power LED DL-DVI-R250 1 1. 2. 3. DVI-D Output S/PDIF Output Analog Audio Output 2 3 A A.
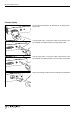
DL-DVI Installation Guide Installation Instructions Quick Start 1. 2. 3. 4. Connect source Connect display Apply power Adjust signal Connect Source Connect the video source to the DL-DVI-S with a DVI-D cable. Set the audio selector switch to the audio connection that will be used in the installation. If using S/PDIF audio, connect the audio source to the DL-DVI-S with a coaxial S/PDIF cable. If using analog audio, connect the audio source to the DL-DVI-S with a 3.5 mm stereo audio cable.
DL-DVI Installation Guide 1 8 TIA/EIA-568B Pin 1 Pin 2 Pin 3 Pin 4 Pin 5 Pin 6 Pin 7 Pin 8 Orange/White Orange Green/White Blue Blue/White Green Brown/White Brown The UTP ports require a standard straight-through Category 5e or greater cable with the TIA/EIA-568B crimp pattern for optimal operation. Connect the Category cable to the UTP port on the DL-DVI-S.
DL-DVI Installation Guide Connect Display Connect the DL-DVI-R100 or DL-DVI-R250 to the display with a DVI-D cable. If using S/PDIF audio, connect the audio output device to the DL-DVI-R100 or DL-DVI-R250 with a coaxial S/PDIF cable. If using analog audio, connect the audio output device to the DL-DVI-R100 or DL-DVI-R250 with a 3.5 mm stereo audio cable. Connect the Category cable to the DL-DVI-R100 or DL-DVI-R250.
DL-DVI Installation Guide Connect Power Connect the power supply to the 5V DC port on the DL-DVI-S. Connect the power supply to the 5V DC port on the DL-DVI-R100 or DL-DVI-R250.
DL-DVI Installation Guide Adjust Signal The DL-DVI-R250 features switches to provide a boost to the incoming signal based on the cable distance between the transmitter and the receiver. 1 2 CTI 250M 150M 100M 50M If the image is blurry, adjust the EQ setting on the receiver until the image becomes clear. If the image is dim or too bright, adjust the Gain setting on the receiver until the image becomes clear.
DL-DVI Installation Guide Troubleshooting Extender does not power on »» Verify power outlet is active. »» Verify power supply is functioning properly by using on another extender. Cannot see image »» »» »» »» Verify video source provides video to local display. Verify display provides video to local video source. Verify twisted pair cable wiring is terminated correctly. Verify continuity of twisted pair cable. Image is blurry »» Adjust EQ control on the receiver.
DL-DVI Installation Guide Technical Specifications I/O Connections (DL-DVI-S) DVI-D Input Stereo Audio Input S/PDIF (Coaxial) Audio Input 5V DC Power Twisted Pair Output Audio Mode Switch One (1) Female DVI-I Receptacle One (1) 3.5 mm Jack (TRS) One (1) Female RCA Receptacle One (1) Locking Coaxial Barrel (5.5mm OD; 2.
DL-DVI Installation Guide 15
Thank you for your purchase. Please contact us with your questions and comments. 11675 Ridgeline Drive Colorado Springs, Colorado 80921 USA Phone: 719-260-0061 Fax: 719-260-0075 Toll-Free: 800-530-8998 www.libav.