
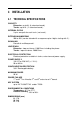
User Guide


49
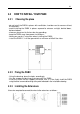
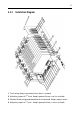
4.2.5
Installating the Lines
Next to the lines connectors, there are various plastic fixers to help distributing the
wiring inside the PABX.
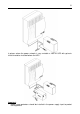
The connections between the lines and the trunk boards is done using an internal
wiring. Whenever the trunk board is installed, the wiring should be connected to
CN2 .
If the trunk board is installed without the line, the access to the trunk should be
disabled using jumper J1, to avoid having the PABX accessing the trunk without a
telephone line. Each board has a possibility to receive 2 telephone lines. Enabling
the access to line 1 and 2 is done by closing jumper J1A and J1B respectivaly.
Line 1 and 2 of the 1
st
trunk board are linked, in case of power failure, to the
second and third extension of the 1
st
extension board. Therefore connectors CN1A
and CN1B of the trunk board should always remain connected to the wiring directly.
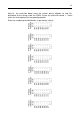
When installing the lines, always check the jumper position as follows :
J1A and J1B:
closed : enable the trunk circuit. If there is no line in the opened positions, the
corresponding J1 must be opened to avoid the having the extensions using a
position of the trunk.
J2A and J2B:
Alter the ring circuit sensibility. To keep the circuit less sensitive, J2A and
J2B must
be in position 2-3.
to keep the circuit more sensitive, J2A and J2B must be in position 1-2.
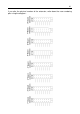
J3A/B and J4A/B
if you are using a caller id board, J3A/B and J4A/B must be in position “IDA”.
If you are not using caller id board, J3A/B and J4A/B should return to position “NM”
(normal). If you disable the subscriber id in one of the lines, the corresponding
jumpers J3 and J4 must return to position “NM”(normal).