
Service Guide


Hardware Installations and Upgrades
Intel
®
Server System P4000IP and Intel
®
Workstation System P4000CR Service Guide 67
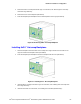
Figure 82. Installing Hard Disk Drive – Removing 3.5” HDD carrier
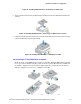
2. Remove the four screws securing the HDD interface bracket and remove the HDD interface bracket (see
letter C).
Figure 83. Installing Hard Disk Drive – Removing 3.5” HDD interface bracket
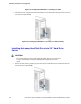
3. Install the hard disk drive using the same four screws as shown. Make sure the connector end of the drive
matches the backplane connector (see letter D).
Figure 84. Installing Hard Disk Drive – Installing 3.5” HDD
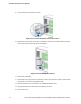
For installing 2.5” Hard Disk Drive as option:
Break off the tab on the HDD interface bracket (see letter d1). Install the HDD interface bracket
from top. Secure the bracket with three screws as shown (see letter d2). Slide the 2.5" HDD into
the bracket to align the screw holes with the right and left rail (see letter d3). Secure the hard
disk drive using the four screws for 2.5" HDD (see letter d4).