
Computer Hardware User Manual

62 SKA4 Baseboard Product Guide
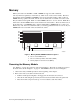
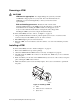
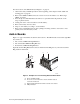
Installing the Memory Module
1. Observe the safety and ESD precautions at the beginning of this chapter.
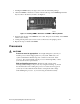
2. Holding the memory module by its edges, align the module so its edge engages the guide rails
at the back and front of the electronics bay.
CAUTION
The memory module is held in place by the 330-pin connector on the
baseboard, the guide rails in the center of the electronics bay. You must
support the module until it is fully seated in the connector.
3. Push the memory module toward the baseboard until it fully engages the connector on the
baseboard.
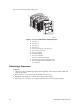
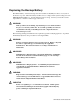
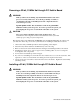
Removing DIMMs
CAUTION
Use extreme care when removing a DIMM. Too much pressure can damage
the socket slot. Apply only enough pressure on the plastic ejector levers to
release the DIMM.
1. Observe the safety and ESD precautions at the beginning of this chapter.
2. Remove the memory module and place it component-side up on a nonconductive, static-free
surface. See “Removing the Memory Module” on page 61.
3. Gently push the plastic ejector levers down. The DIMM is ejected from its socket.
4. Hold the DIMM only by its edges, being careful not to touch its components or gold edge
connectors. Carefully lift it away from the socket and store it in an antistatic package.
5. Repeat to remove other DIMMs as necessary.
Installing DIMMs
CAUTIONS
Use extreme care when installing a DIMM. Applying too much pressure can
damage the socket. DIMMs are keyed and can be inserted in only one way.
Mixing dissimilar metals might cause memory failures later, resulting in
data corruption. Install DIMMs with gold-plated edge connectors only in
gold-plated sockets.
✏
NOTE
DIMM slots on the memory module must be installed only in certain
configurations. See “Memory” on page 16 for requirements.