
Installation Guide


2.5” Hard Drive Carrier Kit Installation Guide
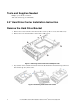
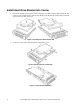
About the 2.5” Hard Drive Carrier Kit
Use the instructions in this 2.5” Hard Drive Carrier Kit Installation Guide to assemble a 2.5” hard drive
into the carrier kit and then install into a 3.5” hard drive hot swap bay in the Intel
®
chassis and server
system. Refer to your server system user guide or service guide for how to install a hot swap hard drive
carrier into the system. Refer to web link below for compatible Intel
®
chassis and system list.
http://www.intel.com/support/motherboards/server/sb/CS-030726.htm.
NOTE
Refer to your server board documentation to determine SSD/SAS/SATA support
for your server system.
If you want to use your SSD/SAS/SATA drives for a RAID configuration, you may
need to install a RAID add-in card. Refer to your server board documentation and/or
your RAID card documentation for additional installation instructions and
requirements.
Before You Begin
Before removing the access cover for any reason, observe these safety guidelines.
1. Turn off any peripheral devices connected to the server.
2. Turn off the server by pressing the power button on the front of the chassis.
3. Unplug the AC power cord from the chassis or wall outlet.
4. Label and disconnect all peripheral cables connected to I/O connectors or ports on the back of the
chassis.
5. Label and disconnect all telecommunication lines connected to I/O connectors or ports on the back
of the chassis.
6. Provide electrostatic discharge (ESD) protection by wearing an anti-static wrist strap attached to a
chassis ground—any unpainted metal surface—when handling components.
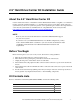
Kit Contents Lists
Each 2.5” Hard Drive Carrier Kit (AXX25DRVADPTR) contains the following items:
Item Quantity
2.5” Hard Drive Carrier 1
M3 Screws 6
This manual 1
2.5" Hard Drive Carrier Kit Installation Guide for Intel
®
Server Chassis/System 1