
Install Guide


Installation Information
6 Slimline USB Floppy/CD-ROM/DVD-ROM Drive Kit Install Guide
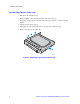
Install Slimline CD-ROM or DVD-ROM Drive
Note: You can install either a slimline CD-ROM drive OR a slimline DVD-ROM drive.You
cannot install both.
Note: For Intel supplied CD-ROM/DVD-ROM drives, the correct setting is “No Jumper”.
Note: For non-Intel supplied CD-ROM/DVD-ROM drives, see the documentation that came
with your slimline drive for master/slave jumper settings.
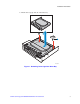
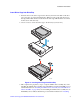
1. Turn the drive cage so that the metal flange at the side of the drive extends to the right.
2. Lay the slimline CD-ROM drive or the slimline DVD-ROM drive in the drive cage,
with the front of the drive facing you. The slimline CD-ROM drive/DVD-ROM drive
lies on top of the slimline floppy drive.
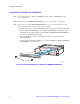
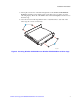
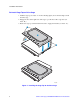
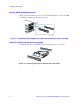
3. Insert the backplane connector into the drive connector (see letter “A” in the
following figure).
4. Use two screws from the bag marked “A” to secure backplane to slimline CD-ROM/
DVD-ROM drive (see letter “B”).
Figure 5. Attaching Backplane to Slimline CD-ROM/DVD-ROM Drive
AF000490
B
A