
Service Guide


Intel
®
Server System SR2612UR Service Guide 77
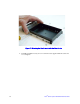
Figure 76. Installing the Four Screws into the Drive Carrier
5. Insert and hand tighten the four (4) 6 x 32 x .25-inch screws. Do not overtighten the
screws as this may strip the threads on either the screw or the disk drive.
6. You can now install the drive into the enclosure.
The universal carrier also has the ability to accommodate an interposer multiplexer
module (MUX) that you can install to accommodate dual-port capability with SATA
drives (SAS drives are already dual ported and do not require a mux). This feature is not
supported on the storage application array, but is used on other enclosures.
Installing a Blank Insert in a Universal Drive Carrier
A drive blank insert (plastic spacer) is used on a drive carrier when no disk drive is
installed. The plastic insert is required to maintain structural integrity of the universal
carrier when used as a blank drive in the enclosure. An enclosure is required to have either
a disk drive or blank in every drive slot to maintain proper cooling.
1. To install the blank insert in the universal drive carrier, position the plastic insert as
shown in the following figure with the connector indentation at the “rear” of the
universal drive carrier.