
Service Guide


Intel
®
Server System SR2612UR Service Guide 35
Removing a Disk Drive Carrier Assembly (or Drive
Blank)
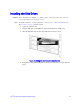
Note: For disk drive installation instructions, see “Installing the Disk Drives” on page 33.
Important Safety Precautions
Before you remove a populated disk drive carrier, read these important notes:
• To avoid data loss, stop all I/O activity on the disk drive before removing it.
(Removing a disk drive during I/O activity could also hang the host system.)
• Do not attempt to remove more than one disk drive or blank drive carrier at a time.
Damage to the drive carrier can occur if adjacent disk drives are removed at the
same time.
• To maintain proper airflow and cooling inside the enclosure, install either a
populated disk drive carrier or a plastic drive blank assembly into the empty drive
slot as quickly as possible.
If you will be installing a replacement drive carrier populated with a new disk drive, allow
it to acclimate to room temperature before continuing.
Removing a Disk Drive
Warning: Disk drives spin at high speed.When removing a Disk Drive Carrier from an enclosure
with power on, unlatch the carrier and allow the drive to completely spin down for
approximately 15-20 seconds before sliding the carrier out of the enclosure. Removing the
Disk Drive Carrier assembly while the drive is spinning could cause injury and may cause
severe damage to the disk drive.
To remove a populated disk drive carrier assembly (or drive blank assembly):
1. Press the button on the assembly to release the lever.