
User Guide


Intel
®
Remote Management Module User’s Guide 15
Note: If you have previously changed the IP address from the default through DHCP, mmconfig,
or the Network Settings web page, and the DHCP server subsequently fails to assign an
IP address, the Intel
®
Remote Management Module defaults to IP address 192.168.0.122.
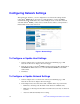
3. In the Speed field, select the LAN speed: Autosense, 100mb, or 10mb from the
drop-down menu. Autosense will automatically select a setting.
4. DHCP (Dynamic Host Configuration Protocol) is enabled by default, allowing your
remote Intel
®
RMM to automatically retrieve an IP address if your subnet has a
DHCP server. If you would like to disable this feature and assign a network address
for the Intel
®
RMM yourself, uncheck the Enable DHCP box. The Gateway
Address, IP Address, and Subnet Mask Address fields will become activated for
you to enter your choices manually.
Note: If your Intel
®
RMM is on a subnet that has no DHCP server, the Intel
®
RMM defaults to
the static IP address of 192.168.0.122. If you select disable DHCP and then enable it
again after you click Apply, your new IP address will display in the address bar. This IP
address will replace your previous IP address.
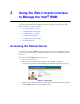
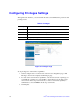
Configuring Session Settings
Through the web interface, you can choose to adjust settings for User Timeout, Web
Server, Video Viewer, and Virtual Media sessions. These adjustments include port
numbers and enable/disable toggles. This page is important because some networks may
block the usage of certain ports. Since the ports used by the Intel
®
RMM are
reconfigurable, they can be changed to port numbers accessible in your environment.
Figure 3. Session Page