
Product User Guide


Intel® Remote Management Module 2 User Guide 11
AF00205
7
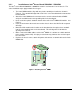
Figure 3: Installing the Intel
®
RMM2 Dedicated NIC Module
2.3.2 Installation on the Intel
®
Server Board S5000PSL
The Intel
®
Server Board S5000PSL installs in pedestal style chassis. The following steps detail
the installation for this type of chassis.
• The Intel
®
RMM2 module ships with one plastic standoff pre-installed as shown in
Figure 4. The standoff will align with a hole in the server baseboard when mounted
to the baseboard.
• Attach the Intel
®
RMM2 to the connector on the server baseboard labeled “RMM”.
Snap the standoff into the corresponding hole in the baseboard.
• Attached the NIC module to the add-in card slot bracket as shown in Figure 5. Use
the screws provided.
• Mount the bracket with the NIC module in a chassis slot near the baseboard
connector for the cable.
• Attach the cable from the baseboard to the NIC module as shown.
• Make a note of the MAC address of the Intel
®
RMM2. It is written on a label attached
to the module (not the NIC). Keeping a record now may eliminate the need to
reopen the cover later.
• Replace the chassis cover, attach AC power and connect a network cable to the
Intel
®
RMM2 NIC.