
WinPE Instructions
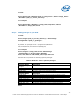

Repeat the same steps for all the packages mentioned in following table:
Table 3: List of Packages to be installed with WinPE* 2.x
Package Name Description
WinPE-HTA-Package HTML Application support
WinPE-MDAC-Package Microsoft* Data Access
Component support
WinPE-Scripting-Package Windows* Script Host support
WinPE-SRT-Package Windows* Recovery Environment
support
WinPE-XML-Package Microsoft* XML (MSMXL) Parser
support
WinPE-WMI-Package Windows* Management
Instrumentation support
Verify that the packages were installed by using the peimg /list command to view all
packages in the current image. For example,
peimg /list c:\winpe2\x86\mount\windows
where,
first parameter is the peimg command ‘list’ and second parameter is the path to the
Windows directory within the base Windows PE* image.
Note:- All the inserted packages will show (‘+’) in INS column.
Create a folder named WinPEUtils and add the required utilities and programs to the
Windows PE* image, For example
md c:\winpe2\x86\mount\WinPEUtils
xcopy c:\WinPEUtils\* c:\winpe2\x86\mount\WinPEUtils /S
Step 3: Prepare a Windows PE* Image
• Now prepare the WinPE* image for deployment.
peimg /prep c:\winpe2\x86\mount\windows
where,
/prep optimizes the WinPE image for size.
14
Intel® Server Utilities Deployment Procedure for Windows* Preinstallation Environment – White Paper