
Product User Guide


80
To create and install an SSL certificate for the Intel
®
RMM2, the following steps are necessary:
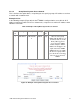
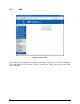
1. Create an SSL Certificate Signing Request using the panel shown in Figure 6-31.
You need to fill out a number of fields that are explained below. Once this is done,
click on the button "Create" which will initiate the Certificate Signing Request
generation. The CSR can be downloaded to your administration machine with the
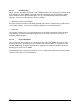
"Download CSR" button (see Figure 68).
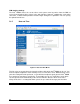
2. Send the saved CSR to a CA for certification. You will get the new certificate from the
CA after a traditional authentication process.
3. Upload the certificate to the Intel
®
RMM2 using the "Upload" button.
Figure 68: Certificate Upload
After completing these three steps, the Intel
®
RMM2 has its own certificate that is used for
identifying the card to its clients.
If you destroy the CSR on the Intel
®
RMM2 there is no way to get it back! If you delete it by
mistake, you will have to repeat the three steps as described above.
7.6.4.1 Common Name
This is the network name of the Intel
®
RMM2 once it is installed in the user’s network (usually
the fully qualified domain name). It is identical to the name that is used to access the Intel
®
RMM2 with a web browser, but without the prefix "http://". If the name given here and the actual
network name differ, the browser will pop up a security warning when the Intel
®
RMM2 is
accessed using HTTPS.
7.6.4.2 Organizational Unit
This field is used for specifying to which department within an organization the Intel
®
RMM2
belongs.