
Quick Install Guide
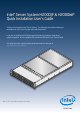
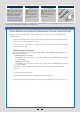

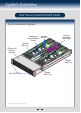

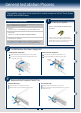
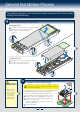

Table Of Contents

3
General Installation Process
The installation instructions in this section are for common components of Intel® Server System
H2000JP and H2000WP family.
Minimum Hardware Requirements
• Memory Type:
Minimum of one 1GB DDR3 1066/1333/1600 MHz RDIMM.
• Processor:
Intel
®
Xeon
®
processor E5-2600 product family (TDP 130W or below).
• Hard Disk Drives: SATA/SAS
For a complete list of compatible processors, heatsinks, and memory, see
http://www.intel.com/p/en_US/support (post-production only)
To avoid integration difficulties and possible board damage, your system must
meet the following minimum requirements:
1
Preparing the System
Observe normal ESD (Electrostatic Discharge)
procedures.
Place your Intel
®
Server System on a flat anti-static
surface to perform the following integration procedures.
Observe ESD procedures before reaching inside to make
server board connections or install components.
2
Install/Remove the Power Supply Unit
A
Align and slide in the Power Supply Unit to the power cage rail.
B
A
B
Carefully push in the latch on the right hand of PSU.
Pull the handle with the PSU while still press the latch.
Push the Power Supply Unit along the rail until the latch locks in
position with a “tick” sound.
Install the Power Supply Unit: Remove the Power Supply Unit:
3
Remove/Install Computer Node Tray
Push-in the latch on the left hand of Node Tray.
To Remove Node Tray: To Install Node Tray:
A
B
Pull the handle of the Node Tray while pushing the latch.
Align and slide in the Node Tray to the chassis rail.
A
B
Push the Node Tray along the rail until the latch locks in position
with a tick sound.