
Quick Install Guide

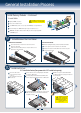
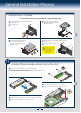
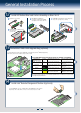


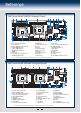
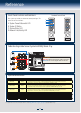
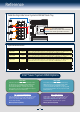
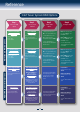
Table Of Contents
7
General Installation Process
Install Memory Modules ... Continued
To Install DIMMs:
Open both DIMM socket levers.
C
A
D
E
Note location of alignment notch.
B
CAUTION: Avoid touching contacts
when handling or installing DIMMs.
A
C
D
B
E
IMPORTANT! Visually check that each latch is fully closed and correctly engaged with
each DIMM edge slot.
Push down firmly on the DIMM until it snaps into place and both levers close.
Insert DIMM making sure the connector edge of the DIMM aligns correctly with the slot.
10
Install
Hard Drives
2.5" Hard Drive Carrier (For system with 2.5" hard drive bay only)
A
B
Pull out the black lever and slide
the carrier out.
D
C
Remove the four screws securing the plastic drive blank
from the 2.5" HDD carrier.
Disengage the plastic drive blank from the HDD carrier.
Remove the plastic drive blank from the 2.5" HDD carrier.
C
D
Install the hard disk drive using the four screws as shown.
Make Sure the connector end of the drive matches the
backplane connector.
E
2.5" HDD
E
With the lever open, insert the hard disk drive
assembly into the chassis, then push in the lever
to lock it into place.
F
CAUTION: If you don't install
all drives, empty drive bays
must be occupied by carriers
with plastic drive blank
provided to maintain proper
system cooling.
A
B
F
Remove the drive carrier
by pressing the green latch
to unlock.
9
Install/Remove the Front Bezel
A
Unlock the bezel if it is locked. Remove the left end of front
bezel from rack handle
B
A
B
Lock the right end of the front bezel to the rack handle.
Note: Before installing the bezel, you must install the rack handles.
Rotate the front bezel clockwise till the left end clicks into place.
C
Lock the bezel if needed.
Rotate the front bezel anticlockwise to release the latches on the
right end from the rack handle.
Install the Front Bezel:
Remove the Front Bezel:
A
B
A
B