
Technical Product Specification


Intel® Server Board S1400FP TPS Jumper Blocks
Revision 2.0 Intel order number G64246-003
95
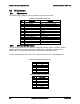
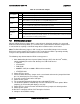
Table 48. Server Board Jumpers
Jumper Name
Pins
System Results
J3J2: BMC
Force Update
1-2
BMC Firmware Force Update Mode – Disabled (Default)
2-3
BMC Firmware Force Update Mode – Enabled
J3J4: BIOS
Recovery
1-2
Pins 1-2 should be jumpered for normal system operation. (Default)
2-3
The main system BIOS does not boot with pins 2-3 jumpered. The system only boots from
EFI-bootable recovery media with a recovery BIOS image present.
J3J1: BIOS
Default
1-2
These pins should have a jumper in place for normal system operation. (Default)
2-3
If pins 2-3 are jumpered with AC power plugged in, the CMOS settings clear in 5 seconds.
Pins 2-3 should not be jumpered for normal system operation.
J3J3: ME
Force Update
1-2
ME Firmware Force Update Mode – Disabled
(Default)
2-3
ME Firmware Force Update Mode – Enabled
J3J5:
Password
Clear
1-2
These pins should have a jumper in place for normal system operation.
2-3
To clear administrator and user passwords, power on the system with pins 2-3 connected.
The administrator and user passwords clear in 5-10 seconds after power on. Pins 2-3 should
not be connected for normal system operation.
9.1
BIOS Recovery Jumper
When the BIOS Recovery jumper block is moved from its default pin position, the system will
boot into a BIOS Recovery Mode. It is used when the system BIOS has become corrupted and
is non-functional, requiring a new BIOS image to be loaded on to the server board.
Note: The BIOS Recovery jumper is ONLY used to re-install a BIOS image in the event the
BIOS has become corrupted. This jumper is NOT used when the BIOS is operating normally
and you need to update the BIOS from one version to another.
The following steps demonstrate the BIOS recovery process:
1. After downloading the latest System Update Package (SUP) from the Intel
®
website,
copy the following files to the root directory of a USB media device:
IPMI.EFI
IFlash32.EFI
RML.ROM
####REC.CAP (where #### = BIOS revision number)
STARTUP.NSH
2. Power OFF the system
3. Locate the BIOS Recovery Jumper on the server board and move the jumper block from
pins 1-2 (default) to pins 2-3 (recovery setting)
4. Insert the recovery media into a USB port
5. Power ON the system
6. The system will automatically boot into the embedded EFI Shell
7. The STARTUP.NSH file automatically executes and initiates the flash update. When
complete, the IFlash utility will display a message
8. Power OFF the system and return the BIOS Recovery jumper to its default position
9. Power ON the system
10. Do *NOT* interrupt the BIOS POST during the first boot.
11. Configure desired BIOS settings