
Intel Matrix Storage Console Reference Content

How do I move my RAID 1 volume to larger hard drives?
Use the following steps to move a RAID 1 volume to larger hard drives. The procedure will not
require reinstallation of the operating system and will not compromise the current information on
the RAID 1 volume.
1. Shut off the system and remove one of the hard drives.
2. Attach one of the large hard& drives in its place.
3. Turn on the system and boot into Windows*.
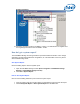
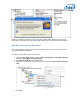
4. Open the Intel® Matrix Storage Console, right-click the new hard drive in the device tree
(shown in the Non-RAID Hard Drive section), and click Rebuild to this Hard Drive.
5. Allow the rebuild to complete.
6. Restart the system and enter the Intel® Matrix Storage Manager option ROM by pressing
Ctrl and i when prompted.
7. Click Reset Disks to Non-RAID.
Note
You may see a dialog box warning you of data loss. This warning does not apply to
RAID 1; you will still be able to access your data.
8. Click Yes to confirm.
9. Click Exit and shut off the system.
10. Remove the original (smaller) hard drive from the system. This will leave only the new
(larger) hard drive, acting as a single hard drive (it is no longer part of a RAID volume).
11. Turn on the system and boot into Windows. You may need to change the hard drive
priority in order to boot.
12. From within Windows, use the Windows computer management tools or third party
partitioning software in order to resize the hard drive partition so that it uses the entire
capacity of the hard drive.
13. Turn off the system and attach the second large hard drive.
14. Turn on the system and boot into Windows.
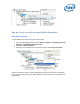
15. Open the Intel Matrix Storage Console, click Actions (if you don't see an Actions menu,
first click Advanced mode in the View menu) and then click Create RAID Volume from