
Intel Application Accelerator User's Manual

Configuring BIOS for Intel RAID for Serial ATA on Intel Motherboards
R
11.2 Create RAID 0 or RAID 1 Volume
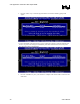
Note: Please refer to Section 13 for illustration examples of the Intel Application Accelerator RAID
Option ROM windows.
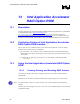
1. Select option 1 Create RAID Volume and press the <Enter> key.
2. If you selected RAID 0, select the RAID level and press the <Enter> key.
3. Select the strip value for the RAID array by scrolling through the available values by using
the <Ç> or <È> keys and pressing the <Enter> key.
4. The available values range from 4 KB to 128 KB in power of 2 increments. The strip value
should be chosen based on the planned drive usage. Some suggested selections are listed
below. The default selection is 128 KB.
16 KB – low disk usage x
x
x
64 KB – typical disk usage
128 KB – performance disk usage
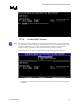
5. At the Create Volume prompt, press the <Enter> key to create the array. Confirm this
selection by pressing the <Y> key after the prompt.
6. Scroll to option 4 Exit and press the <Enter> key to exit the RAID Configuration utility.
Confirm the exit by pressing the <Y> key.
11.3 Delete RAID Volume
Note: Please refer to Section 13 for illustration examples of the Intel Application Accelerator RAID
Option ROM windows.
Warning: All data on the RAID drives will be lost.
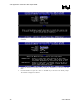
1. Select option 2 Delete RAID Volume and press the <Enter> key to delete the RAID volume.
2. Use the up and down arrow keys to select the volume you would like to delete.
3. Press the <Delete> key to delete the RAID volume. Confirm the volume deletion by pressing
the <Y> key.
11.4 Reset RAID Data
Note: Please refer to Section 13 for illustration examples of the Intel Application Accelerator RAID
Option ROM windows.
Warning: All data on the RAID drives and any internal RAID structures will be lost.
1. Select option 3 Reset Disks to Non-RAID and press the <Enter> key to delete the RAID set
and remove any RAID structures from the drives.
32 User's Manual