
Hardware User Guide

Intel® RAID Controller RS3UC080 User Guide 9
7 Hardware Detailed Installation
Instructions
To install the Intel 12Gb/s SAS Controller, follow these steps:
1. Unpack the controller, and inspect it for damage. Unpack the controller in a
static-free environment. Remove the controller from the antistatic bag, and
carefully inspect the device for damage. If you notice any damage, contact Intel or
your reseller support representative.
Caution: To avoid the risk of data loss, make a backup of your data before changing
your system configuration.
2. Prepare the computer. Turn off the computer, and disconnect the power cord from
the rear of the power supply.
Caution: Disconnect the computer from the power supply and from any networks to
which you will install the controller, or you risk damaging the system or
experiencing electrical shock.
3. Remove the cover from the chassis.
4. Check the mounting bracket on the controller (system-dependent). If required
for your system, replace the full-height mounting bracket that ships on the
controller with the low-profile bracket supplied.
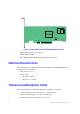
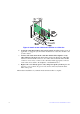
5. Insert the controller into an available PCIe slot. Locate an empty x8 PCIe slot.
Remove the blank bracket panel on the rear of the computer that aligns with the
empty PCIe slot. Save this bracket screw, if applicable. Align the controller to a
PCIe slot. Press down gently, but firmly, to seat the controller correctly in the slot.
The following figure shows how to insert the controller into a PCIe slot.
Note: The shape, size, and locations of the components on your controller and its
bracket might vary from this illustration. The controller requires a x8 PCIe
slot.