
Installation Guide


6 Intel
®
RAID Smart Battery AXXRSBBU7 User’s Guide
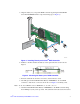
2. Remove the chassis cover and ground yourself before touching the RAID controller.
Carefully unplug all cables connected to the RAID controller. Press the silver spring
at the connector end of the data cables to make sure the two tiny catches release.
3. Carefully remove the RAID controller from the server board. For more information
on removing add-in cards, refer to the server board documentation.
4. Place the RAID controller on a flat, clean, static-free surface.
Installing the Intel
®
RAID Smart Battery AXXRSBBU7
You can either directly connect the Intel
®
RAID Smart Battery AXXRSBBU7 to the
RAID Controller or you can set up a remote connection to the RAID Controller.
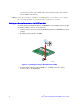
Installing Directly on the RAID Controller
To install the Intel
®
RAID Smart Battery AXXRSBBU7 on the RAID Controller through
the J5 board-to-board connector (daughter card), do the following:
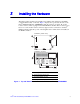
1. Ground yourself, and remove the Intel
®
RAID Smart Battery AXXRSBBU7 from the
package.
2. Verify that the wire from the battery is connected to the circuit board. If it is not
connected, insert the battery pack harness connector at the end of the colored wires
into the 5-pin J4 connector (see letter “A” in Figure 1) on the back side of the battery.
3. Make sure the three standoffs, six screws, and Phillips* screwdriver are easily
accessible during the following steps.
4. Remove the protective metal cover from the battery connector on the Intel
®
RAID
Controller (connector JT3 on the Intel
®
RAID Controller RS2BL080).