
AXXRSBBU7User's Guide


Intel
®
RAID Smart Battery AXXRSBBU7 User’s Guide 5
Important Pre-installation Considerations
Warning: Always ground yourself and/or use a ground strap before touching the RAID controller or
the Intel
®
RAID Smart Battery AXXRSBBU7. Perform all installation work at an ESD-
safe workstation. Use an ESD-safe Phillips* screwdriver set to a maximum torque of 2.25
inch-pounds, and be sure the screwdriver is centered in the screw to avoid damaging the
screw head. If you exceed the maximum torque specification, you may damage the board,
connectors, or screws, and you will void the warranty of the board.
The batteries in the Intel
®
RAID Smart Battery AXXRSBBU7 must charge for at least six
hours during fast charge, under normal operating conditions.
To protect your data, Intel recommends that you set the RAID Controller Write Policy to
write-through until the battery unit is fully charged. When the battery unit is charged, you
can change the Write Policy to write-back to take advantage of the performance
improvements of data caching.
The maximum ambient temperature for the battery pack is 40° C.
Note: The temperature of the battery pack is generally 15-20 degrees higher than the ambient
temperature during fast charge. Therefore, to complete the fast charge cycle, ambient
temperature should be less than 40° C. If the ambient temperature exceeds 40° C, the fast
charge cycle will terminate prematurely, thus preventing the battery pack from reaching a
fully charged state. Intel recommends mounting the battery remotely from the RAID
controller when possible to provide additional cooling.
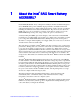
Installing the Intel
®
RAID Smart Battery AXXRSBBU7
To install the Intel
®
RAID Smart Battery AXXRSBBU7 on the Intel
®
RAID Controller,
you must perform the following steps:
1. Remove the RAID Controller if it is already installed in the server system. For
information, see “Removing the RAID Controller” on page 5.
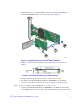
2. Install the Intel
®
RAID Smart Battery AXXRSBBU7 on the RAID Controller using
one of the following methods:
— Install directly through the board-to-board connector. For information, see
“Installing Directly on the RAID Controller” on page 6.
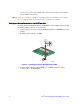
— Set up a remote connection through the remote BBU connector. For information,
see “Setting up a Remote Connection to the RAID Controller” on page 8.
3. Install the RAID Controller in the server system. For information, see “Installing the
Intel
®
RAID Controller in the Server System” on page 10.
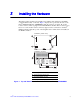
Removing the RAID Controller
If the RAID controller is already installed in a computer, do the following to remove it
before you install the Intel
®
RAID Smart Battery AXXRSBBU7:
1. Shut down the computer, turn off the power, and unplug the power cord(s).