
Users Guide


Connecting the Plastic RMFBU2 Holder to the Chassis
The Intel
®
RAID Maintenance Free Backup Unit AXXRMFBU2 is designed for easy
attachment to either an Intel
®
pedestal or rack mount chassis. Complete the following
instructions for your server.
If you are installing this component into a third-party chassis, you must first install an
attachment mechanism, such as industrial-grade Velcro*. Refer to your server chassis
documentation or discuss an appropriate attachment mechanism with your server chassis
manufacturer to ensure the attachment mechanism complies with the chassis requirements.
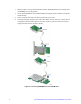
1. Locate the installation clips inside the chassis. For the location of the installation clips, see
your server system documentation. Remove the Mylar* pad if there is a Mylar* pad
covering the mounting hole.
2. Align the tabs on the plastic RMFBU2 holder with the clips on the chassis (See A in Figure
5).
3. Slide the plastic RMFBU2 holder toward the front of the system until the tabs engage with
the clips in the chassis (See B in Figure 5).
Figure 5. Connecting the Plastic RMFBU2 Holder to the Chassis
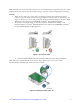
Attaching the Connecting Cable to the Server System
Follow the appropriate set of instructions below for your server:
1. Route the cable through the cable holder on the edge of the chassis.
2. Connect the cable to the RAID module.
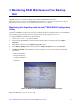
Installing the Intel
®
Integrated RAID Module in the Server System
To install the Intel
®
Integrated RAID Module back into the server system, do the following:
Intel
®
Integrated RAID Module RMS25PB040, RMS25PB080, RMT3PB080
1. Align the RAID module with the PCI Express* slot. To locate an appropriate slot and for
instructions on installing an add-in card, see your server system documentation.
2. Press down gently, but firmly, to ensure that the RAID module is properly seated in the slot.
The bottom edge of the RAID module must be flushed with the slot.
6 Intel
®
RAID Maintenance Free Backup Unit AXXRMFBU2 User’s Guide