
Hardware User Guide

12Gb/s Intel® RAID Controllers User Guide 20
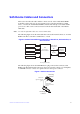
4. Review the RAID module jumpers and connectors.
The jumpers are set at the factory, and you usually do not need to change them. See
Chapter 3, 12Gb/s Intel
®
RAID Controller Characteristics, for diagrams of the
12Gb/s Intel
®
RAID Module that show their jumpers and connectors.
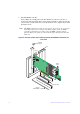
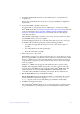
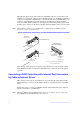
5. Install the RAID module.
a. Attach the RAID module to the matching server board connector and press the
module card firmly to engage the barrel standoffs.
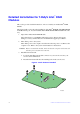
b. Press down gently but firmly to ensure that the card is properly seated in the
connectors, and then insert the four pin standoffs into the barrel standoffs
respectively.
Figure 5. Install the RAID Module
6. Configure and install the SAS devices, the SATA devices, or both in the host
computer case. Refer to the documentation for the devices for any pre-installation
configuration requirements.
7. Connect the RAID module to the devices.
Use SAS cables to connect SAS devices, SATA devices, or both to the 12Gb/s
Intel
®
RAID Module. See SAS Device Cables and Connectors for SAS cable and
connector information. See Connecting a RAID Controller with Internal Port
Connectors by Cable to Internal Drives for information about connecting the
module to the drives.
AF006531