
Users Guide


Note: Carefully observe how the cable connectors are keyed and avoid asserting unnecessary force when
plugging in the cable. Do not insert at an angle. Doing so will cause connector deformation or damage.
Warning:
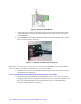
1. Make sure the yellow pin 1 of the cable is in alignment with the yellow mark on the board
connector. Press the connector with your finger and insert with the connector parallel (see A in
Figure 3). Do not try to insert cable backwards. Doing so will cause damage to the Intel
®
RAID
Maintenance Free backup Unit AXXRMFBU2 and Intel
®
Integrated RAID Module.
2. Do not insert at an angle. Doing so will cause connector deformation or damage, even
hardware damage to the Intel
®
RAID Maintenance Free backup Unit AXXRMFBU2 and Intel
®
Integrated RAID Module (see B in Figure 3).
Figure 3. Connect the cable
5. Secure the cable at 26-pin end with a provided Cable Twist Tie as shown in Figure 4.
Note: This step is optional depends on the chassis design. Please refer to your server chassis
documentation to determine if the Cable Twist Tie is needed.
Figure 4. Installing the Cable Twist Tie
Intel
®
RAID Maintenance Free Backup Unit AXXRMFBU2 User’s Guide 5