
Quick Integration Guide
Intel® RAID SSD Cache Controller RCS25ZB040/RCS25ZB040LX Quick Installation Guide 13
— Press F6 for SuSE Linux* Enterprise Server 11.
3. Continue the installation procedure and, when prompted, insert the driver diskette.
The utility locates and loads the driver for your controller.
4. Press Alt+Ctrl+F4 to verify that the driver is loaded.
5. Press Alt+Ctrl+F1 to return to the installation.
6. Follow the SuSE installation procedure to complete the installation.
Note: If you use Service Pack (SP) 1 or SP 2, you need to load the driver. If you use
SP 3 RC 2, the MegaSAS driver is already on the SuSE SLES Linux* CD.
For details on these drivers and for other OS driver installation instructions see the Intel
®
RAID Software User’s Guide.
Creating a RAID 1 Virtual Drive with WebBIOS Configuration
Utility
These steps describe how to create the virtual drive used for an OS. You can add other
virtual drives to the running OS after the OS has been installed. The Nytro MegaRAID
pre-boot BIOS utility (WebBIOS) that creates the virtual disk for the OS is accessible
during the power-on self-test (POST) part of boot-up.
Refer to the Intel
®
RAID Software User’s Guide, Chapter 8 for more information about
the WebBIOS configuration utility (CU).
The following procedure describes the creation of a RAID 1 array. You can use other
RAID levels, and the steps are the same except when selecting the RAID level. In RAID
1, the RAID controller duplicates all data from one drive to a second drive. RAID 1
provides complete data redundancy, but at the cost of doubling the required data storage
capacity. It is appropriate for small databases or any other environment that requires fault
tolerance but small capacity. Follow these steps to create the virtual disk in WebBIOS:
1. When the host computer is booting, hold down the Ctrl key and press the H key
when the following text appears on the window:
Copyright
©
Intel Corporation Press <Ctrl><G> for WebBIOS
The Controller Selection window appears.
2. If the system has multiple SAS/SATA controllers, select a controller.
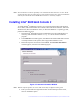
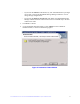
3. Click Start. The main WebBIOS CU window appears.
4. Click Configuration Wizard. The first Configuration Wizard window appears.
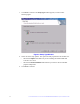
5. Click New Configuration.
Note: If you choose the first or second option, all of the existing data in the
configuration is deleted. Make a backup copy of any data that you want to
keep before you choose an option.