
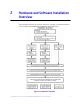
Quick Integration Guide


Intel® RAID SSD Cache Controller RCS25ZB040/RCS25ZB040LX Quick Installation Guide 7
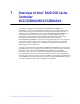
3 Installing the Intel
®
RAID SSD Cache
Controller
RCS25ZB040/RCS25ZB040LX
Use the following steps to install your Intel
®
RAID SSD Cache Controller
RCS25ZB040/RCS25ZB040LX. These steps are for experienced computer users or
installers.
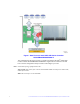
1. Unpack the card and inspect it for damage. Unpack the card in a static-free
environment, and follow good antistatic grounding procedures. Remove the card
from the antistatic bag, and carefully inspect the device for damage. If you notice
any damage or if any component is missing, contact Intel
®
or your reseller support
person.
Caution: Back up your data before changing your system configuration.
2. Prepare the computer. Turn off the power to the server, all drives, enclosures, and
server components, and disconnect the AC power cord.
3. Open the cabinet. Follow the instructions in the server technical documentation.
4. If required, replace the mounting bracket (server dependent) and install light
pipe in the Life (upper) position.
5. If required, install optional SuperCap and external LED before installing the
card in the PCIe slot.
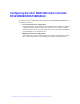
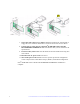
6. Insert the Intel
®
RAID SSD Cache Controller RCS25ZB040/RCS25ZB040LX
in an available PCIe slot. Locate an empty PCIe slot that offers the maximum
airflow. Remove the blank bracket panel on the server chassis that aligns with the
empty PCIe slot. Save the bracket screw, if applicable.
Align the card to a PCIe slot. Press down gently, but firmly, to correctly seat the
card in the slot. The following figure shows how to insert the card in a PCIe slot.
Caution: The PCIe slot must meet the 300 linear feet per minute (LFPM) minimum airflow
requirement but 500 LFPM is optimal for thermal performance.